老友记学习机安装指南
好记星V1+ 使用手册

前言首先感谢您选用本公司的产品,在使用本机之前,敬请仔细阅读本机的使用手册,以便您能充分地了解本机的功能和特点,阅读后请妥善保存,以供日后参考之用。
所有重要资料请另作备份。
以免因操作不当、维修、靠近磁场周围等情况下造成机内资料损失、删除或更改。
本产品功能不断升级,本说明书使用部分难免介绍不全,如有疏漏不符部分,请以实际产品为准。
如果您发现本说明书有缺页、破损等现象,请向原购买处更换或与我们联系。
客户中心电话:4008101991目录一、使用前的注意事项 (6)1.1使用本机的注意事项 (6)1.2电池的注意事项 (6)二、基本使用说明 (7)2.1机身示意图 (7)2.2触摸按键说明 (8)2.3基本操作说明 (8)三、背单词 (11)3.1智能背单词 (11)3.2五维记忆 (12)3.3闪电记忆 (14)3.4艾宾浩斯 (15)3.5测试评估 (15)3.6下载词库 (16)3.7生词本 (16)13.8自建词库 (16)四、同步英语 (18)4.1同步英语 (18)4.2同步评测 (20)4.3开口学 (21)五、综合英语 (23)5.1整句翻译 (23)5.2影音互动 (24)5.3色拉英语 (24)5.4探索教育 (25)5.5空中英语 (25)5.6英语900句 (25)5.7基础英语 (25)5.8动漫单词 (28)5.9P E P动漫 (28)六、全科搜学 (29)6.1词典搜学 (29)26.2试题搜学 (29)6.3查漏补缺 (30)6.4英语搜学 (31)七、多科同步 (32)八、全科学习 (33)8.1特教指导 (33)8.2名师讲堂 (33)8.3中高考真题 (33)8.4学科资料 (34)8.5古文学习 (34)8.6公式常量 (34)8.7诗词曲赋 (34)8.8科普知识 (34)九、辞典 (35)9.1牛津进阶 (35)9.2牛津精解 (36)9.3牛津同义 (36)39.4新英汉世纪版 (36)9.5汉英大辞典 (36)9.6中文词典 (37)9.7全科词典 (38)9.8英语常见问题词典 (39)9.9其他词典 (39)十、娱乐 (42)10.1M P4 (42)10.2M P3 (42)10.3录音 (43)10.4图片浏览 (44)10.5电子书 (44)10.6游戏 (45)10.7动漫下载 (47)10.8宠物猫 (47)十一、工具 (50)11.1系统设置 (50)11.2资源管理器 (50)411.3U盘 (51)11.4时钟日历 (52)11.5计算换算 (53)11.6名片记事 (57)11.7数据传输 (58)11.8存储管理 (59)11.9产品信息 (60)十二、本机参数 (61)12.1数据参数 (61)12.2规格参数 (62)5一、使用前的注意事项1.1使用本机的注意事项1.本机是由高精度集成电路组成,请勿自行拆卸,并避免发生强烈碰撞。
洛基英语右脑频闪学习软件使用说明书

目录1.软件主要特点 (2)(1) 海量的资源,真实的语境 (2)(2) 鼠标一点,要听那一句就播放那一句,精确定位,可以显示或隐藏中英字幕 (2)(3) 最完美的导出功能 (3)(4) 录音对比 (3)(5) 非常实用人性化的的听写,隐藏显示功能 (3)(6) 强大的单词本 (4)(7) 英语资料管理 (4)(8) 完美的音标 (4)(9) 完美的语法 (4)(10) 强大的笔记和资料管理功能 (5)(11) 还有学习记录保存,学习进度保存,录音机,英文朗读机等 (5)(12) 软件界面华丽,布局简单,操作方便,有十多种皮肤更换 (5)2.注意事项 (5)3.正式版安装和注册步骤 (6)1.软件主要特点(1) 海量的资源,真实的语境英文歌曲,电台录音(如BBC、VOA),教材(如新概念、走遍美国),好来坞的大片,热播的电视连续剧,只要你喜欢,只要适合你学习,你就可以拿来做你的英语学习材料。
我们的洛基英语右脑频闪学习机,可以帮助你听懂美国大片中的每一句话。
想想看,当你不用字幕就能看懂整部大片,看懂正在热播的电视剧,哇,那感觉该有多棒!电影电视等视频,为我们提供了影像、声音、情景等,构造出真实的语境,10倍速提升英语学习效率!(2) 鼠标一点,要听那一句就播放那一句,精确定位,可以显示或隐藏中英字幕自主开发的播放器,可以随心所欲操控视音频,可以对不同的句子指定不同的播放次数,可以随时进入一句话的循环播放,不用像复读机操作那么麻烦,浪费那么多时间和精力;可以对句子标识难度等级,以难度等级排序,可以对难句狂轰滥炸,对易句不浪费时间。
(3) 最完美的导出功能无论是电影文件还是MP3文件,都可以把里面的一些难句重点句导出成一个新的MP3文件和一个附带的歌词Lrc文件,然后你就可以在手机和MP3播放器上征服这些难点重点句,反反复复,把它们熟悉到像Mother这个词这么熟。
可以把多个媒体文件摘录的单词导出成一个新的MP3文件和一个附带的Lrc文件,然后在手持设备上征服它们。
factorytalk view machine edition 安装指南.pdf说明书

章节 1
FactoryTalk View Machine Edition 系统基本信息
什么是 FactoryTalk View Machine Edition? ............................................ 9 FactoryTalk View Machine Edition 软件包................................................................................................... 9 FactoryTalk View 安装 DVD........................................................................................................................ 10 请联系 Rockwell Automation 技术支持 .................................................................................................... 10
无人参与安装或静默安装 .......................................................................................................................16 执行无人参与安装或静默安装 ........................................................................................................19 示例 ........................................................................................................................19
EGit安装使用教程(英文版)

EGit TutorialJonas HelmingMaximilian KoegelJanuary 2013Table of Contents1.EGit Tutorial (2)2.Installing EGit in Eclipse (2)3.EGit Configuration (3)4.Creating Local Repositories (3)mit (5)6.Adding Files (7)7.Reverting Changes (7)8.Revert via Compare (8)9.Revert via Reset (8)10.Cloning Repositories (9)11.Creating Branches (13)12.Merge (14)13.Resolving Conflicts (14)14.Fetch and Pull (15)15.Push (15)16.Synchronize (15)17.History View (16)18.Creating Patches (16)19.Repository View (16)20.Additional Information (17)21.Index (17)22.Reset Types (18)eful pages (18)1. EGit TutorialThis tutorial guides you through the essential use cases for EGit, in addition to notes on how to install, configure and create your first repositories. The tutorial is targeted at developers with a basic knowledge of Git processes. Please help us to keep this tutorial up-to-date by reporting any issues or questions.2.Installing EGit in EclipseEGit is already included in the Eclipse Juno Release, so you do not need to install it. If you use an older version of Eclipse, open the Eclipse Wizard to install new software Help => Install New Software. Insert /egit/updates after Work with: and hit Return. Select Eclipse EGit as a child from Eclipse Team Git Provider. You don't have to install any other plugins. Click Next and confirm your selection in the following window by pressing Next again. Finally, accept the terms of use and the license agreement and click Finishto start the installation. After the installation has finished restart Eclipse.3.EGit ConfigurationEvery commit in EGit will include the user's name and his email-address. These attributes can be set in the Preferences-window Window => Preferences. Navigate to Team => Git => Configuration and hit the New Entry... Button. Enter as Key and your name as Value and confirm. Repeat this procedure with user.email and your email address and click OK in the Preferences window. The username and email should be the same you use for your git account, ie. your GitHub account.4.Creating Local RepositoriesOne major advantage of Git compared to SVN or CVS is that you can easily create local repositories, even before you share them with other people. In this way, you can version your work locally. First, you have to create a project that you want to share via your local repository. For later purposes it would be useful to add some files, e.g. a Java class to your project.After you have created your project, select the context menu by right clicking it and navigate to Team => Share Project... . Select Git as the repository type and hit Next. In the following window select your project, hit the Create Repository-button and click Finish. The repository will be assigned automatically.The newly created repository will be empty, although the project is assigned to it. (Note the changed icons: the project node will have a repository icon, the child nodes will have an icon with a question mark, ignored fil es, e.g. the bin directory, won’t have any icons at all.) Before you can commit the files to your repository, you need to add them. Simply right click theshared project's node and navigate to Team => Add . After this operation, the question mark should change to a plus symbol. To set certain folders or files to be ignored by Git, e.g. the bin folder, right click them and select Navigate => Ignore . The ignored items will be stored in a file called gitignore , which you should add to the repository. The last thing to do iscommit the project by right clicking the project node and selecting Team => Commit... from the context menu. In the Commit wizard, all files should be selected automatically. Enter a commit message (the first line should be headline-like, as it will appear in the history view) and hit the Commit button. If the commit was successful, the plus symbols will have turnedinto repository icons.5. CommitNow you can start to modify files in your project. To save changes made in your workspace to your repository, you will have to commit them. After changing files in your project, a ">" signwill appear right after the icon, telling you the status of these files is dirty. Any parent folder of this file will be marked as dirty as well.If you want to commit the changes to your repository, right click the project (or the files you want to commit) and select Team => Commit... . This will open a new window, allowing you to select the files you want to commit. Before you can commit the files, you will have to enter a commit message in the upper textbox. After you're done, click Commit to commit the selected files to your repository.Note that the status of the changed file is Mod., not staged. By staging the files before you commit (see the section “Additional Information”), you can change the status to Modified (and the dirty sign to a staged icon).If you later realize that your previous commit was incomplete (e.g. you missed committing a file) or your commit message was wrong, you might want to use Amend previous commit. This will merge the current commit and the previous commit into one, so you don't have to perform an extra commit (and maybe cause confusion). However, this should only be used if the previous commit hasn't already been published to a shared repository.Another option is Show untracked files. By checking this checkbox, new files you created but did not add yet, will be available for you to select in the Commit window.6. Adding Fil esTo add a new file to the repository, you will have to create it in your shared project first. The new file will, again, appear with a question mark.Right click it and navigate to Team => Add . The question mark will turn into a plus symbol and the file will be tracked by Git, but it is not yet committed. All of the file's parent folders should now have a symbol that looks like an asterisk indicating that it is ‘staged’ (more on that later). In the next commit, the file will be added to the repository and the plus symbol will turn into a repository icon. The repository icons of all the file's parents (packages/project...) will turn into staged icons. EGit also allows selecting untracked files to be added in the commit dialog if you turn on the option “Show untracked files”. Inthis case, they will be added and committed at the same time.7. Reverting ChangesIf you want to revert any changes, there are two options. You can compare each file you want to revert with the HEAD revision (or the index, more on that later) and undo some or all changes done. Second, you can hard-reset your project, causing any changes in the working directory to be reverted.8.Revert via CompareRight click the file you want to revert and select Compare With => HEAD Revision. This will open a comparison with the HEAD Revision, highlighting any changes done. If you want to completely revert your file, hit the Copy All Non-Conflicting Changes from Right to Left-button in the Java Source Compare toolbar. If you only want to revert several lines, select each line individually and hit the Copy Current Change from Right to Left button (in the toolbar) for each line. To complete the Revert operation, you will have to save either the comparison or your local copy of the file.9.Revert via ResetTo reset all changes made to your project, right click the project node and navigate to Team => Reset... . Select the branch you want to reset to (if you haven't created any other branches, there will be just one) and choose Hard as a reset type. By confirming this operation, all changes will be reset to this branch's last commit, including all changes done in the workspace (and index, more on that later). Be careful with this option as all changes in your workspace will be lost.10. Cl oning RepositoriesNote:For this and some of the following sections (especially Fetch/Push), you might want to use https://to create your own remote repository. Public repositories are free at GitHub and performing the actions might help you gain some insights.In order to checkout a remote project, you will have to clone its repository first. Open the Eclipse Import wizard (e.g. File => Import), select Git => Projects from Git and click Next. Select “URI” and click next. Now you will have to enter the repository's location and connection data. Entering the URI will automatically fill some fields. Complete any other required fields and hit Next. If you use GitHub, you can copy the URI from the web page.Select all branches you wish to clone and hit Next again.Hit the Clone...button to open another wizard for cloning Git repositories.Choose a local directory to save this repository in.To import the projects, select the cloned repository and hit Next. Select Import Existing Project s and hit Next. Please note that there needs to be existing projects in your repository, and if you use your own repository it might be empty. In the following window, select all projects you want to import and click Finish. The projects should now appear in the Navigator/Package Explorer. (Note the repository symbol in the icons indicating that the projects are already shared.)11.Creating BranchesTo create a new branch in your repository, right click a shared project and navigate to Team => Switch to => New Branch... from the context menu. Select the branch you want to createand enter a name for the new branch.a new branch from, hit New branch.the newly created branch, select it and click Checkout12.MergeTo merge one branch into another, you will have to checkout the branch you want to merge with. Right click the project node and navigate to Team => Merge... . Select any branch (other than the checked out branch) and hit Merge.The merge will execute and a window will pop-up with the results. The possible results are Already-up-to-date, Fast-forward, Merged, Conflicting, Failed. A Conflicting result (see image below) will leave the merge process incomplete. You will have to resolve the conflicts (see next section). A Failed result may occur when there are already conflicting changes in the working directory.13.Resolving ConflictsIf your merge resulted in conflicts (note the red symbols on the file icons), you will have to resolve these manually. Open the conflicting files and scroll to the conflicting changes marked with “<<<<<<<”After you are finished the manual part of the merge, you will have to tell Git that the conflicts are resolved. To do so, Add the files and Commit to complete your merge.14.Fetch and PullWhen cloning remote repositories, git creates copies of the branches as local branches and as remote branches. A Fetch operation will update the remote branches only. To update your local branches as well, you will have to perform a Merge operation after fetching. The operation Pull combines Fetch and Merge. To perform a Fetch, select Team => Fetch From... from the project's context menu. Enter the repository you want to fetch branches from. (If you cloned this repository, the remote branch will be selected as default.) In the following window you will have to select what you want to fetch. As default, all branches are selected. The result of the Fetch-operation will be shown in a final confirmation window. Follow the same steps to apply a Pull.15.PushLocal changes made to your local branches can be pushed to remote repositories causing a merge from your branches into the branches of the remote repository (X pulls from Y is the same as Y pushes to X). The Push-wizard is pretty much the same as the Fetch-wizard. First, right click the project node and navigate to Team=> Push... . Enter the repository you want to push your branches to (the default for this will be the same as the Fetch-default if you didn't configure a Push-default) and hit Next. Choose the branches you want to push or click Add all branches spec if you want to push all branches. You can also select branches you want to delete from the remote repository. If you are done hit Finish. A final window will show the results of the Push.16.SynchronizeComparisons between your workspace and the local repository or between the current branch and others and are done via the Synchronize-operation. If you right click Team => Sychronize Workspace, your local workspace will be compared with the current branch showing uncommitted changes. If you select Team => Advanced => Synchronize... . , you can select other branches to compare your current branch with. In this case you can also include local uncommitted changes.To compare the branches you may want to switch to the Synchronizing perspective, where you can get a more detailed view of several changes. Here is an example of a Synchronize operation in the Synchronizing perspective:17.History ViewTo show any shared file's history, right click it and select Team => Show in History. This will open the History View, giving an overview of the commits and allowing you to perform several actions (compare, creating branches/tags, reset...). Every commit you select comes up with a revision comment and revision details. The revision comment (bottom left corner) includes parents, children, commit message and changes whereas the revision details (bottom right corner) name the changed files and the actions performed upon them (A=ADD,M=MODIFY, D=DELETE). Selecting a file in the revision details will scroll the revision comment to the changes to that file.18.Creating PatchesAny patch can only include one commit that is from a parent to its child (if a child has just one parent, you cannot merge so you will need to patch). To create a patch you have to open the History View first (see previous section). Right click a commit you want to create a patch for (this must be a child with exactly one parent) and select Create Patch....Select either Clipboard or File and hit Next and click Finish. The resulting patch can be applied to the parent commit via Team => Apply Patch....19.Repository ViewThe repository view is useful when working with branches/tags and executing operations on them, as well as handling remote repositories and getting an overview of all your repositories. To open this view, select Team => Show in Repositories View from any file's context menu.20.Additional InformationIcon Decorations/Signsignored: The repository treats these files as if they were non-existent (e.g. the bin-directory by default). Add a .gitignore file or Team => Ignore to ignore a file.untracked: Any file known, but not yet recorded. To track a file, add it or select theShow untracked files-option in the commit-wizard and commit it directly.tracked: Any file known to and recorded by the repository.added: Any file known to the repository, but not yet committed. Perform a Commit to change this file's status to tracked.removed: Any file that should be removed from the repository. For this icon to appear Team => Untrack has to be performed. By deleting the file from the workspace, thefile will disappear (and therefore no icon will appear). However, it will still be removed from the repository with the next commit.dirty: Any tracked file with changes that have not yet been added to the index.staged: Any tracked file with changes that are already included in the index.partially-staged: Any tracked file with changes, where some changes are alreadyincluded in the index, and others that are not yet added.conflicted: Any file where the merge result caused a conflict. Resolve the conflicts and perform an Add operation to change this file's status.assume-valid: Any modifications won't be checked by Git. This option can be activated via Team => Assume unchanged. However, it can only be turned off via the command line. Performing a Reset operation resets this status as well.21.IndexThe index, sometimes referred to as staging area, is an area between the working directory and the repository. Any change made to any file will change this file's status to dirty (see above). Any dirty file can be added to the index with an Add operation. The file's status changes to staged. You can compare files to the index and reset the index without resetting the workspace. In the original Git, files had to be added to the index before performing a Commit operation. This is not necessary in EGit, as Team => Commit allows you to commit unstaged changes.22.Reset TypesYou can reset your current branch to any other branch, tag or commit you want. Right click any commit in the History View and select Reset. There are three options available: Soft:The current branch's tip will point to this branch/tag/commit. Changes in the index and working directory, however, won't be reset.Mixed:Same as a soft reset, only that the current index will be replaced by the selectedbranch/tag/commit's index. The working directory stays unchanged.Hard:All changes will be reverted to the selected branch/tag/commit. Uncommitted changes will be lost, therefore this operation has to be confirmed.eful pages∙To create your own remote repositories and perform operations on them, you might want to register at https://. As long as your repository is public, github isfree.∙ A tutorial with more information on certain options and actions:/EGit/User_GuideFor more information, contact us:Email: e4@/munich。
M16功能操作及安卓应用手册

2012年度新品M16介绍---功能操作讲解内容介绍:一、安卓应用及下载二、Wifi连接三、如何使用好记星教育商城四、在线答疑的操作流程安卓应用及下载一、M16不能连接网络时,用电脑下载安卓应用。
1.在电脑百度里输入“91助手、豌豆荚”下载并安装到电脑上B连接电脑—设置—应用程序—开发—USB调试(是否进行USB调试)--是3.运行电脑“豌豆荚”根据豌豆荚界面提示调试USB连接并安装驱动程序。
4.根据自己的需要下载即可。
二、把电脑上的应用拷贝到M16里1.在电脑上安装豌豆荚2.数据线连接电脑3.打开M16的USB4.进入豌豆荚应用程序5.点击“应用程序”“安装新应用”6.点击“添加文件夹”从相应的路径中传输即可连接wifi设置—无线和网路—wifi(√)— wifi设置—网络通知—选择所在网络—点击链接M16可以直接连接网络,在“好记星教育商城”直接下载应用连接WiFi点击好记星教育商城根据自己需要下载应用在线答疑的个人中心1.首次使用本功能系统将赠送60道题的免费解答机会供您使用。
2.赠送免费解答机会须在2个月内(每月30道,第一个月没用完的不累计到下月)用完,过期无效.3.免费解答机会使用期限本机将从您提交的第一个问题开始计算。
4.充值:50元=10次卡(无折扣)88元=20次卡,原价100元(8.8折)128元=30次卡,原价150元(8.5折)420元=100次卡,原价500元(8.4折)包月的方式暂不提供10次卡可以提10个问题,10次卡起充。
电脑上网,去好记星官网,用支付宝,网银均可充值。
MagIQ Link模块安装指南说明书
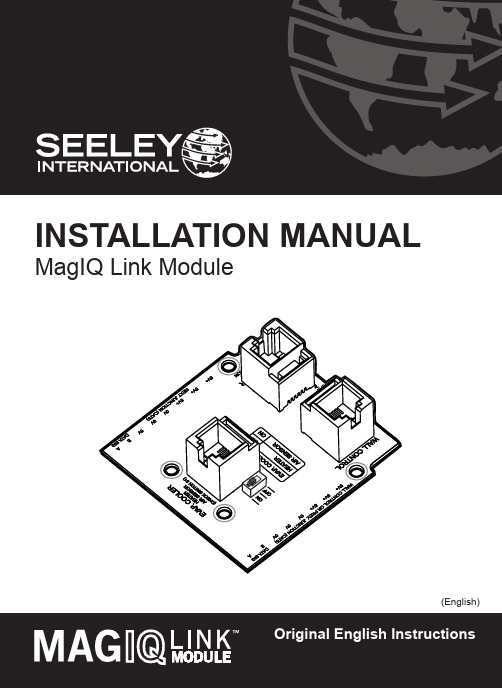
OR
2. HEATER
OR
3. AIR SENSOR
1. WALL CONTROL
(MAGIQ TOUCH CONTROLLER)
Cable lengths between all other components should be no greater than 20m. For more information, refer to System Configuration diagrams at the end of this manual.
SAFETY
EMPLOYER AND EMPLOYEE RESPONSIBILITIES
The installation and maintenance of evaporative coolers at height has the potential to create Occupational Health and Safety issues for those involved. Installers are advised to ensure they are familiar with Local Acts, Regulations and Standards, which may offer practical guidance on health and safety issues. Compliance with these regulations will require appropriate work practices, equipment, training and qualifications of workers. INSTALLER AND MAINTENANCE CONTRACTORS– RISK ASSESSMENT
外语学习机安装指南

外语学习机安装指南如您计算机已安装“Framework”,软件自动会侦测到,并跳过第一步及第二步安装。
第一步:将产品的第一张光盘放入光驱内,计算机会自动安装Framework 2.0“如图一”。
图一第二步:安装Framework 2.0“如图二”,点击下一步出现许可协议界面,在我接受许可协议中的条款打钩,点击安装,此时开始安装Framework 2.0,请等待,安装完毕后点击完成。
图二第三步:视频解码器的安装界面“如图三”,点击Next,出现第二个协议许可界面后,继续点击Next,第三个路径选择界面,继续点击Next,第四个安装插件选择界面,继续点击Next,第五个快捷方式界面,继续点击Nxet,第六个文件类型连锁选择界面,继续点击Next,第八个确认安装界面,继续点Nxet完整安装,第九个附加选项界面,点击Finish完成。
图三第四步:外语学习机安装界面“如图四”,第一个安装界面,点击下一步,第二个路径选择界面,点击下一步,第三个选择快捷方式界面,选择下一步,第四个附加任务界面,可选择创建桌面快捷方式,然后选择下一步,第五个准备安装界面选择安装,稍后会完成学习机的安装,点击完成,此时会自动弹出外语学习机,如果没有自动弹出外语学习机,请在桌面上或者开始菜单中运行外语学习机。
图四外语学习机疑难解答1.光盘放到光驱里,计算机没有任何反应,如何安装学习机。
解决办法:打开我的电脑,鼠标单击你光驱的所在盘符,再点击鼠标右键,选择打开,此时会浏览出光盘中的文件,双击运行“CDRomMain.exe”文件,软件开始自动启动安装程序。
2.打开光盘后,运行“CDRomMain.exe”依然没有反应,或者只弹出一个界面窗口,就没反应了。
解决办法:打开我的电脑,鼠标单击你光驱的所在盘符,再点击鼠标右键,选择打开,此时会浏览出光盘中的文件,双击进入“additional”文件夹,找到“client”“framework”“tools”这三个文件夹,并依次安装每个文件夹下的执行文件。
Pep Boys SUN MACHINE 400安装指南说明书

INSTALLATION OVERVIEW:_____________________________________________The Installation Instructions listed are for the Pep Boys SUN MACHINE 400. The unit is shipped as a fully assembled unit with the exception of the monitor and the items listed in the PARTS & ACCESSORIES LIST. The Pep Boys Sun Machine 400 operating software is loaded at the factory. We will verify that the Unit is operating properly.PARTS & ACCESSORIES LIST:___________________________________________PART NUMBER DESCRIPTIONQTY 0002-0133-15Test Lead Assembly 13-0216Pep Boys CD13-03126Install Upgrade Floppy 10301-0944-01Filter Element,75 Micron 10301-0945-01Filter Element,8 Micron 10507-0025-01Anti-Dilution Probe10528-1088-01Paper, Printer (LED Printer)10552-0043Adapter, Thexton Gm/Ford Coil Terminal 10552-0044Adapter, Thexton GM HEI External 10552-0045Adapter, Thexton GM Micro-Pak 10552-0089-01Mouse, 3 Button White 10552-0103-01Pad, Mouse10552-0120-01Adapter, Thexton Chry/Jeep/Eagle 10647-0170Tee, Vacuum 10669-0220Hose, Poly, 1/4 Id 24”0669-0623Hose, Vacuum 1/810669-0733Hose, Vacuum 3/1610669-0734Hose, Vacuum 1/410672-0035-01Test Clip10682-1049-01Labels, Stickers40692-1617Instructions, Isuzu/Honda10692-1834-01Quality Control Questionnaire SEL 1403C 10692-1928-01Product Registration Form 10692-2291-01Warranty Registration Form 10787-0035Cap11747-0101Test Adapter Assembly, Pat Pickup Secondary 11747-0102Test Adapter Assembly, HEI Pickup Secondary 11747-0103Test Adapter Assembly, Toyota Secondary1Model:EEOS111APRSUN MACHINE 400 Pep Boys UNIT SET UP Page:1 of 4Installation InstructionsPART NUMBER DESCRIPTION QTY1747-0105Test Adapter Assembly, Isuzu/Honda Secondary11-7726Screw, TF, 10-32 x 1/2” LG.42161-0023Hangers43988-0255-01Test Assembly, Exhaust Hose 3/16"14100-5016-01Screw, Shoulder, 5/16-18 x 3/8” LG.35-2745Strap, Velcro w/Ring16002-0346Test Lead Assembly16002-0349Test Lead Assembly, ALDL Jumper16002-0355Adapter, Isuzu/Honda Primary16004-0544-02Test Lead Assembly, Pattern Dual HD26004-0763-02Test Lead Assembly, Pattern Conventional16004-0775-02Cable, Secondary “Y” Adapter16004-0819-01Adapter, Universal Pattern Pickup16005-0182-02Test Lead Assembly, Universal16006-0003-03Hose, Vacuum Source17009-1869-01Test Assembly, Exhaust Probe Assembly17009-2325-02Test Lead Assembly, Trigger Pickup17049-0004-01Oxygen Sensor1EAE0026L10A Printer1EAK0116L01AB Software Kit, PEP Boys1EAW0058C00A Test Lead Assembly, Volt/Ohm Pinpoint1EAX0075C00AF Test Lead Assembly, Auxiliary Extension Leads1EERC102A Remote Control1EETL501A Timing Light1MT2597-PEP Scanner w/Scan Gra-Fix1MT3000-400B Probe, Vacuum1MT3000-410A Probe, High Amps1MT3000A440Probe, Low Amps1SS1495POP (Point of Purchase) Kit1TEEOS111APR Installation Instructions1ZEE0S111A Operators Manual1 REQUIRED TOOLS:____________________________________________________•Complete Tool KitINSTALLATION INSTRUCTIONS:_________________________________________ NOTE: Steps 1 through 8 will require two or more people.1. Cut and remove the straps. Remove the top of the shipping carton.2. Remove the carton by sliding the carton over top of the unit.3. Locate the Pep Boys Sun Machine 400 Operating Software Package. The software could be locatedon the outside of the carton or on the inside if there is a slot in the shipping carton. Remove the software package and set aside.4. Remove unit-packing material from around the sides of the unit.5. Carefully slide the unit and foam base partially off of the shipping pallet.6. Lean the Sun Machine 400 so that the shipping pallet and half of the foam base can be removed.7. Lean the Sun Machine 400 so that other half of the foam base can be removed.8. Remove tape from ALL drawers and covers.9. Remove bubble wrap from Keyboard, located in the keyboard drawer.10. Inventory all items using the Parts & Accessories List and inspect for damage. The Unit Accessoriesare located in the bottom drawer of the unit. The Literature Kit is also located in the bottom drawer of the unit.NOTE: Any software or hardware owners’ manuals and pre-loaded software that come with the computer, such as Microsoft Windows® 95, are located in the bottom drawer of the unit.NOTE: Any REGISTRATION CARDS for the installed software such as Microsoft Windows® 95 must be filled out and sent in by the customer to ensure compliance with any software licensing agreements.11. Locate the four hangers (2161-0023) and the four 10-32 x 1/2” Hex Screws (1-7726). Attach the twohangers to the left side and two to the right side of the unit using the hex screws.12. The monitor is shipped separately from the unit. Locate the monitor box.13. Remove the monitor from the box and inspect the monitor for damage. Discard the A.C. Cablesupplied with the monitor.14. Remove the swivel base and the rear plastic protector from the monitor and discard. Refer to figure 1,below;Figure 1. Monitor Bottom View15. Place the monitor into the monitor plate and check for proper fit. Once satisfied with the fit, peel offthe adhesive backing of the pre installed Velcro on the monitor plate, and place the monitor onto the plate.16. Fasten the Velcro straps over the top of the monitor.17. Use the A.C. Cable found attached to the unit to connect power for the monitor. Connect the datacable from the monitor to the connector plate on the left rear side of the unit.18. Locate the Mouse and install the Mouse cable end to the COM 2 connector, of the connector plate onthe left rear side of the unit.19. Locate the printer paper (0528-1088-01). Load paper for the printer.20. Connect all Test Leads to the respective connectors located on the boom of the Sun Machine 400.Store any unused leads and accessories in the lower storage drawer.21. Open the back panel of the unit.22. Remove the stop bolt on the boom tube. Slide the boom up approximately 7 to 8 inches; reinstall thestop bolt in the new hole that is 7 to 8 inches lower on the boom than the hole from which the stop bolt was just removed.23. Locate the 3 shoulder screws 5/16-18 x 3/8” LG (4100-5016-01). Install the screws on the bottom ofthe boom journal, there are three holes pre-threaded for these bolts. The heads of the screws go on the inside of the journal tube.24. Close the back panel of the unit.25. Power up the analyzer.26. The analyzer will boot into the Windows 95 user information wizard. If necessary, edit the name andcompany, then choose <NEXT>.27. The end user (customer) must select, I accept the agreement, in the License Agreement window,then select <NEXT>.28. The Certificate of Authenticity window will be displayed now. Enter the Product ID in this Window.The ID number can be found on the Introducing Microsoft Windows 95 book. After entering the ID number select <NEXT>.29. Start Wizard window is now displayed, select Finish.30. The analyzer will boot to the PepBoys application.31. Select, Continue in the Disconnect Multimeter Leads and short together Window.32. Select Continue in the System Status window.33. In the PEP BOYS window, select Exit.34. Select, Yes in the System Message window.35. Select, Safe Shut Down on the ToolBar, far right Monitor Icon.36. Select, Yes in the Shutdown window.37. When prompted "It's now safe to turn off your computer", press the reset button on the computersfront panel.38. While the computer is rebooting watch for the PEPBOYS logo to appear. Windows® 95 desktop willappear and disappear; just when it disappears, hold down u and 3.39. Enter the PepBoys password to exit to Windows® 95, (the same as the password to exit to DOS),then select OK.40. Place the mouse over the clock in the lower right of the monitor and press the right mouse button41. Select Adjust Date/Time on the pop-up menu.42. Select your time zone, set the date and time, then select Apply then OK.43. Select the Start button on the Task Bar.44. Select Shut Down, Restart the Computer and then Yes.45. Do a complete operational checkout of the unit.NOTE: This tester is equipped with a 4-gas analyzer: see the Emissions Chapter of the Sun Machine Service Manual for the calibration andcheckout.INSTALLATION COMPLETE。
- 1、下载文档前请自行甄别文档内容的完整性,平台不提供额外的编辑、内容补充、找答案等附加服务。
- 2、"仅部分预览"的文档,不可在线预览部分如存在完整性等问题,可反馈申请退款(可完整预览的文档不适用该条件!)。
- 3、如文档侵犯您的权益,请联系客服反馈,我们会尽快为您处理(人工客服工作时间:9:00-18:30)。
注:老友记学习机的资料比较大,大家可以依照一集
一集来下载哦。
外语学习机安装指南
在安装学习机前,请保证电脑里已经安装“Framework”。
如您计算机已安装“Framework”,软件自动会侦测到的。
因学习机为镜像ISO文件,所以在安装ISO文件前,不需将该文件压缩,而是需要安装虚拟镜像ISO光驱,该光驱也已经含在本套资料中了。
安装好该虚拟光驱后双击打开该软件,界面如下:
1.点击下面的“添加镜像”按钮:
2.选中你刚刚添加的镜像文件,然后点击下面的“载入”按钮
3.点击该“载入”按钮后出现以下画面,点击运行CDRomMain.exe
4.接下来直接安装到你相应的文件夹里即可,安装好的界面如下:
有中英文对照,而且下面还有设置等等。
视频里的人物对话与中英文是对应的,对话发展到哪里,右侧的会自动往下翻哦。
右上角的设置,大家可根据自身的喜欢来设置哦。
注:第二次大家如果直接打开该外语学习机时,会发现是空的,不要以为是坏了
哦。
其实大家需要利用原先装好的虚拟镜像ISO软件来将资料加载进去,因为安装好的学习机里没有内容哦,只有在哪个镜像ISO里有哦,如果安装时一起包含在里面这样会很占内容呢,因为39G左右毕竟对于电脑而已已经是超大了。
此时大家打开之前安装的虚拟镜像ISO设备(即电脑中的DEMON Tools Lite),像之前一样点击“添加镜像”按钮,然后鼠标选中你要载入的ISO镜像资料,
再点击“载入”按钮;如果想要看的镜像内容已经在映像目录框中了,可直接选中你想看的镜像内容,再直接点击“载入”按钮即可。
此次直接点击这个图标
无需再重新安装(第一次已经安装过
了)。
这时就会将相应的内容导入到该学习机中,想看哪一集,直接双击鼠标即可。
想看其他如第三季第四季等,直接在以下图片的映像目录选择即可,镜像目录中
没有的需要先将其导入(即“添加镜像”)到该目录中。