X Pert使用手册
Power Xpert软件快速入门指南说明书

Note: The PowerVision service is automatically installed, running and configured for Power Xpert software.
allows for PowerNet Software integration. The diagram to the left and descriptions below outline how to set up the six different application scenarios of Power Xpert Software.
Power Xpert® Software Quick Start Guide
Power Xpert Software Pre-Installation Check List
1. Verify minimum server hardware requirements. See system requirements on the back of this guide.
B. Install Power Xpert software on a designated server by choosing Option 1 on the Install Wizard setup menu.
C. Connect to the existing PowerNet system using Power Xpert Configuration Manager.
/powerxpert 1.800.525.2000
Power Xpert, PowerChain, and PowerChain Management are trademarks of Eaton Electrical, Inc. All other trademarks are property of their respective owners.
Milestone 系列XProtect 屏幕录制器 2022 R2 管理手册说明书

2022ContentsCopyright,trademarks,and disclaimer3 Supported VMS products and versions4 Overview5 Introduction5 How XProtect Screen Recorder works5 Licensing6 Licensing6 Installation7 Installing and configuring on computer7 Set password8 Set port number8 Set MAC address9 Configuration11 Configuring after installing on computer11 Change password11 Change port number11 Change MAC address11 Installing on recording server12 Set frames per second/live frame rate12 Set quality12 Set capture mode12 Optimization14 Security14 Maintenance15 Uninstalling from computer15 Troubleshooting16 Troubleshooting16Copyright,trademarks,and disclaimerCopyright©2022Milestone Systems A/STrademarksXProtect is a registered trademark of Milestone Systems A/S.Microsoft and Windows are registered trademarks of Microsoft Corporation.App Store is a service mark of Apple Inc.Android is a trademark of Google Inc.All other trademarks mentioned in this document are trademarks of their respective owners.DisclaimerThis text is intended for general information purposes only,and due care has been taken in its preparation. Any risk arising from the use of this information rests with the recipient,and nothing herein should be construed as constituting any kind of warranty.Milestone Systems A/S reserves the right to make adjustments without prior notification.All names of people and organizations used in the examples in this text are fictitious.Any resemblance to any actual organization or person,living or dead,is purely coincidental and unintended.This product may make use of third-party software for which specific terms and conditions may apply.When that is the case,you can find more information in the file3rd_party_software_terms_and_conditions.txt located in your Milestone system installation folder.Supported VMS products and versionsThis manual describes features supported by the following XProtect VMS products:l XProtect Corporatel XProtect Expertl XProtect Professional+l XProtect Express+l XProtect Essential+Milestone tests the features described in this manual with the above-mentioned XProtect VMS products in the current release version and the two previous release versions.If new features are only supported by the current release version and not any previous release versions,you can find information about this in the feature descriptions.You can find the documentation for XProtect clients and add-ons supported by the retired XProtect VMS products mentioned below on the Milestone download page(https:///downloads/).l XProtect Enterprisel XProtect Professionall XProtect Expressl XProtect EssentialOverviewIntroductionThis manual describes the Milestone XProtect Screen Recorder feature.It allows a Windows computer to act as an IP video camera,sending the contents of its desktop to the recording server it is connected to.The XProtect Screen Recorder feature is a small application to be installed on one or more Windows computers where you want to record desktop contents,and a camera driver included in XProtect Device Pack6.0and later versions.XProtect Screen Recorder works with all XProtect products.To see the list of supported Windows platforms,go to the Milestone website(https:///systemrequirements/)In this document,when the term"recording server"is used,it refers to XProtect recording servers.How XProtect Screen Recorder worksOnce installed,XProtect Screen Recorder is automatically controlled from the startup menu of the computer where it is installed and runs in the context of the user logged into this computer.This means that XProtect Screen Recorder automatically and invisibly starts up every time the user logs in to the computer and closes down every time the user closes down.If online user-switching is done via Window's Fast User Switching feature,the XProtect Screen Recorder will continue to record in the context of the new user,however any other type of user-switching/-logging in or out will result in discontinuation of the feature.Read more about switching users without logging off onhttps:///windows-10-enable-or-disable-fast-user-switching/.This is possible because it is a service running in the background,capturing the computer’s screen at a set frame rate.It is also this service that provides the interface that your XProtect surveillance system can connect to and retrieve images from similarly as any other camera.LicensingLicensingWhen you add a screen recorder device in Management Client,you need a device license,just like with any other device.However,downloading and installing the XProtect Screen Recorder software is free of charge and you can install it as many times as required.XProtect Screen Recorder can and may only be used with Milestone software.InstallationInstalling and configuring on computerBefore you can start using the XProtect Screen Recorder feature,you must first download azznd install it on one or more Windows computer(s)where you want to receive desktop images.The application part of XProtect Screen Recorder consists of a Windows service and a desktop capture process. When installing the feature,you must have administrator rights to the computer you are using.Uninstalling or stopping the Windows service also requires administrator rights.Locate the file(https:///downloads/)named MilestoneXProtectScreenRecorderInstaller.exe and follow the download and installation procedure.When complete,the computer will work as an IP camera.From Management Client,you can add the XProtect Screen Recorder device,similar to adding a camera,to connect to it.Towards the end of the installation,the Milestone XProtect Screen Recorder-Administrator window appears. Address the configuration parameters below and click OK to save and finish the installation process.Set passwordIt is important that only the relevant recording server connects to and request video from a computer with XProtect Screen Recorder installed.You do this by entering a password of your choice in the text fields displayed in the illustration below.Milestone recommends that you fill in the password fields.In addition,there is no way to be reminded of the password,so it is important to remember the password.You must enter the password in Management Client on the recording server side.Set port numberFor the relevant recording server to connect to a computer with XProtect Screen Recorder installed,you must specify a Transmission Control Protocol(TCP)port.TCP ports are identified by their number.The default number is52111.If this port is already in use by another program,change it.Make sure that the selected port is open on your firewall so the recording server canconnect to it.Set MAC addressFor licensing purposes,you must also select a MAC address.You can choose between all MAC addresses available on the computer with XProtect Screen Recorder installed.1.Make a selection in the MAC address available list.2.Click Set.3.The selected MAC address is displayed in the MAC address used field.When you configure the screen recorder device in Management Client,you must provide a license key that matches the selected MAC address.ConfigurationConfiguring after installing on computerAfter installing,it possible to change all XProtect Screen Recorder configurations.This is done from the Milestone XProtect Screen Recorder-Administrator’s window which can be reached in the following way:1.Open Windows’Start menu.2.Click Milestone XProtect Screen Recorder Administrator.3.Confirm that the XProtect Screen Recorder is allowed to make changes to your hard drive.Next,theXProtect Screen Recorder-Administrator’s window will open.4.From the left-hand menu of the window,click Password,Port Number or MAC Address(depending onwhat you want to do).Change password1.In the Administrator’s window,on the Password tab,move focus to either text field to clear them both.2.Next,click OK to delete the old password(you will be presented with a warning).3.Enter a new password and click OK.This saves changes and restarts the XProtect Screen Recorder.4.Close the window.Change port number1.In the Administrator’s window,go to the Port Number tab.2.Fill in the port number(see Set port number on page8).3.When done,click OK.This saves changes and restarts the XProtect Screen Recorder.4.Close the window.Change MAC addressMAC addresses relate to hardware.If you change your network adapter,the selected MAC address may no longer be available.You must then select another valid address.This also requires that you enter a new license on the recording server side.1.In the Administrator’s window,go to the MAC Address tab.2.Set the MAC addresses(see Set MAC address on page9).3.When done,click OK.This saves changes and restarts the XProtect Screen Recorder.4.Close the window.Installing on recording serverIn Management Client,you must add a screen recorder device that connects to the XProtect Screen Recorder service.It is added and configured like any other IP video camera.For more information,see the section about how to add hardware in the administrator manual for XProtect VMS.When you add a screen recorder device,the user name must be videoos and the device type Screen Recorder.A screen recorder device has the following configurable parameters:l Frames per second/live frame ratel Qualityl Capture modeWhen adding a screen recorder device,you must provide the IP address of the device.Inthis case,the device is a computer.But when adding a device of the Screen Recorder type,you may be in a situation where the computer does not have a permanent IP address.Inthat case,you can use the Domain Name System(DNS)name of the computer.Set frames per second/live frame rateFrames per second in XProtect Corporate/Live frame rate in other Milestone surveillance products.A low frame rate is recommended because high frame rates may cause heavy CPU usage on the computer with XProtect Screen Recorder installed.For this reason,the XProtect Screen Recorder feature never yields more than4frames per second.Two frames per second offers a nice impression of screen activity and causesapproximately5-8%extra CPU usage on an average Windows7computer anno2010.Thus,2or3frames per second is the recommended daily setting.Set qualityVideo frames are sent to the recording server as a series of JPEGs.It is possible to lower network and storage consumption by configuring a lower quality.However,this will result in a more blurred image.The effective valid range is0(poorest quality)to100(best quality).Default is75,which reduces the amount of data nicely without reducing the visual quality too much.However,the JPEG algorithm is not optimized for computer images with many rectangles.So even with a high quality you will still observe glitches around straight lines.Set capture modeWith regards to capture mode,there is a choice of:l Primary screen only:the primary screen onlyl All screens(if there is more than one screen):a mosaic of all screens setup for the computer in question l Screen1,Screen2,etc.(if there is more than one screen):The selected screen onlyOptimizationSecurityThe recording process of XProtect Screen Recorder is controlled from the computer startup menu and runs in the context of the logged in user.This means that the user can use the Windows Task Manager to shut down the process.To prevent that,Windows must be configured so that the user has no access to Windows Task Manager or other programs with similar capabilities.Disabling XProtect Screen Recorder results in the device connecting to the XProtect Screen Recorder service showing a red screen with a cross over it.The TCP based protocol used between the recording server and the computer withXProtect Screen Recorder installed utilizes Digest Authentication(RFC7616)with SHA256as a hashing algorithm.The risk of other products intercepting a desktop is thereforeminimal,but you are urged to define a password in the Milestone XProtect ScreenRecorder-Administrator’s window.MaintenanceUninstalling from computerThe following procedure describes standard system component removal in recentWindows versions.The procedure may be slightly different in older Windows versions.1.In Windows'Start menu,select Control Panel,and:l If using Category view,find the Programs category,and click Uninstall a programl If using Small icons or Large icons view,select Programs and Features2.In the list of currently installed programs,right-click the required Milestone program or service.3.Select Uninstall if you wish to uninstall all components.Select Change if you only wish to uninstall somecomponents.4.Follow the removal instructions.TroubleshootingTroubleshootingA problem which may occur with XProtect Screen Recorder is that the recording server and the computer with XProtect Screen Recorder installed cannot connect.These are probable causes:l The configured TCP port is not open on the firewall that the XProtect Screen Recorder is installed on.Or if communication runs through a router,the router may also have a firewall that causes problemsl The IP address defined on the recording server is different from the IP address on the computer withXProtect Screen Recorder installedl The IP port defined on the recording server is different from the one configured on the computer with XProtect Screen Recorder installedl The password defined on the recording server is different from the one configured on the computer with XProtect Screen Recorder installedl The Device Pack and XProtect Screen Recorder versions are incompatibleXProtect2019R3includes Device Pack10.5.Connection will fail if you are runningDevice Pack10.4(or earlier)and using the XProtect Screen Recorder version2019R3(or later).To investigate other problem scenarios,you can enable the tracing of relevant desktop recordings:1.In Windows Explorer,in the directory:%PROGRAMFILES%\Milestone\XProtect Screen Recorder,locate thefile:ScreenRecorderService.exe.config.ing an editor,for example,Microsoft©Notepad,change the value of the attribute"Log"to"yes"asillustrated below:<?xml version="1.0"?><configuration><startup><supportedRuntime version="v2.0.50727"/></startup><appSettings><add key="Log"value="yes"/></appSettings></configuration>4.Save the file under the same name and in the same location.5.Start Milestone XProtect Screen Recorder Administrator(see Configuring after installing on computer onpage11).6.Click OK to restart XProtect Screen Recorder.Logging is now enabled.7.In the AllUsers ProgramData folder,in the subdirectory:Milestone\XProtect Screen Recorder,two logfiles are now available:Servicelog.txt and Desktoplog.txt.l Servicelog.txt is a log of all network traffic and communication between the recording server andthe computer with XProtect Screen Recorder installedl Desktoplog.txt is a log of the process running on the computer with XProtect Screen Recorderinstalled,capturing desktop images and sending them to the Windows service as JPEG images 8.To avoid that the two log files grow extensively,it is important to reset the"Log"attribute to"no"whendone.See step2.9.Restart Milestone XProtect Screen Recorder Administrator(see Configuring after installing on computeron page11).open platform video management software;technology that helps assets and increase business estone Systemscollaboration and innovation in the development and use of scalable solutions that are proven in more than 150,000sitesis a stand-alone company in the Canon Group.For more *************************。
Power Xpert Dashboard Processor (PXDBP) 产品简介说明书

Power Xpert Dashboard Processor (PXDBP)Product snapshotThe Power Xpert E Dashboard Processor (PXDBP) has been designed to be installed in low- and medium-voltage switchgear and low-voltage motor control centers whichis the engine that produces the Power Xpert Dashboard user interface. The user interface allows visualization and interaction with Eaton trip units, meters, relays, starters, drives, I/O, and diagnostic devices.Product overview• Communicates to Eaton’s INCOM E, Modbus T RTU and Modbus TCP devices• Upstream Modbus TCP and BACnet/IP support facilitates integration with third-party monitoring solutions• View the Power Xpert Dashboard screens locally through a 12, 15- or 21-inch HMI mounted in the switchgear/MCC or near the switchgear/MCC in a wall-mount enclosureor kiosk. Using a standard Web browser, view the Power Xpert Dashboard password protected Web interface remotelyAdditional reference information• Quick Start Guide IB150015ENH01—an overview of the Power Xpert Dashboard user interface• Installation Guide MN150009EN—information on mounting and connecting the Power Xpert Dashboard ProcessorFeatures and benefitsRugged, industrial design• Designed specifically for industrial environments,the PXDBP has a compact design that only requires convection cooling• Stringent EMI design requirements ensure that the PXDBP will function in the most difficult EMI situationsto deliver high reliability• Mounting options are provided for panel mountingor DIN rail, allowing for installation flexibility Smart configuration and user interface• As an out-of-the-box, plug-and-play device, there isno additional software required to configure and view downstream devices• All configuration menus are straightforward and easyto followOptional apps increase functionalityOptional apps can be installed at order entry or anytimevia the Web interface:• Control App provides control of breaker trip units and protective relays to allow open/close and Arcflash Reduction Maintenance Mode activation• Setpoints App provides Digitrip E 1150 and Digitrip OPTIM 750 and 1050 set point viewing and programming with settings file management. Digitrip 810, 910, and 520 settings may be viewed with the App• Remote Racking App provides control of MR2 remote racking device to allow motorized insertion and removalof drawout circuit breakers• Transfer Scheme App provides a user interface to Eaton’s PLC based main-tie-main transfer system. The app monitors status of the controller and allows mode changes, timer changes and manual controlSecure cyber communicationControlling access to the PXDBP is a vital component in any effort to secure it. Many regulatory agencies and standards organizations now recommend/require Role-Based Access Control (RBAC) password management and previous login notification as part of any access control effort. The PXDBP has been tested and is in compliance with the UL 2900-2-2 Cybersecurity standard. Some of the cyber security methods include:• Password protection and managementRBAC is part of any access control effort. To support this, the PXDBP has a robust set of tools you can use to create the set of users and role-based permissions as well as a comprehensive set of password management features you need to comply with security policies in effect at your site • Secure Web browsingSSL Encryption option ensures that information and passwords exchanged with the PXDBP’s Web server cannot be intercepted on the LAN• Access control / trusted host listProvides an additional method of security by limiting access to the communication ports by authorized trusted hosts’ IP addressesTime synchronizationThe PXDBP supports synchronization of clocks on INCOM devices that support the set time and date command. Additionally, the PXDBP can be combined with a network time server for accurate time stamping via NTP.2Technical Data TD152027ENEffective November 2018Power Xpert Dashboard Processor(PXDBP)EATON Save and restore configuration settingsThe PXDBP provides the ability to save the PXDBP device andnetwork configuration settings to a configuration file. This file can be used to restore settings to any PXDBP to facilitate configuration of similar systems.Technical specificationsT able 1.Power Xpert Dashboard part numbersEaton catalog Memory• Flash: 8 GB •RAM: 2 GBCommunication ports•Network ports: Three 10/100BASE-T RJ-45 connectors −Network 1—not used −Network 2—Main network connection −Network 3—Modbus TCP device sub net•Serial ports:−Two RS-485 ports for Modbus RTU devices −Three INCOM ports for Eaton INCOM devices •Configuration port: One mini USB port (After loading the USB driver connect to IP address 192.168.200.101)Network protocols supported•Modbus TCP/IP: Supports data access from Modbus TCP clients •Web server: Supports data access from Web browsers (HTTP and HTTPS)• DHCP: Supports automatic IP address assignments, if enabled •NTP: Supports time synchronization via a network time server for PXDBP synchronization•BACnet/IP: Supports data access from BACnet clientsSerial protocols supported• INCOM •Modbus RTUWeb browsers recommended•Google ChromePower input• Input voltage, nominal: 24 Vdc; 0.3 A minimum •Input voltage range: ±10% nominalPower consumption•8 W maximumOperating temperature•+32 to +140 °F (0 to +60 °C)Ambient storage temperature•–40 to +185 °F (–40 to +85 °C)Relative humidity•5 to 95% noncondensing at 122 °F (50 °C)Size (H x D x L) in inches•2.00 x 4.50 x 9.00Weight•1.9 pounds3Technical Data TD152027ENEffective November 2018Power Xpert Dashboard Processor (PXDBP) EATON Supported devicesT able 2. Supported devices and protocolsFamily ModelINCOMI/O DIM I/OAR IIProtection Digitrip 810/910Protection Digitrip 1150V Protection Digitrip OPTIM 750Protection Digitrip OPTIM 1050Protection Magnum DS Digitrip 520MC Protection Magnum DS Digitrip 1150 Protection Series NRX Digitrip 520 ProtectionSeries NRX Digitrip 1150 Modbus RTUMeter IQ 130/140/150 Meter IQ 250/260 Meter PXM1000Meter PXM4000/6000/8000Protection InsulGard ProtectionTC50/100Modbus TCPI/O C441V Logic ELCMeter PXM2250/60/70/80/90 Meter PXM4000/6000/8000Protection EDR-3000 Protection EDR-5000 Protection EGR-5000 Protection EMR-3000 Protection EMR-4000 Protection EMR-5000 Protection ETR-4000 Protection ETR-5000Protection InsulGard Control C440Control C441Control C445Control S811Control SVX ControlDG1Regulatory and standards compliance• UL T 508, Standard for Programmable Controller Equipment • UL 2900-2-2 Cybersecurity assurance program certificate •FCC, Class A, Part 15, Subpart B, Sections 15.107b and 15.109b •EN55022:2010/A1:2011 Class A and EN55024:2010 Information Technology Equipment•EN 61326-1:2006 and EN 61326-2-2:2006 Electromagnetic Compatibility (EMC) in Industrial Environmentsotee:N Features and specifications listed in this document are subject to change without notice and represent the maximum capabilities of the product with all options installed. Although every attempt has been made to ensure the accuracy of information contained within, Eaton makes no representation about the completeness, correctness, or accuracy and assumes no responsibility for any errors or omissions. Features and functionality may vary depending on selected options.Eaton1000 Eaton Boulevard Cleveland, OH 44122United States © 2018 EatonAll Rights Reserved Printed in USAPublication No. TD152027EN / Z21793November 2018Eaton is a registered trademark.All other trademarks are property of their respective owners.Power Xpert Dashboard Processor(PXDBP)Technical Data TD152027ENEffective November 2018Panel mountingPower StatusWebBridge Com2Com1INCOM1INCOM2INCOM3DHCPNTP USBconnection for localconfiguration capabilityINCOMconnectionsRS-485connections24 Vdcinput powerRJ-45 connections with link speed and activity indicatorsFront viewSide view。
Siemens SCALANCE X200-4PIRT 产品说明书
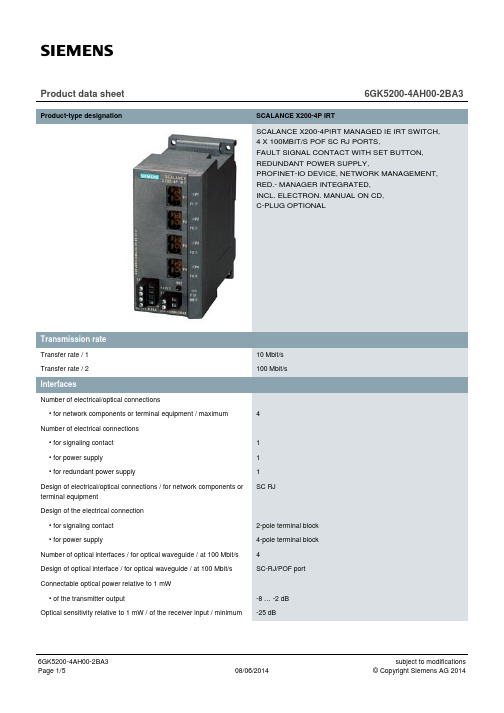
Product data sheet6GK5200-4AH00-2BA3 Product-type designation SCALANCE X200-4P IRTSCALANCE X200-4PIRT MANAGED IE IRT SWITCH,4 X 100MBIT/S POF SC RJ PORTS,FAULT SIGNAL CONTACT WITH SET BUTTON,REDUNDANT POWER SUPPLY,PROFINET-IO DEVICE, NETWORK MANAGEMENT,RED.- MANAGER INTEGRATED,INCL. ELECTRON. MANUAL ON CD,C-PLUG OPTIONALTransfer rate / 110 Mbit/sTransfer rate / 2100 Mbit/sNumber of electrical/optical connections• for network components or terminal equipment / maximum4Number of electrical connections• for signaling contact1• for power supply1• for redundant power supply1Design of electrical/optical connections / for network components orSC RJterminal equipmentDesign of the electrical connection• for signaling contact2-pole terminal block• for power supply4-pole terminal blockNumber of optical interfaces / for optical waveguide / at 100 Mbit/s4Design of optical interface / for optical waveguide / at 100 Mbit/s SC-RJ/POF portConnectable optical power relative to 1 mW• of the transmitter output-8 … -2 dBOptical sensitivity relative to 1 mW / of the receiver input / minimum-25 dBAttenuation / of fiber-optic cable transmission link / minimum0 dBnecessaryRange / at the optical interface / depending on the optical fiber used0 … 0.05 kmdesign of the removable storage / C-PLUG YesOperating voltage / of signaling contacts / at DC / rated value24 VOperating current / of signaling contacts / at DC / maximum0.1 AType of / supply voltage DCSupply voltage / external24 V• minimum18 V• maximum32 VProduct component / fusing at power supply input YesType of fusing / at input for supply voltage1,1 A / 33 VConsumed current / maximum0.4 AActive power loss / at 24 V / for DC9.6 WAmbient temperature• during operating-25 … +40 °C• during storage-40 … +70 °C• during transport-40 … +70 °CRelative humidity / at 25 °C / without condensation / during operating95 %/ maximumProtection class IP IP30Design compactWidth60 mmHeight125 mmDepth124 mmNet weight0.78 kgMounting type• 35 mm DIN rail mounting Yes• wall mounting Yes• S7-300 rail mounting Yes50Cascading in the case of a redundant ring / at reconfiguration time of<\~0.3\~sCascading in cases of star structuring Any (depending only on signal propagation time) Product function• CLI Yes• web-based management Yes • MIB support Yes • TRAPs via email Yes • Configuration with STEP 7Yes • Port mirroring No • for IRT / PROFINET IO switch Yes • PROFINET IO diagnosis Yes • switch-managed Yes Protocol / is supported• Telnet Yes • HTTP Yes • HTTPS Yes • TFTP Yes • FTP Yes • BOOTP No • SNMP v1Yes • SNMP v2Yes • SNMP v3Yes • DCP Yes • LLDP Yes Identification & maintenance function• I&M0 - device-specific information Yes • I&M1 – higher level designation/location designation YesProduct function• Port diagnostics Yes • Statistics Packet Size Yes • Statistics packet type Yes • Error statistics YesProduct function / DHCP client YesProduct function• Ring redundancy Yes • Redundancy manager Yes • Standby redundancy Yes • High Speed Redundancy Protocol (HRP)Yes • Media Redundancy Protocol (MRP)Yes • Parallel Redundancy Protocol (PRP)No• Passive listening YesProtocol / is supported / PRP YesProtocol / is supported / SSH YesProduct function / SICLOCK support YesProtocol / is supported• NTP No• SNTP YesStandard• for EMC / from FM FM3611: Class 1, Division 2, Group A, B, C, D / T4, CL.1, Zone 2,GP. IIC, T4• for hazardous zone EN 60079-0 : 2006, EN 60079-15: 2005, II 3 G Ex nA II T4 KEMA 07ATEX 0145X• for safety / of CSA and UL UL 60950-1, CSA C22.2 No. 60950-1• for hazardous area / of CSA and UL ANSI / ISA 12.12.01, CSA C22.2 No. 213-M1987, CL. 1 / Div. 2 /GP. A, B, C, D T4, CL. 1 / Zone 2 / GP. IIC, T4• for emitted interference EN 61000-6-4:2001• for interference immunity EN 61000-6-2:2001Verification of suitability EN 61000-6-2:2001, EN 61000-6-4:2001• CE mark Yes• C-Tick Yes• KC approval Yes• Railway application in accordance with EN 50155No• Railway application in accordance with EN 50124-1NoMarine classification association• American Bureau of Shipping Europe Ltd. (ABS)No• Bureau Veritas (BV)No• Det Norske Veritas (DNV)No• Germanische Lloyd (GL)No• Lloyds Register of Shipping (LRS)No• Nippon Kaiji Kyokai (NK)No• Polski Rejestr Statkow (PRS)NoInternet-Link• to website: Industry Mall /industrial-controls/mall• to website: Industrial communication /simatic-net• to website: Information and Download Center /automation/net/catalog• to website: Image database /bilddb• to website: CAx Download Manager /cax• to website: Industry Online Support letzte Änderung:Aug 6, 2014。
X Pert使用手册

7.若想剥离 K-α2,则先点击“Treatment”菜单下的“Strip K-Alpha2”命令。
接着点击弹出的对话框里的“Strip K-Alpha2”。 最后点击“Replace”即可。
8. 导出数据。 若要求得到衍射峰(如 d 值,半高宽,峰高等)的信息,则可以点击“Reports”
菜单中的“Create RTF Report”或者“Create Word Report”。那么产生的报告里有
点 击 “Start Rietveld Refinement” 注意:精修模式为 “Automatic Mode”
将精修模式改为 “Semi-automatic Mode”
第九步:
将 “Refine” 这 一 栏 里 所有的“V”都去掉, 只留下“Silicon,syn” 里有。
第十步: 先在相应的选项里画“V”,进行“Start Rietveld Refinement”后再去掉“V”;接着在 下一步的选项里画“V”….,反复操作,直到达到自己的要求。 (1) (2) (3) (4)
X’Pert HighScorePlus
使用手册
^_^ Cally Mo ^_^
E-mail: morype@
一、 进入 HighScorePlus
1.在开始菜单或者桌面上找到“HighScorePlus”图标,双击,一个简单的启动页面 过后,就进入到 HighScorePlus 的主窗口。
详细的衍射峰的信息。
若要得到衍射图谱的数据,从而可以让自己在 Excel 表里面把这个谱图作出来, 则可以点击“File”菜单里面的“Save as”,选定保存类型为“*.ASC”即可。
9. 补充
(1)对于经常分析的样品,熟悉其选用的 PDF 卡后,可以不用经过第二步的 “IdeAll”,而是点击“Treatment”菜单下的“Search Peaks”,在弹出的对话框里设
X'Pert使用手册

寻找花样 用户花样加到数据库 从数据库中删除用户花样 将花样保存在子集中 子集装入花样表中 设置所有的手动坐标 去掉全部花样
其中:(1)Crystallography:
物相鉴定 结晶学 结构精修
(2)Rietveld:
搜寻单胞 精修单胞 约化单胞 转化单胞
精修模式 开始花样模拟 开始精修 停止精修 编辑自动精修步骤 编辑排斥的区域 编辑背底点 编辑扫描步骤 显示校正矩阵 显示精修的值 输入新的结构
7.若想剥离 K-α2,则先点击“Treatment”菜单下的“Strip K-Alpha2”命令。
接着点击弹出的对话框里的“Strip K-Alpha2”。 最后点击“Replace”即可。
8. 导出数据。 若要求得到衍射峰(如 d 值,半高宽,峰高等)的信息,则可以点击“Reports”
菜单中的“Create RTF Report”或者“Create Word Report”。那么产生的报告里有
五、Rietveld 全谱拟合
建议:先选定自动精修模式,再选定半自动精修模式 具体步骤如下: 第一步:打开需要精修的文件(这里以 Si 为例),点击“IdeAll”进行物相检索。 第二步:
将“Profile Base Width” 里的值改为“7”
第三步:
在 “Pattern List” 里 点 住 “00-027-1402”按右键,在 下拉菜单里点击“Convert Pattern to phase”
XRD分析软件使用手册,使用说明。很好用的哦!
X’Pert HighScore (Plus) 快速入门指南X’Pert HighScoreX’Pert HighScore Plus目录1. 约定术语 (1)1.1. 动作术语 (1)1.2. 指令与说明 (1)1.3. 按钮与表单域 (1)1.4. 菜单项与按键 (1)2. 启动HS+并启用示例数据库 (2)2.1. 介绍 (2)2.2. 启动X’Pert HighScore Plus (2)2.3. 启用数据库 (4)3. 载入及显示数据 (6)3.1. 介绍 (6)3.2. 载入扫描 (6)3.3. 显示扫描 (7)3.4. 检索参考卡片 (8)3.5. 显示参考卡片 (10)4. 图谱处理 (12)4.1. 介绍 (12)4.2. 确定背景 (12)4.3. 寻峰 (14)5. 进行物相鉴定 (17)5.1. 介绍 (17)5.2. 物相检索 (17)5.3. 物相鉴定 (18)6. 改变评分 (21)6.1. 介绍 (21)6.2. 改变评分 (21)7. 运行用户批处理 (22)7.1. 介绍 (22)7.2. 运行用户批处理 (22)8. 检索及精修晶格 (23)8.1. 介绍 (23)8.2. 准备 (23)8.3. 载入图谱 (23)8.4. 寻峰 (25)8.5. 检索/精修晶格 (27)8.6. 保存结果 (30)9. 自动Rietveld精修 (31)9.1. 介绍 (31)9.2. 载入数据 (31)9.3. 自动精修 (32)9.4. 更好的精修 (32)9.5. 注解及建议 (33)10. 物相鉴定策略及疑难解答 (35)10.1. 介绍 (35)10.2. 图谱处理顺序 (36)10.3. 物相鉴定 (37)10.4. 疑难解答 (37)1. 约定术语1.1. 动作术语本指南中代表动作的术语如下:单击按下鼠标左键并马上松开双击快速地重复两次按下鼠标左键并马上松开拖动按下鼠标左键不放,拖动鼠标以划定一个矩形区域或移动一个对象输入打入文本或数字类型的数据按下按下键盘上的一个键或窗口中的一个按钮右击按下鼠标右键并马上松开选中将鼠标指针移到你要的选项或对象上并单击勾选在复选框中打上勾切换来回改变参数或状态(如:开-关-开)在本指南中单击(或按下)意味着关闭你当前工作的窗口而非程序1.2. 指令与说明指令性的文字前面有圆点符“·”。
定性分析-Xreport软件操作说明
1 打开 Xreport 软件双击桌面上的图标,进入报告模板编辑界面;2 选择报告模板对应的数据处理软件3 Xcalibur 软件模板编辑 选择下图中的 Xcalibur 2.2 点击 Start 进入报告模板编辑界面4 进入 Xcalibur 模板编辑界面 如下图所示,拖动界面左上角的 NR 至中间界面,同时在右侧部分会显示目前模板包括 NR 部分;如下图所示,拖动界面左上角的 QN 至中间界面,同时在右侧部分会显示目前模板包括 QN 部分;NR 和 QN 部分可添加的内容都在左下角,可同样拖动至界面中间不同的部分,拖进来之后 每一部分的修改都是在鼠标右键属性中进行修改,具体可详见视频。
5 LC Quan 软件模板编辑 选择下图中的 LC Quan2.7 点击 Start 进入报告模板编辑界面6 进入 LC Quan 模板编辑界面 如下图所示,拖动界面左上角的 Comp Repeating 至中间界面,同时在右侧部分会显示目前 模板包括 comp repeating 部分;如下图所示,拖动界面左上角的 Sample Repeating 至中间界面,同时在右侧部分会显示目前 模板包括 sample repeating 部分;可同样拖动至界面中间 Comp Repeating 和 Sample Repeating 部分可添加的内容都在左下角, 不同的部分, 拖进来之后每一部分的修改都是在鼠标右键属性中进行修改, 具体可详见视频。
7 报告模板保存 编辑完报告模板之后可点击 File/Save as 对报告模板另存为。
。
X'pert_XRD_实验操作步骤(厦门大学详细版)
X’pert PRO X射线衍射仪实验操作固体表面物理化学国家重点实验室2004.12X’pert PRO X射线衍射仪实验操作1.开启仪器1)合上配电箱冷却水系统空气开关,将冷却水主机电源开关打到“ON”。
2)合上配电箱内仪器电源空气开关。
3)关好仪器门,将仪器上的高压锁开关顺时针向转动90º。
4)按下仪器面板上的“Power on”按钮启动仪器(高压显示15KV,5mA,顶灯亮)。
5)按下仪器面板上的“Light”按钮可以开启仪器内照明灯。
2.启动测试程序与登录1)启动计算机,以xrd/xrd登录Windows。
2)双击桌面上“X'pert Data Collector” 图标,启动测试程序。
3)在登录框中填入用户名“xrd”,密码“xrd”,点“OK”。
3.联接仪器选菜单“Instrument”中的“Connect”。
在弹出的窗口中选择相应的测试平台:一般测试选择“flat sample stage”,选择后点“OK”,并对弹出的提示框点“OK”。
对如下提示点“Yes”。
联接成功,显示如下界面。
4.设置电压和电流在软件左侧窗口的“Instruments Settings”选项卡中,双击“X-ray” 或其下的任意一项(行),在弹出的对话框的相应栏中[Tension(KV)和Current(mA)],按规定顺序分步直接输入数据后点“Apply” 按钮。
设置顺序如下:(1)先升电压:15KV --→ 20KV --→ 30KV --→ 40KV(2)后升电流:5mA --→ 10mA --→ 20mA --→ 30mA注意:每一步操作完毕,须等待5–10分钟后才能进行下一步操作!5. 设置实验参数选菜单“Files”中的“Open Program”(或工具栏第2个按钮)。
在弹出的窗口中选择相应的测试程序后点“OK”。
可以选择的测试程序如下:(1) Phase_XRK-p 高温分析测试程序(须更换高温原位反应室)(2) PW_small_angle 低角度衍射分析测试程序(2 不得小于0.4º)(3) X’celerator_grazing_angle膜、薄层等的分析测试程序(2θ不得小于3º)(4) X’celerator_normal一般定性分析测试程序(2θ不得小于3º)(1)一般定性分析测试程序:X’celerator_normal(2θ不得小于3º)在菜单“Open Program”——选择程序后点“OK”,在如下页面中可以设置实验参数(直接输入数据):可以设置的实验参数有:每个参数输入数据后,应点一下其它栏或按TAB键。
x'pert highscore plus 使用手册
E-mail: morype@一、进入HighScorePlus1.在开始菜单或者桌面上找到“HighScorePlus”图标,双击,一个简单的启动页面过后,就进入到HighScorePlus的主窗口。
2.选择菜单“File”菜单下的“Open”命令,即打开一个读入文件的对话框。
工具“”具有同样的功能。
3. 在文件名上双击,这个文件就被“读入”到主窗口并显示出来。
HighScorePlus 的另一种进入方式是在电脑里面双击一个“.RD”或者“.xrdml” 图形显示窗口物相检索快捷键工具栏分析结果栏二、基本功能操作1. File菜单(1) “Save as”命令可以将当前窗口中显示的图谱数据以各种格式保存,以方便用其他作图软件作图和作其他处理。
最常见的如格式“*.ASC”,这种格式可以用Excel打开。
需要注意的是该命令保存的是当前窗口中显示的图谱,如果保存前作过平滑处理等,则保存的数据为平滑后的数据而非原始数据。
(2) “Insert”命令可以将两个衍射花样在同一个窗口里进行比较。
2. Edit菜单3. View菜单其中:(1)Desktop:(2)Toolbars:其中:Corrections:5. Reference Patterns菜单6. Analysis菜单(1)Crystallography:其中:7. Report菜单三、物相检索1. 打开HighScorePlus软件,读入需要分析的文件。
2. 点击“IdeAll”。
或者:3. 检索结果如下:4. 选定合适的PDF卡(尽可能选用卡片号靠后的,这样准确性要好一些)。
对于同一种物质的不同来源,可以选用相同的PDF,从而进行对比,故可以自或者:点击用红圈圈住的其中一个,在弹出的对话框里点击此图标,待图形区出现一条蓝色线后,选定需要拟和fit的峰,按右键,选定”Fit Profile”6. 点击“Treatment”菜单下的“Determine Background”进行背底的扣除。
- 1、下载文档前请自行甄别文档内容的完整性,平台不提供额外的编辑、内容补充、找答案等附加服务。
- 2、"仅部分预览"的文档,不可在线预览部分如存在完整性等问题,可反馈申请退款(可完整预览的文档不适用该条件!)。
- 3、如文档侵犯您的权益,请联系客服反馈,我们会尽快为您处理(人工客服工作时间:9:00-18:30)。
三、 物相检索
1. 打开 HighScorePlus 软件,读入需要分析的文件。 2. 点击“IdeAll”。
或者:
3. 检索结果如下:
4. 选定合适的 PDF 卡(尽可能选用卡片号靠后的,这样准确性要好一些)。 对于同一种物质的不同来源,可以选用相同的 PDF,从而进行对比,故可以自 己输入已知的 PDF 卡号。
置好各个参数后,点击“Search Peaks”,再点击“Replace”即可。
然后输入 PDF 卡片号,拟和 Fit…..
设置的值越大,其拟和得到
的峰值就越接近真实。
大部分为默认值。对于宽峰, Maximum tip width 值要增 大;对于窄峰,Minimum tip width 值要减小。
五、Rietveld 全谱拟合
建议:先选定自动精修模式,再选定半自动精修模式 具体步骤如下: 第一步:打开需要精修的文件(这里以 Si 为例),点击“IdeAll”进行物相检索。 第二步:
将“Profile Base Width” 里的值改为“7”
第三步:
在 “Pattern List” 里 点 住 “00-027-1402”按右键,在 下拉菜单里点击“Convert Pattern to phase”
一般为 2。对于宽峰,设置 的值要增大(3~6)。
(2)计算结晶度 第一步:先找到一个已知结晶度的标样数据,如 HighScorPlus 软件自带有一个 结晶度为 50 的数据:
C:\Program Files\ PANalytical \ X’pert Highscore Plus\Tutorial\Cryst 50.RD 第二步:打开这个文件 第三步:寻峰,再拟和 Fit 第四步:
(5)
(6)
第十一步: Rietveld 是否好,其判断标准为:
R profile:
﹤10
Goodness of Fit: ﹤1.5(最关键)
这些值是否能够达到要求也 要视样品而定。有时候若无 法达到,则只要其值尽量小 了也就可以了。
详细的衍射峰的信息。
若要得到衍射图谱的数据,从而可以让自己在 Excel 表里面把这个谱图作出来, 则可以点击“File”菜单里面的“Save as”,选定保存类型为“*.ASC”即可。
9. 补充
(1)对于经常分析的样品,熟悉其选用的 PDF 卡后,可以不用经过第二步的 “IdeAll”,而是点击“Treatment”菜单下的“Search Peaks”,在弹出的对话框里设
第四步:
在“Refinement Control” 里点击“Silicon,syn”, 在子菜单里点住“Atomic Coordinates”按右键,在 出现的下拉菜单里点击 “Add New Atom”
第五步:
将“ ”移到这一栏
第六步: 第七步: 第八步:
在“Element”里输 入“Si”,“Wyckoff Position” 里 输 入 “8a”
7.若想剥离 K-α2,则先点击“Treatment”菜单下的“Strip K-Alpha2”命令。
接着点击弹出的对话框里的“Strip K-Alpha2”。 最后点击“Replace”即可。
8. 导出数据。 若要求得到衍射峰(如 d 值,半高宽,峰高等)的信息,则可以点击“Reports”
菜单中的“Create RTF Report”或者“Create Word Report”。那么产生的报告里有
4.软件界面介绍
下拉菜单
工具栏
图形显示窗口 物相检索快捷键
分析结果栏
二、基本功能操作
1. File 菜单
产生一个空白的文档 打开文件,选择需要处理的衍射花样 在原有花样的基础上再插入一个新的花样 关闭 保存文件 另起名字保存文件 设置页面 打印图形 打印预览 打印设置 分析文件通过 Email 发送出去 文件的属性 退出
第二步:在弹出的对话框里:
在这一栏里输入物质分子式, 并按下 Enteerr 键键。。 点击““CaClacluclualtaete PPeenneettrraattiioon Deepptthh……””
第三步:
输入物质密度、入射角 等参数,则可以在
“Penetration depth” 里看到其穿透深度。
X’Pert HighScorePlus
使用手册
^_^ Cally Mo ^_^
E-mail: morype@
一、 进入 HighScorePlus
1.在开始菜单或者桌面上找到“HighScorePlus”图标,双击,一个简单的启动页面 过后,就进入到 HighScorePlus 的主窗口。
点 击 “Start Rietveld Refinement” 注意:精修模式为 “Automatic Mode”
将精修模式改为 “Semi-automatic Mode”
第九步:
将 “Refine” 这 一 栏 里 所有的“V”都去掉, 只留下“Silicon,syn” 里有。
第十步: 先在相应的选项里画“V”,进行“Start Rietveld Refinement”后再去掉“V”;接着在 下一步的选项里画“V”….,反复操作,直到达到自己的要求。 (1) (2) (3) (4)
2.选择菜单“File”菜单下的“Open”命令,即打开一个读入文件的对话框。 工具“ ”具有同样的功能。
3. 在文件名上双击,这个文件就被“读入”到主窗口并显示出来。
HighScorePlus 的另一种进入方式是在电脑里面双击一个“.RD”或者“.xrdml” 文件,也会进入 HighScorePlus,并将该文件读入。
用 鼠 标 点 击 “Scan List” 一 栏 下 面 的 list 。 找 到 “Object Inspector” 窗 口 下
“Scan Statistics”
在“Constant Background”里输入值,直到 “Crystallinity” 值 为 50 % 为 止 。 记 住 这 个 “Constant Background”里的值 m,如这里 的 290.75。
或者:
点击用红圈圈住 的其中一个,在 弹出的对话框里 输入已知的 PDF 卡号,再点 击对话框里的 “Load”即可。
5. 对衍射花样进行拟和 Fit。
点击此图标,待图形区出现一条蓝色 线后,选定需要拟和 fit 的峰,按右键, 选定”Fit Profile”
6. 点击“Treatment”菜单下的“Determine Background”进行背底的扣除。 扣除方式有两种,一种是自动模式:
图中绿色线即为选 定的背景底线。达到 自己的要求后,点击 “Subtract”
接着上一步 后,点击 Replace
另外一种是手动模式:
选定自动模式里的“Move Base points”时,可以移动每一个图中 绿色线上的 base 点从而达到自己 的要求;其他两个模式分别为增加 和减少 base 点。设置好背底后, 与手动模式相同,先点击 “Subtract”,再点击“Replace”
2. Edit 菜单
撤销 不能撤销 剪切 拷贝 粘贴 删除 全选
3. View 菜单
其中:(1)Desktop:
显示 Object Inspector 锁定窗口位置 窗口默认设置 附加图形窗口 显示各种窗口 显示扫描数据窗口 显示峰的数据窗口 显示 PDF 数据窗口 显示原始数据窗口 显示目标检查窗口 显示定量分析窗口 显示精修数据窗口 显示结构图 显示 Fourier 图 显示键长和键角 桌面设置 工具条 指针模式 显示模式 主图 附图 手工设定 恢复-放大缩小 全图恢复 最大主图
桌面的命名 保存桌面设置 删除桌面设置 无设置 物相,有少量工具按钮 物相,无工具按钮 物相检索 结构精修,有少量工具按钮 结构,显示全部工具按钮
(2)Toolbars:
4. Treatment 菜单
其中:Corrections:
标准工具条 XRD 工具条 画图工具 导向工具条 批量工具条 读出工具条 花样工具条 附图类型 主图 显示模式 指针模式 修正工具条 寻找花样 精修工具条 桌面 用户自定义
寻找花样 用户花样加到数据库 从数据库中删除用户花样 将花样保存在子集中 子集装入花样表中 设置所有的手动坐标 去掉全部花样
其中:(1)Crystallography:
物相鉴定 结晶学 结构精修
(2)Rietveld:
搜寻单胞 精修单胞 约化单胞 转化单胞
精修模式 开始花样模拟 开始精修 停止精修 编辑自动精修步骤 编辑排斥的区域 编辑背底点 编辑扫描步骤 显示校正矩阵 显示精修的值 输入新的结构
第五步:打开自己要计算结晶度的文件 第六步:重复第三步和第四步,在“Constant Background”输入 m(如 290.75), 那么“Crystallinity”里显示的值即为此样品的结晶度。 (3)计算 X 射线对物质的穿透深度 第一步:点击“Tools”菜单下的“MAC Calculator”
确定背底 删除背底 寻峰 峰形拟和 删除计算的峰形 剥离 K-Alpha2 图形平滑处理 校正 夹住范围 插入峰 校准到指定的文件 品高度(校正位移) 修正系统系数 修正坏点 修正温度/压力 修正光束溢出
5. Reference Patterns 菜单 6. Analysis 菜单
7. Report 菜单 8. Tools 菜单
9. Customize 菜单
报告页面/打印设置 建立 RTF 报告 简历 Word 报告 编辑报告格式
光谱线 标定峰 设置峰的状态 布拉格计算 α、β计算 质量吸收系数计算 谢乐公式计算 元素周期表 对称性搜寻 物相自动默认检索 物相自动全部检索 物相自动普通检索 物相自动矿物检索 少量自动矿物检索 打印所有的