索尼4.5寸同轴全频喇叭陷波器
EBS-750 定阻吸顶音箱说明书

EBS-750 定阻吸顶音箱说明书EBS-750×2说明书×1欢迎使用EBS-750 定阻吸顶音箱,使用前请您仔细阅读说明书,以便能正确的操作使用。
若存在有疑问或者您有宝贵的建议,可通过拨打得胜官方服务热线400 6828 333 或微信扫描二维码关注得胜官方公众号与我们联系。
■ 标准配置■ 产品特性■ 适用场合■ 技术参数■ 产品图示■ 产品尺寸图■ 安全警示■ 产品安装• 7.5英寸专业级天花板嵌入式安装扬声器,系统采用两分频全频段设计• 面板支架采用防潮,防水,耐紫外线的全天候工作材料• 低音采用7.5口径防潮防水的复合材质振膜,高音采用1英寸蚕丝振膜, 角度可调,整个系统声音温暖厚实,中音饱满,高音细腻柔和• 系统采用目前最流行的无边框及网罩吸附式设计,安装及拆卸维修非常 方便会议中心、酒店、餐厅、建筑背景音乐等多种用途• 额定功率:100W(AES)• 额定阻抗:8Ω• 频率响应(±3dB):50Hz-20kHz • 灵敏度(1W/1M):88dB • 覆盖角:H110×V110°• 最大声压级:105dB • 分频模式:无源二分频• 分频点:2800Hz • 安装方式:嵌入式安装• 安装开孔尺寸:265mm圆孔• 安装深度:108mm• 接线方式:按压式接线端子(IN : 红+,黑-)• 箱壳:ABS工程塑料• 表面处理:白色• 高频:1寸蚕丝膜、钕磁、360度可 旋转高音单元• 低频:7.5″×1(33芯),100磁钢 (聚丙烯)复合盆胴体+NBR丁 腈橡胶悬边单元• 规格: φ293mm×H108mm • 净重:2.1Kg① 此图形纸板用来安装音响开孔使用,外径265mm ② 螺丝刀顺时针方向对4颗脚架螺丝转动为紧固音响; 螺丝刀逆时针方向对4颗脚架螺丝转动为拆卸音响③ 扬声器紧固后将金属网罩吸附在面板①为避免电击、高温、着火、辐射、爆炸、机械危险以及使用不当等可能造成的人身伤害或财产损失,使用本产品,请仔细阅读并遵守以下事项:1. 使用产品时请确认所连接设备与本产品功率是否匹配以及合理调整音量 大小,不要在超过产品功率及大音量下长时间使用,以免造成产品异常 和听力损伤;2. 使用中若发现有异常(如冒烟、异味等),请立即关闭电源开关并拔掉 电源插头,然后将产品送经销商检修;3. 本产品及附件都应放置在室内干燥通风处,勿长期存放在潮湿、灰尘多 的环境,使用中避免靠近火源、雨淋、进水、过度碰撞、抛掷、振动本 机及覆盖通风孔,以免损坏其功能;4. 若产品需要固定于墙壁或天花板上时,请确保固定到位,防止因固定强 度不足导致产品发生跌落危险;5. 使用该产品时需遵守相关安全规定,法律法规明确禁止使用场合请勿使 用本机,以免导致意外事故。
Episode ES-LS-BSUB-12 12英寸500W掩耳盲子潜水子音箱说明书

pg. 1Welcome to Episode ®Thank you for purchasing a great product from Episode ®, one of the best-performing and most reliable loudspeaker lines available today. We appreciate your purchase and are committed to providing the highest-quality products possible.The Episode 12” 500-Watt Burial Subwoofer has been specifically designed to integrate into any outdoor loudspeaker installation to provide optimized bass response for an area between 2,000 and 3,000 square feet. Its rugged 5/8” HDPE construction assures years of trouble-free use.1. Package Contents2. Tools Required3. Important Instructions and Considerations for Installation4. Product RequirementsBox 1• E S-LS-BSUB-12-CPR with 3 feet of Direct Burial16-2 cable attached• (2) Silicone-Filled Weatherized Wire Nuts• Wire Strippers• Digging Tools (such as shovel, pickaxe, etc. as needed for the soil type)• Tape Measure• Slotted Screwdriver (for securing the compression clamps)•Pea Gravel (optional, recommended as a drainage base for high clay content soils)• Read and follow all instructions.•B efore beginning the installation, be sure to carefully plan locations, accounting for potential electrical, plumbing, irrigation, or other obstacles.•M any localities restrict any digging without prior notification due to possible buried utility lines or piping. Contact local authorities before installation to ensure any regulations or requirements are met.•Contact a suitable contractor if you are unsure of how to best install the product.•This subwoofer is a band-pass design, optimized for use with the Episode® 1000-watt 2-channel amplifier with custom-tuned DSP settings, or a specialized subwoofer amplifier with a low-pass filter. It requires an 8Ω-stable amplifier or a 4Ω-stable amplifier if two subwoofers are to be wired together in parallel.•Using more than 2 ES-LS-BSUB-12-CPR on the same amplifier channel is not recommended.Box 2• Weatherized Canopy• Port Tube with Compression Clampspg. 25. Wiring Recommendations6. Choosing the Installation Location• Burial-rated wire is recommended for all installations.• For Maximum Performance:o For wire runs up to 100 feet, 16ga or larger wire is recommended. o For wire runs up to 200 feet, 14ga wire or larger is recommended.o For wire runs up to 300 feet, 12ga wire or larger is recommended.Smaller wire gauges may be used, but overall performance will be reduced depending on the wire gauge used. The chart below shows the wire length and the amount of signal loss that you can expect on a typical run.There are several factors to consider when choosing the final installation location:• Sound CoverageT he low frequencies added by the ES-LS-BSUB-12-CPR will greatly enhance the overall sound quality of any outdoor loudspeaker installation. As a guideline, each subwoofer will provide coverage for between 2,000 and 3,000 square feet.Because the sound will radiate in all directions in an approximate 30-foot radius, consider placing a subwoofer every 60 feet for maximum coverage. Placing a subwoofer near a wall will increase the bass response.• Aesthetic PlacementT he final appearance of the sub leaves a very small footprint, but the sub should be located so that the canopy does not obstruct views or yard ornaments.• Safe EnvironmentT he subwoofer is designed to stand up to the harshest conditions and continue to perform, but there are conditions that could shorten its life.Make sure to minimize the chance of water being sprayed directly into the weatherized canopy, and avoid installing the sub in an area that continuously floods during wet weather or retains standing water.Avoid installing the subwoofer in areas where the canopy could be struck by cars, lawn care equipment, recreation equipment, or people walking in the yard.• Ease of Installation and WiringT he final installation location must be accessible. Make sure that wire can be routed to the location from the amplifier, and that no obstructions will prevent installation of the canopy.Note: We recommend that an outdoor speaker system be fully tested with speakers located at their proposed locations before any wiringtrenches are dug or burial conduit is installed. This allows for easy relocation of any speaker/subwoofer to achieve optimum sound levels throughout the listening area.Wire Gauge8Ω Speaker4Ω Speaker(or two 8Ω speakers in parallel)11% Power Loss 21% PowerLoss 37% PowerLoss 11% Power Loss 21% PowerLoss 37% PowerLoss 12291ft.622 ft.1352 ft.143 ft.311 ft.680 ft.14189 ft.403 ft.876 ft.92 ft.199 ft.437 ft.16117 ft.255 ft.553 ft.61 ft.128 ft.278 ft.1887 ft.194 ft.405 ft.41 ft.92 ft.201 ft.pg. 37. Installation7.1 Hole Dimensions T he subwoofer cabinet is approximately 16” in diameter and 32” long with the port tube attached. Dig a holethat is at least 24” wide and 40” long so that it is about 4 inches larger than the sub in each direction to allow for the sub to be adjusted side to side. Dig down 19” to 22” to allow for adjustment of the port tube height.The port tube height is adjustable by rotating the subwoofer in the hole. Provide at least 3” of soil on top of the subwoofer cabinet, and at least 5” between the bottom of the canopy and the soil surface after installation. This will allow for the best sound and will help prevent water buildup in the enclosure.7.2 Assembly and Setup 1. I nsert the Canopy into one end of the port elbow until it is fully seated. Tighten the compression clampcompletely.2. A ssemble the subwoofer by fitting the open end of the port elbow onto the opening of the subwoofer. Makesure the subwoofer port opening and elbow are free of soil so that a proper seal can be made with the compression clamp. The elbow must be fully seated over the subwoofer port opening. Do not tighten the compression clamp yet.3. T he height of the canopy can now be adjusted by rotating the subwoofer cabinet within the hole. When thecanopy is at the desired height, tighten the compression clamp completely to attach the port elbow to the subwoofer cabinet.4. U sing the included silicone-filled wire nuts, complete the wiring connections. Match the subwoofer’s Redlead to the “+” input and the subwoofer’s Black lead to the “-“ input of your wiring.N ote: The silicone-filled weatherized wire nuts included with this kit are specifically designed to be used for direct burial installations.An equivalent connector must be used for any wiring in the system that could be exposed to water or weather. Damage to loudspeakers or connected equipment due to inadequate installation will not be covered under warranty.5. B efore filling in the hole for the subwoofer or any wiring trenches, test the complete speaker installation,including the subwoofer and any other speakers.Fill the remainder of the subwoofer hole with the soil removed earlier. Pack as much soil around the sides and top of the subwoofer as possible. Make sure the port tube remains fully perpendicular to the surrounding soil during this process. After the subwoofer is fully covered, there should be at least 3 inches of soil covering the main assembly.Note: In areas with a high clay-content in the soil, we recommend using a 1” layer of pea gravel underneath the subwoofer to allow foreasier drainage.8. SpecificationsWoofer 12” High Compliance Mica-filled Polypropylene Cone with Stitched NBR surroundVoice Coil2.5” High Power Handling, 4-layer voice coil on Fiberglass Bobbin Minimum Impedance 8ΩFrequency Response (- 3dB)28-100 Hz Frequency Response (- 6dB)25-115 HzPower Handling 500w RMS, 1000W Peak Cabinet Construction5/8” HDPE9. Troubleshooting10. Warranty11. Contacting Technical SupportEpisode ® subwoofers are designed to function trouble-free. Most problems that occur are due to simple issues. If you have trouble, please follow the troubleshooting instructions below. If you have a different problem, or if the sound problem persists, contact Episode ® Customer Service at 1.866.838.50529.1 No Sound • Verify that there is audio coming from the source selected. Select another source if necessary. • Ensure that the audio source is turned on and connected properly.Phone: (866) 838-5052Email: **********************5-Year Limited Warranty5-Year Limited Warranty. This warranty includes parts and labor repairs on all components found to be defective in material or workmanship under normal conditions of use. This warranty shall not apply to products which have been abused, modified or disassembled. Products to be repaired under this warranty must be returned to SnapAV or a designated service center with prior notification and an assigned return authorization number (RA).。
ArenaMatch Utility 小前景 补声扬声器 AMU105 AMU108 AMU206

规范信息
本产品符合所有适用的欧盟指令要求。您可以从网站 /compliance 找到完整的符合性声明。
此符号表示不得将此产品作为生活垃圾丢弃,应将其送到合适的 回收站点进行回收。正确处理和回收有助于保护自然资源、人类 健康和环境。想要获得更多关于此产品的处理和回收的信息,请 联系当地市政当局、垃圾处理服务部门或您购买此产品的商店。
中国危险物质限用表
有毒或有害物质或元素名称及成分
有毒或有害物质和元素
零件名称
铅
汞
(Pb) (Hg)
镉 ()
六价铬 (CR(VI))
多溴化 联苯 (PBB)
印刷电路板 X
O
O
O
O
金属零件
X
O
O
O
O
塑料零件
O
O
O
O
O
扬声器
X
O
O
O
O
线缆
X
O
O
O
O
此表格依据 SJ/T 11364 的要求制定。
O:表示此零件中所有均质材料所包含的此类有毒或有害物质均低于 GB/T 26572 中的限定要求。
6. 只能使用制造商指定的附件/配件。
7.
只能使用制造商指定或随本设备一起销售的推车、支架、
三角架、托架或工作台。如果使用推车,则在移动推车/设
备时应格外小心,以免因倾倒而造成伤害。
警告/小心:
包含可能导致窒息危险的小部件。不适合 3 岁以下的儿童使用。
本产品含有磁性材料。有关这是否会影响到您的植入式医疗器 械,请咨询您的医生。
包装清单................................................................................................................................................................................................... 5 可选配件................................................................................................................................................................................................... 5 检查和维护....................................................................................................................................................................................................... 6 保持防风雨性........................................................................................................................................................................................... 6 推荐使用的工具.............................................................................................................................................................................................. 6 产品尺寸........................................................................................................................................................................................................... 7 ArenaMatch Utility AMU105........................................................................................................................................................... 7 ArenaMatch Utility AMU108........................................................................................................................................................... 8 ArenaMatch Utility AMU206.......................................................................................................................................................... 9 ArenaMatch Utility AMU208........................................................................................................................................................ 10
索威4寸共点同轴喇叭详细参数
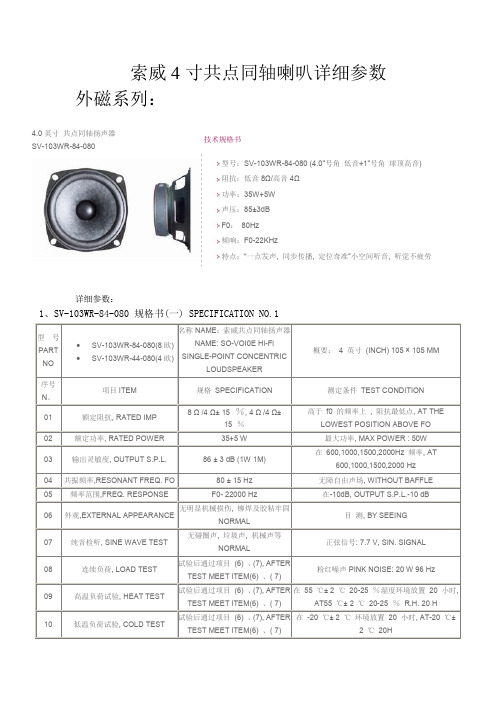
索威4寸共点同轴喇叭详细参数外磁系列:
4.0英寸共点同轴扬声器
技术规格书
SV-103WR-84-080
型号:SV-103WR-84-080 (4.0"号角低音+1"号角球顶高音)
阻抗:低音8Ω/高音4Ω
功率:35W+5W
声压:85±3dB
F0:80Hz
频响:F0-22KHz
特点:“一点发声, 同步传播, 定位奇准”小空间听音, 听觉不疲劳
详细参数:
1、SV-103WR-84-080 规格书(一) SPECIFICATION NO.1
2、材料配制及必要参数——规格书(二) SPECIFICATION NO.2
3、SV-103WR-84-080 频响曲线
4、SV-103WR-84-080 阻抗曲线
5、SV-103WR-84-080 装配尺寸图
防磁系列:
0 英寸共点同轴扬声器SVF103WR-84-088技术规格
阻抗:8Ω/4Ω
功率:35W+5W
声压:85±3dB
F0:80Hz
频响:F0-22KHz
特点:“一点发声, 同步传播, 定位奇准”平曲线音色
1、SVF103WR-84-088 规格书(一) SPECIFICATION NO.1
2、材料配制及必要参数——规格书(二) SPECIFICATION NO.2
3、SVF103WR-84-088 频响曲线
4、SVF103WR-84-088 阻抗曲线
5、SVF103WR-84-088 装配尺寸图
6、SVF103WR-84-088实用接线图。
SONY Discman历代机王
SONY Discman歷代機王大對決~ 相信隨身聽是許多人進入音響世界的起點~合理的音質及多數人可以負擔的價格加上使用極為便利~ 造成Walkman風迷全球~雖然有許多的廠商進行Walkman的研發及製造~但身為隨身聽的發明人”SONY”~至今仍然是Walkman的領導廠商~擁有最多知名機種~當然~這些機種皆成為小弟收藏的對像~廢話不說了~這次評比的機種只限SONY~且為小弟現有機種~順序以綜合音質排名~如果各位前輩你有其他覺得不錯的機種還請告知~1.D-Z555推出. 64000日幣SONY Discman 5週年紀念機~SONY第3號座機級隨身聽~公認音質是CD隨身聽中的第一把交椅~機構使用150系列承盤長軸加強型~音源使用德儀Burr Brown 製PCM66P D/Ax2.並搭配訊源可調DSP系統~使他擁有高級座機的音質水準~音質通透.層次分明.音像比例非常恰當.每一個聲音細節都可交代的很清楚.不拖泥帶水~最難得的是.不論各種頻段的音色都能處理的十分圓潤細膩.高頻或低頻的延伸相當自然漂亮.聽起來很舒服又不刺耳~難以想像隨身聽有這種音色~聽弦樂及小編制室內樂是隨身聽極品~缺點:笨重的體積加上不便的外出電源.實在難以和隨身聽畫上等號~2.D-303推出.37800日幣SONY DAT錄音座專用訊源.Discman in door最高級機種~正式轉用1Bit D/A之音質加強型機種.SONY Discman 音質最顛峰作品~機構延用350承盤+SF89讀取機構~音源使用Delta 1BitL/R獨立雙D/A+LSI系統的強化音質電路+角型光纖輸出~.使它擁有所有CD隨身聽中最大的噪信比.最大動態.最小響頻誤差.音質十分通透華麗.音場寬擴自然.細節豐富.解析超強~由xx以上的優勢..從單純的獨奏到大編制交響樂的重撥.都能讓人感受到其他機種所沒有的音樂張力及情緒!!就是那種說不出的音樂氣氛.使得聽各種音樂都十分適合~大編制交響樂是它拿的手好戲.由其是在鼓號xx時.每件樂器歷歷在目..銅管樂聲猶如日出金光.直上雲霄.那種無與xx的華麗與xx...高價音響也不過如此~缺點:高頻延至部份不夠圓潤細膩.是它敗給555的原因.捨棄150系列.改用350承盤.故障率實在令人不敢恭維.1992年5月10推出後繼機種D-515後.走入歷史...3.D-J50推出. 54800日幣SONY 50譜系特別版Discman~SONY數量最少的Discman~末代16bit D/A CD隨身聽~機構使用J系列超薄型結構”JACKET”.音源使用德儀Burr Brown 製PCM66P D/Ax2+LSI系統的強化音質電路.使他同時擁有16bit及1bit的優點~聲音非常中性均衡.沒有多餘的喧染.透明感極佳.~超薄”JACKET”結構.全金屬機身.秀氣細膩的造型.SONY所有隨身聽中作工品質最精細的一台Discman~因使用D-Z555的D/Ax2加1bit的LSI系統.音質圓潤細膩.層次分明.音場開擴.聲音密度.速度.比例皆非常優秀.由於中性又均衡的特性.絕佳的空氣感.再加上圓潤細膩的音質.清麗飄逸音色..來杯咖啡.最適合夜晚細細的品味~被業界喻為SONY Discman最高傑作之機種.缺點:因過xx密集機構及電路.發生極易故障.及易被干擾的現象.導致他提前停產的命運~4.D-350推出.43800日幣SONY第4號也是末代座機級隨身聽(Protable system in door)~第一台配備線控耳機的Discman~機構使用新350承盤及全座機功能介面.音源使用座機同級SONY 16Bit Daul 8time D/A.使它擁有座機般穩定且理性的音色~聲音密度/層次感/結像度/比例/平衡表現極為優秀.完全沒有現行CD隨身聽的混濁.串音的問題~實際聽感與303很接近.聲音較暖一點.音場近一點.適合中小編制管弦樂~寧靜沉穩的底聲.聽鋼琴曲乾淨俐落.毫不拖泥帶水~由於搭載CD隨身聽中最優秀的DBB系統.使它也適合各種流行樂及搖滾樂.~缺點:早期CD那種過於理性的音色.還有點不習慣...捨棄150系列.改用使用350承盤.故障率實在令人不敢恭維.5.D-335推出. 30800日幣SONY末代超高音質Discman~真正專為MD設計的高音質訊源~機構使用DAX11承盤長軸加強型及6秒進化版ESP.音源使用1Bit L/R獨立雙D/A轉換器及精簡類比電路.全波段20~20KHz唯一+0誤差的Discman~音質忠實自然.音色猶如座機般精準.定位感/結像度/聲音密度/比例/細節/平衡皆十分優秀~搭配20mW驅動力.各頻段表現中規中舉.彷彿有點LP的味道.非常耐聽..適合小爵士xx.流行xx.室內xx...高頻細節部份如行雲流水.圓潤細膩不刺耳.聽Akiko小姐的小提琴還真是美妙...缺點:音場略小.低頻延伸有點不夠漂亮.加上不夠精美的xx麵包的造型...外型難以跟高級機種畫上等號~6.D-250推出.40500日幣機王D-Z555直系血統機種.煎餅機2號~機構使用同系列承盤一般型.音源使用德儀Burr Brown 製PCM66P D/Ax1..音色亮麗溫暖~聲音密度/層次感/定位感/結像度/比例表現極優秀. 加上小巧精美的造型及金屬質感.令人愛不釋手.~良好的音樂氣氛.聲音十分甜美..尤其是人聲嗓音的那種磁性.大提琴那種擦弦箱板聲.. 一般座機都難有這種水準!最適合聽人聲及弦樂.缺點:速度偏慢.有點刻意強化的高低頻及殘響.加上不便的外出電源及功能.真是”缺陷美”的機種~7.D-E9001998年推出. 32300日幣十週年記念機D-777修正版~漂亮的烤漆.輕薄短小的體積.便利的操作是最大特色~ 機構延用D-777 DAX01承盤及進化版ESP2.音源使用1 Bit D/A轉換器及修正類比電路~層次感/比例/空間感/平衡相當優秀.是近代Walkman中音質最好的機種~音色清麗脫俗.各頻段忠實.沒有刻意的強化.聲音有點類似335~均衡性很高的機種.適合流行xx.室內xx.輕音xx~聽bossanova.那種放鬆的感覺真..令人不想放下耳機~個人認為隨身聽綜合評價最優秀的機種~缺點:動態偏弱.定位有點不自在.冷~~少了點氣氛.跟老機相比.有種放不開的感覺.真是不上不下的機種~~8.D-777推出. 32800日幣Discman十週年記念機.近十年來CD隨身聽的代表作!!但也是SONY Discman音質走下坡的分界點..漂亮的烤漆.輕薄短小的體積.超強的重低音是最大特色~機構使用DAX01承盤及強化ESP.音源使用1Bit L/R獨立雙D/A轉換器及超級EX DBB電路.. 聲音密度/層次感/解析力/動態/細節/空間感表現一流~音色溫暖.細節豐富.強列的個性色彩.音樂xx十足.適合大編制交響樂~無與論比的動感及氣氛..聽搖滾樂.舞曲.流行樂真的非常暢快淋漓~缺點電路設計易被干擾.導致底聲不夠乾淨.定位略有浮動.加上個性色彩過xx強烈音質最終評比敗給姐妹機E900的原因.~~9.D-150推出49,800日幣超薄機D-100進化版.煎餅機1號.機王D-Z555直系血統機種~第一台配備機內充電池!機構使用150承盤及KSS 167B雷射頭.音源使用德儀Burr Brown 製16 Bit D/A轉換器~擁有冷靜的音色及優秀的空氣感.類似早期座機般的味道~~音場/透明感/聲音密度/結像度/空間感/動態表現一流.加上小巧精美的造型及金屬質感.令人愛不釋手.~優秀的音場及透明度.晶瑩剔透.聲音乾淨.聽自然音樂.新音樂非常速配.大編制交響樂也相當適合~~缺點:早期CD偏硬的音色.不便的外出電源及功能.加上過高的價格.不到一年時間就被後繼機種D-250淘汰出局~~10.D-E01推出38000日幣SONY Discman 15週年記念機種~隨身聽科技的結晶.最具現代感及未來感的機種.世界第一台吸入式SLIDE IN及G-PROTECTION機構~音源使用SIG 1 Bit D/A轉換器及.超省電STAMINA電路. 透明感/層次感/結像度/解析力表現相當不錯音質清爽不黏膩.聲音乾淨.漂亮.優秀的透明感.聽各種音樂如行雲流水般順暢.適合輕音樂.流行樂~~飄逸透明的音色.聽聽xx樂還不錯~缺點.過xx陰柔的音色筆.缺乏xx及氣氛.只重視功能.吝嗇xx音質電路.只有收藏價質的機王~~11.D-50 MK2推出49800日幣SONY第2台CD隨身聽~第2號座機級隨身聽~世界第1台名叫Discman.的CD隨身聽~機構/不詳??音源使用16 Bit單晶片D/A轉換器..改進1號機頻寬/解析/透明度..等等缺點...擁有極冷靜的音色.極寬廣的音場~透明感/聲音密度/結像度/空間感表現一流.搭載30mW的耳機驅動力.聽大編制交響樂.那種場面及氣勢.xx555.303都不是對手~~缺點:冷~冷~硬的音色.細節豐富但粗顆粒偏粗~加上超重的機身..機內無法裝電池..根本不算是隨身聽~12.D-5WD推出SONY運動型強化防震/防水Widdi全天候CD隨身聽~SONY末代日本本土製造機種(記念機除外)末代正規15mW機~機構使用DAX11承盤及Widdi機構~音源使用1 Bit D/A轉換器及強化ESP2電路~音質偏暖.推力強.動感十足~適合聽流行樂~重裝籃球鞋的造型.CARBON飾板.銀色烤漆大型CD倉門扣~ 個人認為外觀最漂亮的CD隨身聽~缺點:細節/解析模糊/體積偏大~只能用看的隨身聽13.D-E707推出.SONY近代CD中堅機種.xxxx製~機構使用DAX11~音源使用1 Bit D/A轉換器~聲音偏暖~功能齊全~號稱15mW.體積.造型.價格.音質等比例不錯~C/P質最高.同門師兄弟最多.維修材料便宜..xx首選機種..適合一般流行樂~缺點:細節/解析模糊/音場小…..現在給家人拿來聽佛經~14.D-365推出SONY CD中堅機種.xxxx製~機構使用DAX11..音源使用1 Bit D/A轉換器~聲音尚可.功能齊全!!C/P值不錯.雙生機種很多.維修材料便宜~ 不錯的入門機~聽一般流行樂還可以...缺點:其實這種機器不必考慮缺點RUN耳機的首選~15.D-405推出SONY CD低階機種.xxxx製~機構使用DAX11~音源使用1 Bit D/A轉換器~聲音……….功能該有都有~C/P…...平易近人的入門機~聽.....CD……..就好~缺點:不知該怎麼說研究SONY CD隨身聽結構及電路的最佳機種目前xx頭已被拆了………呼~xx寫完了~以上是我目前手上擁有的機種~基xx客觀的理由~我沒有的我就不寫~還有很多好機器~但限xx個人財力…..評論的部份.只是我各人的看法.我已盡力做到客觀. 我相信別人會有不同的看法.提出我都會接受~其實寫到xx面.我已快沒力~還是很遺憾有很多機種沒寫到.包括D-88.D-515.等及現行SONY主力機種~沒寫到的部份.就交給其他前輩了~。
日式品牌SONY的XR-3304型号的FM MW SW磁带车载音响安装说明说明书

InstallationPrecautions•Choose the installation location carefully so that the unit will not hamper the driver during driving.•Avoid installing the unit where it would be subject to high temperatures, such as from direct sunlight or hot air from the heater, or where it would be subject to dust, dirt or excessive vibration.•Use only the supplied mounting hardware for a safe and secure installation.Mounting angle adjustmentAdjust the mounting angle to less than 20°.How to Detach and Attach the Front PanelBefore installing the unit, detach the front panel.To detachPress the RELEASE button to open up the front panel, then pull it out. Then slide the front panel a little to the left, and pull it off towards you.To attachAlign the parts A and B, and push the front panel until it clicks.3-858-022-21(1)Installation/Connections###/### Sony Corporation©1996Printed in SingaporeXR-3304FM/MW/SW Cassette Car StereoMounting ExampleInstallation in the dashboardMounting the Unit in a Japanese CarThis unit may not be installed in some makes of cars. In this case, consult your nearest Sony dealer.Parts for Installation and Connection#####The numbers in the list are keyed to those in the instructions.#####The release key 4 is used for dismounting the unit. See the operating instructions manual for details.#################### •#### •#### •#### •###################################################SONY XR-C210 (E,S,C)3-800-373-71(1)ConnectionsCaution•This unit is designed for negative ground 12V DC operation only.•Before making connections, disconnect the ground terminal of the car battery to avoid short circuits.•Connect the yellow and red power input leads only after all other leads have been connected.•Be sure to connect the red power input lead to the positive 12 V power terminal which is energized when the ignition key is in the accessory position.•Run all earth wires to a common earth point.#########Reset ButtonWhen the installation and connections are over,be sure to press the reset button with a ball-point pen etc.Reset button####Connection Example############## •######### •######### •######### •######## •###########。
升级你的电视声音索尼HT-S350回音壁

升级你的电视声音索尼HT-S350回音壁作者:来源:《新潮电子》2020年第05期当你觉得用家里的电视机看电影大片时没有那种能让你声临其境的声音氛围时,说明你需要升级电视机声音了。
我们当然不让你拆开电视机,而是用另外一种更为便捷的方式——回音壁。
索尼新推出的高品质进阶级回音壁产品——HT-S350搭载索尼独家黑科技S-Force Pro前置虚拟环绕技术,通过一台前置条形音响和无线低音炮,能瞬间让你拥有堪比电影院般的音效。
极致简约虽然回音壁产品的外形都比较固定,但精于设计的索尼依然力求在外观设计上为用户带来更富艺术气息的产品。
作为极简主义美学的践行者,索尼设计师在HT-S350的外形材质上非常用心,其前置条形音响和低音炮均采用大面积富有质感和触感的金属网罩设计,从而为产品注入了艺术品般的视觉体验。
无线低音炮上扩大的倒相管出口,不仅从专业角度还是从外观上,都体现出HT-S350在低频方面具有强大冲击力。
此外,HT-S350机背还特别设计了壁挂孔,因此即便是壁挂电视机也能与之形成理想搭配。
便捷操作很多不了解回音壁产品的用户心中有个疑问,就是回音壁与电视机的连接与使用是否方便?其实这是完全不必担心的问题,因为回音壁在国外非常流行,就是因为使用方便才深受用户喜爱。
而且索尼推出了多款回音壁产品,HT-5350在連接方式上,配有一套完整的解决方案。
如果你的电视机有支持ARC功能的HDMI接口(只要不是太老的电视机,都具有支持ARC功能的HMDI接口),那么就可以通过此接口用HDMI连接HT-5350即可完成画面与声音的同时传速。
如果你的电视不支持HDMIARC也没关系,也可以通过HDMI和光纤完成视频和声音的传输。
另外一个好消息是,HT-S350还支持蓝牙功能。
因此,HT-5350还能摇身一变成为蓝牙音箱,让高音质为音乐插上翅膀,在你的家中翱翔。
高音质技术连接固然方便,但音质才是我们向大家推荐HT-5350最重要的原因。
Sony MHC-V75D 音响系统用户手册说明书

WARRANTY:We at DigiT ech®are proud of our products and back-up each one with the following warranty:1.The warranty registration card must be mailed within ten days after purchase date to validate thiswarranty.2.DigiT ech warrants this product,when used solely within the U.S.,to be free from defects in materialsand workmanship under normal use and service.3.DigiT ech liability under this warranty is limited to repairing or replacing defective materials that showevidence of defect,provided the product is returned to DigiT ech WITH RETURN AUTHORIZATION, where all parts and labor will be covered up to a period of one year (this warranty is extended to a period of six years when the product has been properly registered by mail or through our website).A Return Authorization number may be obtained from DigiT ech by telephone.The company shall notbe liable for any consequential damage as a result of the product's use in any circuit or assembly.4.Proof-of-purchase is considered to be the burden of the consumer.5.DigiT ech reserves the right to make changes in design,or make additions to,or improvements uponthis product without incurring any obligation to install the same on products previously manufactured.6.The consumer forfeits the benefits of this warranty if the product's main assembly is opened andtampered with by anyone other than a certified DigiT ech technician or,if the product is used with AC voltages outside of the range suggested by the manufacturer.7.The foregoing is in lieu of all other warranties,expressed or implied,and DigiT ech neither assumes norauthorizes any person to assume any obligation or liability in connection with the sale of this product.In no event shall DigiT ech or its dealers be liable for special or consequential damages or from any delay in the performance of this warranty due to causes beyond their control.NOTE:The information contained in this manual is subject to change at any time without notification.Some information contained in this manual may also be inaccurate due to undocumented changes in the product or operating system since this version of the manual was completed.The information contained in this version of theowner's manual supersedes all previous versions.Included ItemsThe DigiT ech ® Scott Ian Black-13™ Artist Series Pedal includes the following items:• DigiT ech Scott Ian Black-13TM Artist Series Pedal • Artist Series Pedal Gig Bag • Scott Ian Artist Series Guitar Pick • PS200R Power Supply • This Owner’s Manual • Battery Notice• DigiT ech Warranty Card • DigiT ech BrochurePlease make sure that all of these items have been included before you get started.Congratulations and special thanks from DigiT ech ®for choosing the Scott Ian Black-13™ Artist Series P edal .DigiT ech’s philosophy for developing products begins with the desire to provide every guitarist with the best-sounding,most creative tools possible.T o this end,our revolutionary technology,ProductionModeling ™,was designed to help reproduce the studio and live sounds and effects of an artist as heard on their recordings.This includes modeling the speaker cabinets,microphones with their placements,pre/post effects,and the recording engineer’s magic all in one pedal.The Black-13TM Artist Series Pedal is the product of ourcollaboration with Scott Ian,the world famous guitarist for the bands Anthrax and S.O.D..Scott’s aggressive playing style helped create and define old-school metal,thrash,nu-metal and even rap music genres.The Black-13 pedal models seven of Scott’s signature tones from songs like “Madhouse” with Scott’s devastating rhythm crunch from his early years with Anthrax,“Finale” with its dramatic delay and eerie pitch shift effect,to “What Doesn’t Die” which features Scott’s ultra-heavy,grinding tone.Mosh it Up with the Black-13!5.MODELSelects one of the seven different signa-ture Scott Ian tones:1.“I Am the Law”2.“Madhouse”3.“March of the S.O.D.”4.“Protest and Survive”5.“Room For One More”6.“What Doesn’t Die”7.“Finale”Please refer to the Knob Function Descriptions section on the following pages for a more detailed explanation of each model.6.INPUTConnect your instrument to this jack. Connecting a guitar cable to this jack sup-plies battery power even though the Indicator LED may not be lit.T o prolong battery life,disconnect all cables when not in use.7.Pedal Release PinsThese two pins are spring-loaded hinges that hold the pedal in place.Push thesepins in to release the pedal from the pedal chassis exposing the battery compartment and the serial number therein.(See the Battery Replacement Diagram at the end of this Owner’s Manual)8.PedalPress the pedal to turn the effect on and off.9.OUT 1 (AMP)Connect this output jack to your guitar amplifier.10.Indicator LEDThis LED indicates when the effect isturned on.If the LED becomes dim ordoes not light when using battery power(with the cables connected),the batteryneeds to be replaced.11.OUT 2 (MIXER)This output has been specifically designedfor use with a full range audio system.It is designed to be plugged directly into amixer or recording device for optimalperformance.MODEL 1.“I Am the Law,” Anthrax – Among the Living (1987)Model 1 captures the clearer,more sizzling distortion tone Scott used for “I Am the Law”.Use the CONTROL 1knob to boost or cut the low e theCONTROL 2knob to boost or cut the high frequencies.MODEL 2.“Madhouse,” Anthrax – Spreading the Disease (1985)Model 2 generates the more refined tone Scott used in “Madhouse”.Use the CONTROL 1knob to boost or cut the low e the CONTROL 2knob to boost or cut the high frequencies.MODEL 3.“March of the S.O.D.,” S.O.D.– S.E.D.(1985)This is the classic “grind” distortion tone Scott pioneered and utilized in “March of the S.O.D.”.Use the CONTROL 1knob to boost or cut the low e theCONTROL 2knob to boost or cut the high frequencies.Model DescriptionsNOTE:Set the CONTROL 1 and CONTROL 2knobs to the12 o’clock position to most accurately recreate each tone as it sounds in the original recordings.MODEL 7.“Finale,” Anthrax – State of Euphoria (1988)Model 7 is based on pitch-shifted delay effect Scott used during the opening muted bar chords of the song “Finale”.The CONTROL 1knob changes the amount of pitch-shifting in the delayed repeats.Setting the CONTROL 1knob fully clockwise will shift each repeat up 12 semitones,while setting the CONTROL 1knob fully counter-clockwise will shift each repeat down 12 semitones.Setting the CONTROL 1knob to the 12 o’clock positionrecreates the same pitch shift that Scott used in the original recording;if you want no pitch shift,set the CONTROL 1knob to the 2 o’clock position (approximately).TheCONTROL 2knob adjusts the delay time of the pitch-shifted repeat;turn it clockwise for longer delays,or counter-clockwise for shorter delays.MODEL 4.“Protest and Survive,” Anthrax – Attack of the Killer B’s (1991)This is based on the raw,more diffuse distortion tone Scott used for the intro to “Protest and Survive”.Use theCONTROL 1knob to boost or cut the low e the CONTROL 2knob to boost or cut the high frequencies.MODEL 5.“Room For One More,” Anthrax – Sound of White Noise (1993)Scott acheived this tone by combining three amps (aMarshall TM JCM 800,a Matchless TM ,and a Marshall Jubilee TM )with a T .C.Electronics TM Booster/Distortion e the CONTROL 1knob to boost or cut the lowe the CONTROL 2knob to boost or cut the high frequencies.MODEL 6.“What Doesn’t Die,” Anthrax – We’ve Come For You All (2003)This effect gives your guitar the more modern distortion tone Scott got with a Randall® amp and a BBE® Sonic Maximizer® e the CONTROL 1knob to boost or cut the low e the CONTROL 2knob to boost or cut the high frequencies.Setup Directions Array Follow these setup directions before use:1.T urn the volume down on the amplifier/mixer you are connecting to.2.Connect the pedal output to the amplifier and/or mixer input. (Please refer to the Connections Diagrams on the following pages.)3.Connect the guitar to the pedal input.(Please refer to the Connections Diagrams on the following pages.)4.Connect the power supply to the pedal.(Please refer to the Connections Diagrams on the following pages.)5.Set the pedal’s LEVEL control to the minimum position.6.T urn up your amplifier/mixer level to your desired listening level.7.T urn on the pedal by pressing the pedal switch and gradually turn upthe pedal’s LEVEL control to the desired listening level.Specifications:• Controls - LEVEL,CONTROL 1,CONTROL 2,MODEL,On/Off Pedal • Jacks - INPUT,OUT 1 (AMP),OUT 2 (MIXER)• Input Impedance - 1 MOhms• Output Impedance - 100 Ohms• Power Supply - Included DigiT ech PS200R or 9V Alkaline Dry Battery • Power Consumption - 0.75 Watts (w/PS200R power supply)• Battery Life - Approximately 4 hours (with continuous usage)• Dimensions - 4 15/16”(L) x 3 1/8”(W) x 2 1/8”(H)• Weight - 2 lbs.• Included Power SupplyPS200R - 100 (100V ~ 50/60Hz)PS200R - 120 (120V ~ 60Hz)PS200R - 230 (230V ~ 50Hz)PS200R - 240 (240V ~ 60Hz)Battery Replacementing the tip of a 1/4”guitar cable,push one of the release pins in on either side of the pedal,and remove the pedal from the pedal chassis.2.Remove the battery from the battery compartment and disconnect the battery cable.3.Connect a new battery to the battery cable and put it back in the battery compartment.Make sure the battery cable does not interfere with the spring or pedal switch arm.4.Place one hole of the pedal over its corresponding pin.5.Push the opposite pin in and lower the other side of the pedal into place over the depressed pin.Release the pin.When the pedal is properly fastened,both release pins are flush with the outer side of the pedal.。