pET22b-KOD使用说明
自动喂食器说明文作文

自动喂食器说明文作文英文回答:Automatic Pet Feeder Instruction Manual.Introduction.The Automatic Pet Feeder is a convenient and reliable device designed to provide your furry companion with food at scheduled times, even when you're away. This user manual will guide you through setting up, programming, and maintaining your Automatic Pet Feeder.Components.Pet Feeder Main Unit.Food Tray.Water Bottle (optional)。
Power Adapter.User Manual.Setup.1. Attach the Food Tray: Align the food tray with the slots on the main unit and push down to lock it in place.2. Connect the Water Bottle (optional): If you want to provide water to your pet, insert the water bottle into the designated slot and connect the hose to the nipple.3. Insert the Batteries: Open the battery compartment and insert 3 D-size alkaline batteries.4. Connect the Power Adapter: Plug the power adapter into the main unit and then into a power outlet.Programming.1. Set the Clock: Press the "Clock" button and use the "+" and "-" buttons to adjust the hour and minutes.2. Program Feeding Times: Press the "Feed" button and select the desired feeding time using the "+" and "-" buttons. You can program up to 4 feeding times per day.3. Set Meal Portions: Press the "Portion" button and use the "+" and "-" buttons to adjust the portion size for each feeding time.4. Confirm Settings: Press the "Confirm" button to save your settings.Operation.1. Automatic Feeding: The feeder will automatically dispense the selected portion of food at the programmed times.2. Manual Feeding: Press the "Feed" button anytime to manually dispense food.3. Water Dispenser (optional): The water bottle provides a continuous supply of water for your pet.Maintenance.Clean the Feeder Regularly: Remove the food tray and wash it with soap and water. Wipe down the main unit with a damp cloth.Replace Batteries: The batteries will last for approximately 6 months with regular use. Replace the batteries when the battery indicator light starts flashing.Check the Water Bottle (optional): Ensure the water bottle is always filled and the hose is securely connected.Troubleshooting.Feeder Not Dispensing Food: Check if the batteries are inserted correctly, if there is food in the tray, and if the feeding time is correctly programmed.Water Not Flowing: Check if the water bottle is properly inserted, if the hose is connected, and if there is water in the bottle.Food Tray Stuck: Gently shake the food tray to dislodge any stuck food. If the problem persists, contact customer support.Safety Precautions.Keep the feeder out of reach of children.Do not immerse the feeder in water.Unplug the feeder before cleaning or performing maintenance.Do not feed your pet hazardous or spoiled food.Warranty.The Automatic Pet Feeder comes with a manufacturer's warranty against defects in materials and workmanship for one year from the date of purchase.中文回答:自动喂食器使用说明书。
得力DL-220D微型针式打印机用户手册 说明书

DL-220D/DL-220B用户手册V1.0安全指引请在使用本产品前仔细阅读本手册,不要执行本手册中没有明确说明的操作。
未经授权的操作会导致错误或意外。
制造商对因错误操作而导致打印机出现的任何问题均不负责。
为了避免受到电击和伤害及防止损坏打印机,在接上电源之前,务请注意以下重要事项:●仔细阅读操作手册等说明文件。
●打印机必须平放在固定的台面上。
●避免震动、碰撞、高温和阳光直射、灰尘等。
●请勿将打印机置于潮湿的环境中,请勿让雨水等任何液体沾湿打印机。
●打印机应安放在接近插座的地方,方便操作者进行电源插头的拔插操作。
●确保电源的电压值与打印机所规定的电压值一致,避免与电冰箱等大功率或有干扰的电器同一电源。
●为保证安全操作,三脚插头必须插进三孔交流电源插座中,其中地线必须有效接地。
●电源延长线必须为三芯并正确连接,以提供接地。
●若交流电源插座与打印机插头不匹配,请更换合适的交流电源插座,以保证人员、设备的安全使用。
●连接打印机通讯电缆时,请先关闭打印机和计算机的电源,选用适合的联机电缆将打印机和计算机连接起来,并锁定卡口和旋紧螺丝。
●请勿接触打印头外壳,以防止高温伤害。
●清洁打印机前,先关闭电源开关,从电源插座拔掉电源插头。
用软棉绒布沾少量中性清洁剂或酒精,轻抺打印机外部。
●如遇打印机发生故障,除认可的合格技术员外,不可擅自进行维修工作。
注:本手册内容如有更改,恕不另行通知。
目录第一章安装打印机 (4)1.1 开箱和检查 (4)1.2 放置打印机 (5)1.3 打印机部件 (6)1.4 打印机与主机连接 (7)1.5 连接电源 (8)1.6 安装纸卷 (9)1.7 安装色带 (10)1.8 安装驱动程序 (10)第二章控制面板操作 (14)2.1 指示灯 (14)2.2 走纸键 (14)第三章参数设置 (15)3.1如何进行参数设置 (15)3.2自检打印 (16)3.3系统设置 (17)3.4接口设置 (17)3.5纵向校正 (18)3.6十六进制 (18)3.7恢复出厂设置 (19)3.8安装智能助手工具 (20)第四章功能设置 (23)4.1 黑标设置 (23)4.1.1 黑标规格 (23)4.1.2 运行设置工具 (23)4.1.3 设置打印起始位置 (24)4.1.4 设置切纸位置 (25)4.1.4 设置黑标间距 (26)4.2 驱动属性设置 (26)4.2.2 钱箱设置 (26)4.2.3 黑标设置 (27)4.2.4 切刀设置 (27)第五章程序更新 (28)5.1 程序更新 (28)第六章故障处理 (30)6.1 指示灯与蜂鸣器 (30)6.2 打印错误 (30)6.3 卡纸处理 (31)6.4 清洁保养 (31)第七章规格参数与性能指标 (32)7.1 打印机规格 (32)7.2 通讯接口引脚 (33)7.2.1 USB接口 (33)7.2.2 钱箱接口 (33)7.2.3 串行接口 (34)7.2.4 并行接口 (34)7.3 电源适配器 (36)7.4 纸张规格 (37)第八章字符集 (38)8.1 通用代码页 (国际字符集: USA) (38)8.2 [PC437: USA, 欧洲标准] (39)8.3 [PC850: 多国文字] (40)8.4 [PC860: 葡萄牙文] (41)8.5 [PC863: 加拿大文-法文] (42)8.6 [PC865: 北欧文] (43)8.7 [PC858: 欧文] (44)8.8 [PC866: 古斯拉夫文 #2] (45)8.9 [KU42: 泰文] (46)8.10 [PC862: 希伯来文] (47)8.11 [PC737: 希腊文] (48)8.12 [PC864: 阿拉伯文] (49)8.13 [PC857: 土耳其文] (50)第九章指令集 (51)9.1 字符控制命令 (52)9.2 打印控制命令 (55)9.3 点图命令 (58)9.4 汉字命令 (59)9.5 黑标及切刀控制命令 (61)9.6 其他命令 (63)附录:电子信息产品污染控制的说明 (65)第一章 安装打印机1.1 开箱和检查打开纸箱,取出打印机并拆除保护材料。
D2CN-RE Platinum Pet Fountain 宠物喷泉饮水器说明书
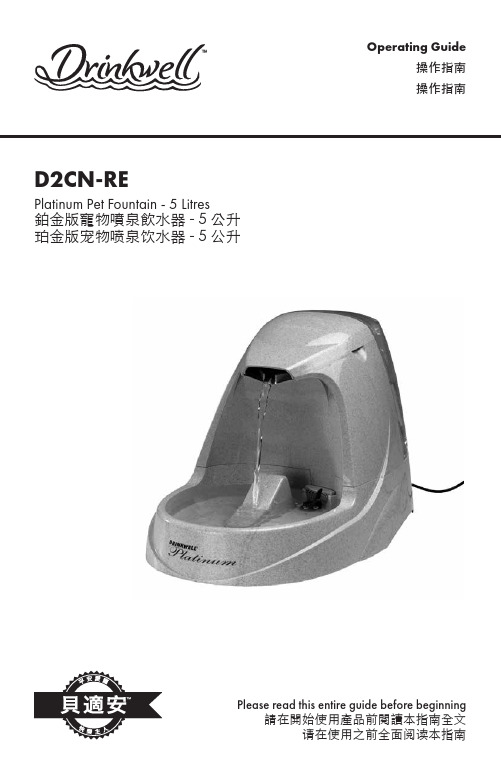
D2CN-REPlatinum Pet Fountain - 5 Litres 鉑金版寵物噴泉飲水器 - 5 公升珀金版宠物喷泉饮水器 - 5 公升Please read this entire guide before beginning 請在開始使用產品前閱讀本指南全文请在使用之前全面阅读本指南Operating Guide操作指南操作指南WaRNING indicates a hazardous situation which, if not avoided,could result in death or serious injury.CaUtION, used without the safety alert symbol, indicates ahazardous situation which, if not avoided, could result in harm toyour pet.NOtICE is used to address safe use practices not related topersonal injury.When using electrical appliances, basic safety precautions shouldalways be followed to reduce the risk of fire, electric shock and/orinjury to persons, including the following:• To reduce the risk of injury, close supervision is necessary whenan appliance is used by or near children.• To protect against electric shock, do not place Power Cord orplug in water or other liquids.• Only use attachments recommended or sold by themanufacturer.• Do not use outdoors. FOR INDOOR HOUSEHOLD USE ONLY.• Do not unplug by pulling on Power Cord. To unplug, grasp theplug, not the Power Cord.• Do not operate any appliance if it has a damaged Power Cordor plug, or if it is malfunctioning or has been damaged. CallCustomer Care Centre immediately for further instructions.• For a portable appliance - To reduce the risk of electrical shock,do not place or store an appliance where it can fall or be pulledinto a tub or sink.• Always unplug any appliance when not in use, before puttingon or taking off parts and before cleaning. Never pull on theelectrical Power Cord to remove the plug from the wall outlet.• Do not use an appliance for anything other than its intended use.• If the plug of this device gets wet, turn off the electricity to thatoutlet. Do not attempt to unplug.• Examine this appliance after installation. Do not plug in if thereis water on the Power Cord or plug.2 • Do not allow pets to chew on or swallow any parts. If you are concerned about the Power Cord, purchase a cord conduit (a hard plastic protector) at any hardware store.• The Pet Fountain parts are BPA-FREE. However, some animals have been known to be sensitive to plastic food and watercontainers. If your animal shows signs of an allergic reaction to the plastic, please discontinue use until you have consulted with your veterinarian.• The Pet Fountain is intended to run continuously (always plugged into electricity), as long as the water level is maintained and thePet Fountain is cleaned regularly. Be sure to check the Pet Fountain regularly to help prevent damage to the Pump, as the water may get consumed or evaporate causing the Pump to run dry.• Do not attempt repairs on the Pump yourself.• To avoid the possibility of the plug or outlet getting wet, the outlet should always be above the level of the Pet Fountain.• If an extension cord is necessary, an extension cord with a proper rating should be used.• The electrical use of this appliance is 2 watts.• Do not use appliance for anything other than intended use. The use of attachments not recommended or sold by the manufacturer may cause an unsafe condition. Do not modify the unit.• Do not install or store appliance where it will be exposed to weather or temperatures below 4.5° C.• Read and observe all important notices listed on the appliance and in the packaging.SaVE tHESE INStRUCtIONS 3Thank you for choosing the PetSafe® brand. You and your pet deserve acompanionship that includes memorable moments and a shared understandingtogether. Our products promote a lifestyle of protection, teaching and love; essentialsthat influence memories for a lifetime. If you have any questions about our products,please visit our website at or contact our Customer Care Centre.table of ContentsComponents (5)Features (5)Key Definitions (6)Operating Instructions (7)Pet Fountain Disassembly & Cleaning (8)Pet Fountain Reassembly (10)Pump Maintenance (11)The Pet Fountain and Your Environment (12)General Tips (13)Warranty and Customer Care (13)Compliance (14)Important Recycling Advice (14)Terms of Use and Limitation of Liability (15)traditional Chinese (16)Simplified Chinese (30)4 5T-CNS-CNComponents features Housing Housing Lid Bowlpump (motor) with flow Control Knob Reservoir Reservoir CapCharcoal filterInline plug & power Cordpre-filter Snap-On Lid Replaceable CharcoalFilter removes bad tastes & odours Pre-Filter Adjustable Flow Control5 L Water Capacity Reservoir reduces splash for nearlyLow-Voltage (12V) SystemKey DefinitionsHousing: The water is pumped up through the Housing to cycle through the Charcoal Filter and out the spout to create a waterfall into the Bowl.Housing Lid: The Housing Lid snaps in place over the Housing, keeping pets out ofthe Charcoal Filter.Charcoal filter: is a 3-layer carbon filter with granulated carbon made fromcoconut shells. The Charcoal Filter absorbs bad tastes and odours as the water passesthrough and helps keep the water tasting fresh and more appealing to pets.pre-filter: This small intake grate catches large particles such as hair and kibblebefore they reach the Charcoal Filter. The Pre-Filter can be removed by pulling up onthe lip at the top. To replace, slide back into place over the Flow Control Knob andpush down until it clamps around the knob.Bowl: The Bowl is the foundation of the Pet Fountain. It features two handles on eitherside of the Pet Fountain as well as a “cord channel” to hide the cord from view.flow Control Knob: The black knob attaches to the Faceplate and adjusts the rateof water flow. The Pre-Filter will snap around the neck of the Flow Control Knob whichwill lock it into place.pump (motor): The small submersible aquarium Pump can be dismantled forcleaning. Important: THE PUMP IS NOT DISHWASHER SAFE! Remove Pump fromPet Fountain before cleaning (See section “Pump Maintenance”). The Pump alsofeatures a removable Inline Plug for easy attachment.Reservoir: The extra capacity Reservoir holds over 1.89 litres of water. The Reservoir Cap will help to minimize spills when you refill the Reservoir.6 7Operating InstructionsImportant: DO NOT RUN DRY - FOR INDOOR USE ONLY. Pet Fountain will come fully assembled and ready for use.1. As with any electrical device, check the electrical Power Cord for any tears ordamage before use.2. Make sure the Inline Plug is connected. (No silver showing)3. Remove the Housing Lid by placing your index fingers into the inset groves oneither side of the Housing Lid. Lift up. Set the Housing Lid aside.4. Lift up the Reservoir andcheck to make sure theIntake Tube is properlyinserted into the Pump(fig. 1 & 2).5. Insert the Charcoal Filter. The Charcoal Filter will fit into the two triangular slots inthe centre of the Housing. The Charcoal Filter fits narrow side down and the black side faces the front of the Pet Fountain. The Charcoal Filter will slide easily into place.NOtE: Rinse the Charcoal Filter thoroughly under coolwater before placing into the Housing. This will remove any loose charcoal dust, which is harmless. A smallamount of charcoal dust may shed for the life of theCharcoal Filter. This is normal and not harmful to yourpet (fig. 3).6. Place the Pet Fountain in desired location. Do notpick up a full Pet Fountain by the Housing. Onlyuse the handles located on the bottom of the Bowlon either side of the Pet Fountain. If placing on carpet, tile or wood flooring use a protective surface such as a towel or placemat to protect your floor from splashing or dripping from your pet.7. Fill the Pet Fountain with water. This includes the Bowl and the Housing. This will prime the Pump. Replace the Housing Lid and snap into place.fig. 1fig. 2fig. 38 8. Remove the Reservoir by lifting up and away from the Pet Fountain. Turn theReservoir upside down and remove the Reservoir Cap. Fill the Reservoir with water and replace the Reservoir Cap. Holding the Reservoir upside down and backwards to the Pet Fountain (fig. 4), quickly turn the Reservoir right side up and slide into place (fig. 5). The water level will equalize to approximately 1.27 cm below the rim of the Bowl.9. Before you plug in the Pet Fountain make sure the Power Cord and your handsare dry. Plug the Pet Fountain into a standard electrical outlet.10. Set your desired flow rate with the Flow Control Knob,located to the right of the receiving ramp. In the 10o’clock position for a smaller stream or in the 2 o’clockposition for a stronger stream (fig. 6).11. Add water to the Bowl as needed. Do not let thewater level fall below the Flow Control Knob or youmay risk Pump failure. Replacement Pumps are soldseparately by contacting the Customer Care Centre at******************.pet fountain Disassembly & Cleaning Important: Pet Fountain must be cleaned to continue working normally.CHaRCOaL fILtERS: Change every 2 to 4 weeks.1. Charcoal Filters should be changed every two to four weeks. Replace CharcoalFilters more frequently when using the Pet Fountain for multiple pets or pets that produce a lot of saliva.2. Charcoal Filters are an added feature of the Pet Fountain. Their use is not requiredfor normal operation.3. Charcoal Filters may be rinsed out when the Pet Fountain is cleaned. Do not wash with soapy water since you cannot remove all the soap residue.fig. 4fig. 5mIN maX fig. 6 9T-CNS-CN EN pEt fOUNtaIN: Clean once a week.1. Unplug the Pet Fountain, remove Housing Lid andremove the Charcoal Filter.2. Remove the Reservoir.3. Empty the water out of the Pet Fountain.4. Remove the Pre-Filter by gently pulling up on the top lipof the Pre-Filter and wash with soap and water (fig. 7).5. Remove the Housing by gently pushing in on either side of the Pet Fountain wherethe curve meets the seam. Gently lift up (fig. 8-10).Important: You will notice the right side of the Housing will offer some resistance as the water Intake Tube pulls away from the Pump.6. Next, remove the Pump by disconnecting the Inline Plug (fig. 12), then lift it outof the Pet Fountain. Clean away any hair or kibble that may have accumulated around the Flow Control Knob and the Intake Plate of the Pump.7. Once the Pet Fountain is completely disassembled you will have 6 plastic parts.8. Clean the Pet Fountain parts with warm water and soap. You can also put the PetFountain in the dishwasher (not the Pump). Remove the Pump before placing in the dishwasher. It is recommended that you turn down the heat of the dishwasher if possible.9. If you have troubles reaching certain spots or hard-to-reach corners, try using acotton swab or purchase the Drinkwell ® Cleaning Kit, a 3-Brush Kit. To purchase a Cleaning Kit, visit our website at to locate a retailer near you *****************************************************.fig. 7fig. 8fig. 9fig. 10fig. 12Inline plug10 pet fountain Reassembly1. Replace the Pump into its location in between the three posts on the right side ofthe Pet Fountain. Gently push down to engage the suction cups. (fig. 13 & 14)2. Thread the plug through the opening next to the Pump. Under the arch you cantuck the Power Cord into “cord channels” (fig. 15), then move the Power Cord along the back of the Pet Fountain to the Power Cord “Pass-Through”. (fig. 16) Use this “Pass-Through” to keep the Power Cord from showing.3. Line up the Housing unit over the Pump and then the Bowl. You will want to lineup the Intake Tube to fit directly into the Pump. Once in place, gently push down, locking the Housing into place (fig. 17 & 18). fig. 13fig. 14fig. 15tubeT-CNS-CN EN 4. Replace the Pre-Filter over the Flow Control Knob bysliding the narrow end in first. The lip on the top of thePre-Filter should be facing the front of the Pet Fountain,push down to snap it into place (fig. 19).5. Replace the Charcoal Filter and the Housing Lid.6. Replace the Reservoir.pump maintenanceImportant: Cleaning the Pump is essential to the longevity of the Pet Fountain, as well as the cleanliness of the water. Clean the Pump every 2 weeks. Warranty may be voided if the Motor is not cleaned.1. Remove the Pre-Filter and Housing from the Bowl.2. Gently lift the Pump out of its resting place. Suction cups on the bottom of thePump will hold it in place. A small amount of force may be necessary.3. Once the Pump is out of the Pet Fountain, with your thumb and forefinger, gentlysqueeze on either side of the Faceplate, and pull it off. It may be necessary to insert a fingernail into the seam of the Faceplate to pry it off (fig. 20-21).fig. 19flow Control Knobfig. 20fig. 214. Next, you will want to remove the Intake Plate by placing your fingernailunderneath the small lip located on the narrow side of the tear drop shaped Intake Plate Pull-Tab and pull it out (fig. 22-23).5. Once the Intake Plate is removed, you can alsoremove the Impeller (white, 3-bladed propeller)which is held in place magnetically. To removethe Impeller, use a fingernail to get underneath ablade and lift out (fig. 24).6. Once the Pump is disassembled you can cleanthe parts with warm soapy water. Use a cottonswab or the “motor” brush from the Drinkwell ®Cleaning Kit to get into the Pump’s motor cavityand remove any build-up. For added disinfectingand hard water removal, clean the Motor with white vinegar.7. Once the parts are clean you can reassemble the Pump for use.a) Replace the Impeller.b) Replace the Intake Plate.c) Replace the Faceplate with the Flow Control Knob attached to it.the pet fountain and your Environment If you live in a humid environment and have problems with mold or algae, soak all Pet Fountain parts in a diluted vinegar solution (20% White Vinegar and 80% Water) for 10 minutes after regular cleaning. Also, pour the diluted vinegar solution into the Pump’s motor cavity.If you have hard water, small white mineral deposits may form on or inside the Pump. This can eventually prevent the Impeller from turning properly. To avoid replacement or damage to the Pump, please take the following precautions:• Clean the Pump more frequently.• Clean the Pump with a diluted vinegar solution weekly.• Use bottled water instead of tap water.fig. 22fig. 23fig. 24General tips• When being introduced to the Pet Fountain, your pet may be cautious of this new and unusual object. After beginning operation of your Pet Fountain, simply allow your pet to adjust at his or her own pace. Some pets may take several days or longer to begin use, while others will start right away.• Your pet may prefer that the Pet Fountain be placed away from their normal feeding area. Try placing it in another location, such as a different area of the kitchen or in a bathroom or utility room.• Add ice cubes to the Bowl for refreshing, ice-cold running water! Warranty and Customer CareThis product has the benefit of a 1 (one) year limited manufacturer’s warranty. This warranty does not cover damage from accidents, misuse or abuse. It also specifically excludes incidental or consequential damages as allowed by law. Loss of function as a result of lack of cleaning, debris or mineralization from “hard water” does not qualify under this warranty (Refer to cleaning instructions and environmental notes). Details of the warranty applicable to this product and its terms can be found at and/orareavailablebysendinganemailto:******************. Please contact your local Customer Care Centre with any set-up or technical difficulties you experience, and if necessary to assist in the replacement of your product. For a listing of Customer Care Centres in your area, visit our website at .ComplianceThis equipment complies with the EMC and Low Voltage Directives.Unauthorised changes or modifications to the product that are notapproved by Radio Systems Corporation may violate EU regulations,could void the user’s authority to operate the equipment, and will voidthe warranty.The Declaration of Conformity can be found at:/customercare/eu_docs.php. Important Recycling advicePlease respect the Waste Electrical and Electonic Equipment regulationsin your country. This equipment must be recycled. If you no longer requirethis equipment, do not place it in the normal municipal waste system.Please return it to where it was purchased in order that it can be placedin our recycling system. If this is not possible, please contact the CustomerCare Centre for further information.Covered by: U.S. Patents No. 5,799,609 / 5,842,437 / 7,757,636terms of Use and Limitation of Liability 1. terms of UseUse of this Product is subject to your acceptance without modification of the terms, conditions and notices contained herein. Use of this Product implies acceptance of all such terms, conditions and notices. If you do not wish to accept these terms, conditions, and notices, please return the Product, unused, in its original packaging and at your own cost and risk to the relevant Customer Care Centre together with proof of purchase for a full refund.2.proper UseIf you are unsure whether this Product is appropriate for your pet, please consult your veterinarian or certified trainer prior to use. Proper use includes, withoutlimitation, reviewing the entire Operating Guide and any specific Cautionstatements.3. No Unlawful or prohibited UseThis Product is designed for use with pets only. Using this Product in a way that is not intended could result in violation of Federal, State or local laws.4. Limitation of LiabilityIn no event shall Radio Systems Corporation or any of its associated companies be liable for (i) any indirect, punitive, incidental, special or consequential damage and/or (ii) any loss or damages whatsoever arising out of or connected with the misuse of this Product. The Purchaser assumes all risks and liability from the use of this Product to the fullest extent permissible by law. For the avoidance of doubt, nothing in this clause 4 shall limit Radio Systems Corporation’s liability for human death or personal injury or fraud or fraudulent misrepresentation.5. modification of terms and ConditionsRadio Systems Corporation reserves the right to change the terms, conditionsand notices governing this Product from time to time. If such changes have been notified to you prior to your use of this Product, they shall be binding on you as if incorporated herein.警告表示存在危險狀況,若不予避免可能會導致死亡或嚴重傷害。
所有质粒载体汇总
pEZZ18 pkk232-8,pkk 233-3,pACYC184,pBR322,pUC119 pTYB1,pTYB2,pTYB4,pTYB11 pBlueScript SK(+),pBlueScript SK(-) pLLP ompA, pINIIIompA, pMBP-P ,pMBP-C, 大肠杆菌冷激质 粒: pColdI pColdII pColdIII pColdTF 原核共表达质粒:pACYCduet1,pETduet-1,pCDFduet-1,pRSFduet-1 Takara公司大肠杆菌分子伴 侣: pG-KJE8 pGro7 pKJE7 pGTf2 pTf16 大肠杆菌宿主细胞: DH5a JM101 JM103 JM105 JM107 JM109 JM110 Top10 Top10F BL21(DE3) HB101 ER2529 E2566 C2566 MG1655 XL-10gold XL blue M15 JF1125 K802 SG1117 BL21(AI) BL21(DE3)plysS TG1 TB1 DH5a(pir) Tuner(DE3) Bl21 codonplusRIPL Novablue(DE3) Rosetta Rosetta(DE3) Rosetta(DE3)plys Rosetta-gami(DE3) RosettagamiB(DE3), Rosetta-gamiB(DE3)plysS Orgami(DE3) OrgamiB(DE3) HMS174(DE3) 植物表达/RNAi载体农杆菌pBI121,pBI121-GFP,pBI101,pBI221,pSN1301, pUN1301,pRTL2 , pRTL2-GFP , pRTL2-CFP, pRTL2-RFP , pRTL2YFP,pCAMBIA 1300, 1301, 1302,1303,1304,1305, 1381Z,1391Z,2300, 2301,3300,3301,pCAMBIA super1300,pCAMBIA super1300GFP,pPZP212,pPZP2121,pPZP212-GFP,pGDG,RNAi载 体pART27,pHANNIBAL,pKANNIBAL, pFGC5941,pTCK303, pTRV1,pTRV2, T-DNA插入载体(随机突变体库)pSKI015,pSKI074,真 菌ATMT载体pBIG2RHPH2-GUS-GFP,pBHt1 枯草芽孢杆菌表达载体pWB980,pHT43,pHP13,pHP43, pBE2,pMUTIN4,pUB110,pE194,pMA5, pMK3,pMK4,pHT304,pHY300PLK, pBest502,pDG1363,pSG1154,pAX01, pSAS144,pDL,pDG148-stu,pDG641, pAL12,pUCX05-bgaB,pHT01, 配套 菌株BS 168,WB600,WB800,WB700, WB800N,1012,FZB42,1A747,广宿主 质粒pVLT33
MG22 肉食与食品涂料机操作手册说明书

MG22 MEAT & FOOD GRINDEROPERATOR’S MANUALPersons under age 18 are not permitted to operate or haveaccessibilit y to operate this equipment per U.S. Dept. Of Labor Employment Standards Administration Fact Sheet No. ESA913.MG22 REV ATO INSURE BOTH SAFE AND TROUBLE-FREE PERFORMANCE,WE STRESS THAT ALL PERSONNEL THAT WILL BE INVOLVED WITH YOUR NEW UNIVEX MEAT GRINDER MUST READ AND UNDERSTAND THESE INSTRUCTIONS BEFORE ATTEMPTING TO OPERATE THIS UNIT.-------------------------WE APPRECIATE YOUR COOPERATION AND YOUR BUSINESS.SHOULD THERE BE A QUESTION OR IF WE CAN BE OF FURTHER ASSISTANCE,PLEASECALL US.1-603-893-6191TABLE OF CONTENTSDESCRIPTION PAGE TABLE OF CONTENTS (1)LIST OF ILLUSTRATIONS (1)INSPECTION (2)SAFETY (3)INSTALLATION (5)ASSEMBLY AND OPERATING INSTRUCTIONS (5)CLEANING INSTRUCTIONS (6)WARRANTY.....................................................................................................BACK COVERLIST OF ILLUSTRATIONSILLUSTRATION PAGE FIGURE1OVERALL VIEW (4)FIGURE2GRINDER ASSEMBLY (6)MG22MEAT GRINDERINSTRUCTION MANUALWelcome to UnivexThank you for purchasing this Univex Product.Your new MG22Meat Grinder has been designed with advanced performance and safety features that make it an excellent addition to your food preparation equipment.Like all Univex mixers,slicers,meat grinders and accessories,this power unit is engineered to provide years of reliable service.If you have any questions concerning the operation of this unit,or if we can be of further assistance,please call our Customer Service Department for the location of your nearest service representative.Univex Customer Service:USA&Canada800-258-6358International603-893-6191Or visit us on-line at under service agents.The UNIVEX Model MG22Meat Grinder consists of a1HP electric motor power base which drives a bell-shaped meat grinder designed to utilize industry standard#22knives and a full range of#22grinding plates.Included as standard equipment is a carbon steel knife,a3/16grinding plate,analuminum stomper,a16X24aluminum feed pan and a18.5X13.5storage container with a lid forcollecting meat as it is processed.The MG22meat grinder has safety and ease of operation built into it.The permanent safety guardpositioned over the bell-shaped feed hopper prevents accidental entry of the operator’s fingers and hands into the grinder.The readily removable feed pan and storage container provide ease of processing and cleaning.Noise emissions for this meat grinder are below70db.(A).INSPECTIONAll Univex MG22meat grinders are inspected prior to packaging to assure the machine quality,cor-rect inclusion of options,and the proper voltage.However,upon unpacking,all items should be care-fully inspected and verified that they are correct.Any damage,imperfections,or shortages should bereported immediately to your dealer or directly to the Univex Customer Service Department,and/or the shipping carrier.SAFETY IS OUR TOP PRIORITYREAD AND MAKE SURE THAT YOU UNDERSTAND THE INSTRUCTIONS AND SAFETY WARNINGS IN THIS BOOKLET BEFORE ATTEMPTING TO OPERATE THIS POWER UNIT.IT IS A VIOLATION OF UNITED STATES DEPARTMENT OF LABOR REGULATIONS TO PERMIT OPERATION OF THIS UNIT BY ANY PERSON UNDER THE AGE OF18YEARS.FIRST TIME OPERATORS SHOULD BE PROPERLY TRAINED IN SAFETY PRECAUTIONS AND IN THE PROPER USE AND SERVICING OF THIS EQUIPMENT AND ATTACHMENTS.SWITCH THE POWER“OFF”BEFORE CONNECTING THE UNIT TO THE POWER SOURCE.SWITCH THE POWER“OFF”AND DISCONNECT THE POWER SUPPLY CORD BEFORE MOUNT-ING OR DISMOUNTING ANY ATTACHMENT OR FOR CLEANING OR SERVICING THE UNITTHE KNIFE IS SHARP AND CAN CUT E CAUTION WHEN HANDLING THE KNIFE.ALWAYS SECURELY MOUNT THE GRINDER,FULLY INSERT THE WORM ASSEMBLY INTO THE DRIVE AND SNUG THE KNIFE,PLATE AND RING ONTO THE GRINDER BEFORE SWITCHING THE POWER ON.ALWAYS REMOVE THE GRINDER FROM THE POWER DRIVE UNIT BEFORE CLEANING. NEVER WASH OR RINSE THE GRINDER ASSEMBLY WHILE MOUNTED TO THE DRIVE UNIT AS THIS ILL INVITE ELECTRICAL SHOCK.WIPE DOWN THE EXTERIOR OF THE DRIVE UNIT ONLY,NEVER HOSE DOWN OR IMMERSE THE DRIVE UNIT IN WATER.DO NOT ATTEMPT TO SERVICE THE DRIVE ASSEMBLY.PLEASE CONTACT UNIVEX CORPORATION FOR THE NUMBER OF THE NEAREST AUTHORIZED SERVICE AGENT IN YOUR AREA FOR ADJUSTMENTS OR REPAIR.OVERALL VIEW OF THE MG222.POWER CORD8.STOMPER3.GRINDER MOUNTING KNOB9.FEED PAN4.POWER SWITCH10.FEED PAN SUPPORT5.TUB CLIP11.TUB&COVER(NOT SHOWN)6.GRINDER ASSEMBLYINSTALLATION•This is a table-top unit.The grinder may be secured to a table top via the shipping bolt threaded holes on the bottom of the power drive housing.•Insure that the grinder is located on a flat,level and stable surface.There should be sufficientclearance around the grinder for safety and ease of operation.Sufficient space must be provided for the feed pan and the clip-on storage container.•The feed pan support bracket must be assembled onto the housing cover using the screwsprovided.ASSEMBLY AND OPERATING INSTRUCTIONSASSEMBLY:WARNING:DISCONNECT THE ELECTRICAL POWER SUPPLY CORD PRIOR TO ASSEMBLY.1.Mount the grinder housing onto the studs on the power drive housing and firmly tighten themounting knobs.2.Slide the worm assembly into the grinder housing and into the drive coupling in the power driveunit.3.Slide the knife,with the sharp edges toward the plate,onto the square on the worm assembly.4.Slide the plate onto the worm assembly and screw the ring onto the grinder housing until it is justsnug.Too much pressure on the ring can damage the grinder.WARNING:The knife is very sharp and can cut fingers.5.Place the feed pan onto the pan support and over the grinder throat making sure to align thelocating pin with the small hole in the feed pan.6.Locate the storage container under the clip and resting on the front legs of the power unit.7.Connect the electrical power supply cord and turn on the power switch.WARNING:NEVER put fingers or utensils into the throat of the grinder or the knife and plate. PROCESS:1.Cut meat to be processed to fit under or through the safety guard.The recommended size is1½thick X3inches wide X12inches long.Place the meat strips into the feed pan.2.With the grinder running,slide the product under the guard on the grinder housing or through theopening in the top of the grinder e the meat stomper to guide the product into thegrinder.3.Collect the ground meat in the storage container.CLEANING INSTRUCTIONS1.Turn the grinder off and disconnect the power supply cord.2.Disassemble the grinder in the reverse order of the assembly instructions:Remove the storage container and feed pan.Remove the ring,plate and knife.WARNING:The knife is very sharp and can cut fingers.Slide the worm assembly from the grinder housing.Unscrew the two knobs and remove the grinder housing from the power unit.3.Wash all the components including the drive e the brush provided to clean areas thatare difficult to access.Rinse,sanitize and air dry the components4.Apply a small amount of food grade lubricant to the bronze bushing located inside the grinderhousing before use.GRINDER ASSEMBLYFIGURE2MG22ACCESSORIESPlate3/16 Standard 1000727Plate1/4 Optional 1000728Plate1/2 Optional 1000730Sausage Stuffe1/2 Optional 1000733Plate1/8 Optional 1000726Plate3/8 Optional 1000729KnifeStandard 1000725Sausage Stuffer3/4 Optional 1000734WarrantyThe Univex MG22 Meat Grinder carries a one-year, on-site parts and labor warranty against any defects in materials or workmanship. The one-year period begins on the date of purchase by the end user and remains in full effect provided the unit is used properly and in accordance with our instructions. Any work to be performed under this warranty must be performed between the hours of 8:00 am and 5:00 pm local time, Monday through Friday. Univex will not cover overtime charges of any kind. Please call the Univex Warranty Service Department at 800-258-6358 to report warranty claims before arranging repair or attempting to return the unit to Univex Corporation. Damages incurred in transit or incurred because of installation error, accident, alteration, or misuse are not covered by this warranty. Transit damages should be reported to the carrier immediately.Univex will not be liable for any consequential, compensatory, incidental or special damages.。
兄弟标签打印机使用方法

兄弟标签打印机使用方法第一篇:兄弟标签打印机使用方法兄弟标签打印机使用方法1、初始化初始化是指输入的文本、保存的文件全部清空,所有设定都恢复到购买时的初始设定值。
请在充分确认是否可以初始化后再执行初始化操作。
2、选择“设定”,分别选择尺寸--执行――尺寸大――执行;长度――执行――自动――执行;空白设定――执行――不送带――执行;3、设定打印内容:例如:需打印:Z1501Z1501B1211B1211内容的标签步骤:按照步骤1、2所述进行设定;在1>后,输入Z1501;换行;在2>后,输入B1211;打印――切割(备注:切掉尾巴)送带;打印;送带;切割;第二篇:兄弟PT-2100标签机兄弟PT-2100标签机8个文字×3行液晶显示屏标准的传统键盘布局(符合人体工程学)标签色带宽度从3.5mm-18mm,最多打印7行文字本机自带9种国际标准条形码,连接电脑可打印16种条形码7种字体大小,5种字体修饰最多可保存1,674字符产品介绍使用便捷的办公领域标准机型。
便携式/电脑两用型标签机PT-2100还可用附送的编辑软件与电脑连接,打印文本、图形或导入一个数据库如(EXCEL),打印其中的部分或全部记录。
预设多种常用的标签模板,机器内置9种条形码协议,便于您随时随地使用。
PT-2100参数详解使用场所:办公室、工厂等功能:打印精度180dpi、内置多种图形符号、3.5mm-18mmTZ 系列覆膜标签色带特点:内置预设模板、自动切刀、存储功能;可序号、重复和镜像打印;可打印多种国际标准条形码(符合ANSIx3.182)需求:条形码打印、竖版打印、既能便携又能连接电脑打印标签接口:USB(仅适用于PC)兼容性:仅Windows 98 / Me / 2000 Pro / XP操作系统PT-2100主要特点打印精度180dpi,可以输出文本、商标、条形码、图形符号简单易用的模板功能,内置定式标签模板、任意标签模板、线缆标签模板内置自动切刀,根据文本及图形的长度自动剪切标签PT-2100产品包装兄弟PT-2100机器一台TZ系列标准覆膜标签色带一盒AC电源适配器USB数据线P-touch编辑软件及驱动安装光盘用户手册(附保修卡)第三篇:使用方法第42卷第1期微电子学Vol.41, No.1 模板使用方法:请将文章拷贝到模板里,选择“格式”菜单中的“样式和格式”命令,然后再按本说明选择相应的格式。
半自动PET吹瓶机使用说明书
使用说明书◆达意隆集团◆广州市日精机电设备制造有限公司目录一、概述 (1)二、主要技术参数 (1)三、机器的安装 (2)四、安全及注意事项 (2)五、机器的调整 (3)六、机器的操作 (4)七、机器常见故障及排除方法 (5)八、产品常见缺陷及处理方法 (6)九、设备保养 (7)十、附图A、气动系统图B、模板尺寸图C、电气原理图D、机器总图E、附图一一、概述CP22系列直压式吹瓶机是由PLC控制、属国内首创直压式锁模、高压吹气的二步法PET吹瓶机,可配套使用红外线加温设备。
它由机械、电气、气动等系统构成,对加热瓶坯完成拉伸、吹制工作。
特别适用于吹制0.5-6升油瓶、五爪可乐瓶、化妆品瓶、省料水瓶、糖果、食品等PET包装瓶。
直压式锁模高压吹瓶机与旧链杆式低压吹瓶机比较主要有以下特点:1、锁模力大,可以从5吨-30吨调整;2、锁模行程大,行程从100-280mm,调整方便;3、模具安装方便,不需要调模厚;4、采用低压合模,高压锁模,确保安全和保护模具;5、采用德国高压吹气阀,吹气压力达3.5Mpa;6、开合模速度快,而且运行平稳,无振动现象;7、整机生产率提高15%;8、大部分零配件采用国际名牌产品,确保吹瓶机性能稳定,可靠性高,寿命长等特点。
二、主要技术参数注:生产效率及瓶子容量视瓶形状及模具尺寸而定。
三、机器的安装1、机器运到工厂以后首先检查机器各部件是否有松动,电气接线是否连接牢固。
如有不牢或有松动,则应加以紧固。
2、机器必须安装在水平的地板上。
调节地脚螺钉,使机器保持水平。
3、电气部分使用单相220V电源,电源线的截面积须大于4mm2,同时机器必须有良好的接地,以保证人身安全。
4、机器使用的气源分为两路,控制回路的气源通过一条10mm2气管连接,气源压力应能保持0.8-1.0Mpa,工作气压则应调节减压阀使其为0.6-0.8Mpa。
吹瓶回路通过IZG1/2的接头接入,气源压力为小于或等于3.0Mpa。
塑料用系列增白剂产品说明书
外观(粉末)
淡黄绿色粉末
淡黄色粉末
黄色粉末
淡黄绿色
色光
荧光白至微红
荧光白,微呈红
纯白至微蓝
荧光白
荧光强度,相当于标准品
100
100
100
100
化学结构
二苯乙烯
二苯乙烯复配物
二苯乙烯复配物
二苯乙烯衍生物
离子性
非离子
非离子
非离子
非离子
用量ppm
75~500
200~500
200~500
200~500
外观(粉末)
浅黄色粉末
微黄色粉末
浅黄色粉末
色光
微青
微青
微红
荧光强度,相当于标准品
100
100
100
化学结构
二苯乙烯复配物
二苯乙烯复配物
二苯乙烯复配物
离子性
非离子
非离子
非离子
用量ppm
100~1000
100~1000
100~500
应用
PVC扣板、电缆料母料、管材、型材
PVC扣板、电缆料母料、管材、型材
PVC扣板、电缆料母料、管材、型材
聚氯乙烯(PVC)系列荧光增白剂(调色型)
HONGDA
KOB-F
KOB-K
KBF-201
KBF-202
特性
Color Index NO.
外观(粉末)
灰绿色粉末
土黄色粉末
灰白色粉末
暗黄绿色
色光
纯白至微蓝
偏蓝,微呈红
纯白至微蓝
纯白至微红
荧光强度,相当于标准品
100
100
微黄至白色
浅黄色粉末
地贝 FC22 无线真空吸尘器 使用说明书
FC22无线真空吸尘器使用说明书Instruction Manual在使用本产品前,请务必仔细阅读本说明书。
请务必妥善保管好本书,以便日后能随时查阅请在充分理解内容的基础上,正确使用全国统一服务热线 : 400-828-2055感谢您购买地贝品牌家用清洁电器产品,地贝电器始终秉持“用心创造好产品”的企业理念,致力于带给用户更多质量优,性能佳的家用电器产品。
为了方便您的使用,请认真阅读此说明书,了解如何安全、正确的操作本产品,并从中获得 理想的使用效果。
此说明书包括截止印刷时的最新信息,本公司全权负责该手册的修订、解释及说明。
本公司的策略是不断对产品进行修改,因此本公司保留说明书印刷后更改产品而不另行通知的权利。
在使用过程中,如果您对本公司产品有任何的疑问和建议,欢迎拨打我们的服务热线: 400- 828-2055,我们将竭诚为您服务!安全使用指南 .............................................................................................1-2产品部件介绍 .....................................................................................................................3-4使用方法 ..............................................................................................................................5-12 使用地刷 ........................................................................................................................5-7 使用附件 (8)充电 (9)更换电池 (10)清洁方法 ........................................................................................................................10-12常见故障 (13)产品参数 (13)注意事项 (13)售后服务 ………………………………………………………………………………………………………………14-15注意:请在正式使用前仔细阅读使用说明,请保存好说明书以便以后查阅。
二穗短柄草(Brachypodium distachyon)BdAD1基因的克隆、表达及功能分析
二穗短柄草(Brachypodium distachyon)BdAD1基因的克隆、表达及功能分析齐旭莉;肖亮;刘奕彤;沈红祥;刘清波;蒋建雄【摘要】本研究利用生物信息学结合RT-PCR技术从二穗短柄草(Brachypodium distachyon)中克隆出BdAD1的cDNA基因,该基因编码一个包含500个氨基酸残基的乙醛脱氢酶家族蛋白.系统进化关系分析表明,该BdAD1蛋白序列与小麦(Triticum aestivum)、羊草(Leymus chinensis)和大麦(Hordeum vulgare)的同源蛋白具有较近的亲缘关系.BdAD1基因在植物细胞的细胞核和细胞质中均有表达,而且BdAD1蛋白兼具松柏醛脱氢酶和芥子醛脱氢酶的活性(CALDH/SALDH),可将松柏醛与芥子醛分别酶解生成阿魏酸和芥子酸,但它对松柏醛的催化效率显著高于芥子醛,因此推测BdAD1可能在苯丙烷代谢途径中对阿魏酸的合成具有重要的调控作用.%The full-length cDNA of BdAD1 gene was isolated from Brachypodium distachyon using a method of RT-PCR combined with the bioinformatics.BdAD1 codes a protein of 500 amino acid residues that belongs to the aldehyde dehydrogenase family and has a high sequence homology with those from Triticum aestivum,Leymus chinensis and Hordeum vulgare.BdAD1 gene expresses in both cell nucleus and cytoplasm.It was revealed by HPLC that BdAD1 combines the catalytic activity of coniferylaldehyde dehydrogenase and sinapaldehyde dehydrogenase for it can hydrolyze coniferyl aldehyde and sinapic aldehyde into ferulic acid and sinapic acid,respectively,but its activity to coniferyl aldehyde is obviously higher than to sinapic aldehyde,indicatingthat BdAD1 might play an important regulating role to ferulic acid biosynthesis in phenylpropanoid pathway of plant.【期刊名称】《激光生物学报》【年(卷),期】2017(026)002【总页数】8页(P168-175)【关键词】二穗短柄草;BdAD1;亚细胞定位;原核表达;松柏醛脱氢酶/芥子醛脱氢酶活性【作者】齐旭莉;肖亮;刘奕彤;沈红祥;刘清波;蒋建雄【作者单位】湖南农业大学生物科学技术学院, 湖南长沙410128;湖南农业大学生物科学技术学院, 湖南长沙410128;江苏大学环境与安全工程学院生物质能源研究所,江苏镇江212013;上海航天控制技术研究所, 上海 201109;湖南农业大学生物科学技术学院, 湖南长沙410128;江苏大学环境与安全工程学院生物质能源研究所,江苏镇江212013【正文语种】中文【中图分类】Q751阿魏酸(ferulic acid, FA)是半纤维素分子之间以及半纤维素与木质素分子之间共价交联的“桥梁”,在植物细胞壁复杂异质的高分子网络结构形成及其木质化过程中起关键作用,它使细胞壁变得坚固,阻碍了纤维素酶、木聚糖酶等木质纤维素降解酶对细胞壁的降解转化[1-2]。