抽油烟机说明书
cxw200204e说明书

cxw200204e说明书
一、在关机状况下,按“强”“弱”键,可启动烟机,运行在强风/弱风状况,“强”“弱”键拥有互锁功能。
二、“灯”键用于单独节制照明灯,按1下灯亮,再按1下灯灭。
三、在开机状况下,按“关”键,使运行状况下的烟机休止工作。
华帝油烟机使用注意事项:
一、抽油烟机排出的气体不应排到用于排出焚烧煤气或者其它的烟雾使用的热烟道中,以防火灾的产生。
二、抽油烟机在炉灶损耗煤气或者其它时使用,房间必需透风优良。
三、制止炉火直接烘烤抽油烟机。
四、必需使用可靠接地的电源插座。
鑫家乐抽油烟机使用说明书
鑫家乐抽油烟机使用说明书
1.油烟机应该使用有可靠接地的插座,请勿将地线接于煤气管、自来水管、避雷针及电话线上。
2.使用过程中如果出现噪音大,吸力弱等现象的请定期清洁油烟机。
3.请勿使用硬物清洁油烟机表面,请使用中性洗涤剂清洁油烟机,清擦机器时注意前面板的控制部分避免进水。
4.清洗油烟机时必须拔掉电源。
5、周围环境应避免门窗敞开过多或关闭而产生空气对流,影响
排烟效果。
6、排出的废气,不允许排到热的烟道中。
7、当油烟机使用时存留在集油杯中的污油存至80%时,应当及
时清空,以免造成过满溢出的现象。
8、为了获得良好的排烟效果,最好在烹饪前开启吸油烟机1-2
分钟。
9、更换灯泡或清洗吸油烟机前,都应拔掉插头切断电源;清洗
时请用中性洗涤剂和软布,以免损坏外壳表面或涂层。
10、在更换油烟机灯泡时,功率不要超过说明书上标示的最大值。
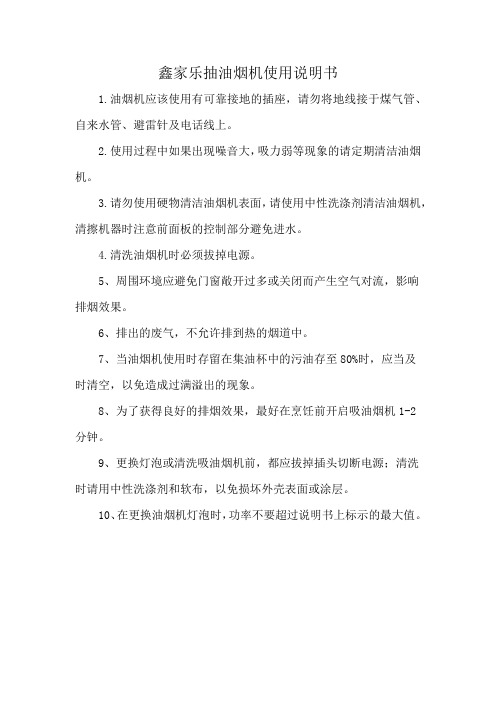
德国宝 TF-600W TF-900W 抽拉式抽油烟机 说明书
TF-600W TF-900W抽拉式抽油煙機SLIDE-OUT TYPE RANGE HOOD目錄TABLE OF CONTENTS注意事項 NOTICE BEFORE USE P.3產品結構 PRODUCT STRUCTURE P.4安裝說明 INSTALLATION INSTRUCTIONS P.5操作說明OPERATING INSTRUCTIONS P.7清潔與維護 CARE & MAINTENANCE P.8技術規格 TECHNICAL SPECIFICATIONS P.9保用條款 WARRANTY TERMS & CONDITIONS P.11重要說明為安全起見,初次使用產品前請先細閱本說明書,並保存說明書,以便日後作參考之用。
本產品只供家居使用。
請必須依照本說明書內的指示安裝及操作。
˙ 抽油煙機必須由總代理或合格技師安裝,以免 產生危險。
˙ 確保抽油煙機必須直接安裝在牆上或吊櫃的底 下部份。
˙ 切勿將抽油煙機安裝於接近窗口位置,以免被 雨水沾濕,引致危險。
˙ 切勿將抽油煙機或電源線放入水中或以液體噴 射,以免觸電。
˙ 進行維修保養前,先切斷電源。
˙ 拆下零件清洗或裝回零件前必須先關掉雙極開 關掣。
˙ 切勿在有易燃氣體或有爆炸物品的環境下操作 抽油煙機。
˙ 如電源線損壞或抽油煙機發生故障、跌撞或有 任何損壞,切勿操作抽油煙機。
˙ 切勿讓電源線接觸熱的表面。
˙ 抽油煙機操作時不要裝拆或檢查過濾網。
˙ 長時間使用後,不要接觸照明燈。
˙ 此抽油煙機只可作家居用途,不可作工商業 用途。
˙ 在未完全安裝及調校抽油煙機前,切勿開動抽 油煙機。
˙ 因未有完全遵照此說明書而引致的損失,德國 寶概不負責。
警告當電源線損壞,必須由德國寶或合格技師更換, 免生危險。
本抽油煙機符合EMC89/336/EEC及修訂後的92/31/EEC及93/68/EEC。
如室內裝有燃氣爐具而不是對衡式的,必須確保 室內有足夠的空氣入口。
泊美棋抽油烟机都有说明书

泊美棋抽油烟机都有说明书一、泊美棋抽油烟机1.使用时,检查吸油烟机安装是否牢固,电源电压是否与性能表上一致。
2.按照控制面板或开关按键上的指示,开关电机或选择风速档位。
3.烹饪前先开启吸油烟机,使进风口处于负压状态,烹饪完毕应继续让机工作2-3分钟,以保证把油烟完全排净。
4.烹调时,将自动/手动开关灯打至手动状态,然后根据需要选择快慢档,当油浓度大时用快档,反则用慢档。
5.烹饪完毕,将自动/手动开关打至自动状态,待2-5分钟后,机器处于全自动监控状态,当室内有害气体达到一定浓度时,监控器发出声光报警,同时电机会自动运行,当室内有害气体浓度降低后,本机仍会运行几分钟后才停机,恢复到自动监控状态。
(只限于全自动机型)。
6.在光线较暗时,可使用专设照明装置。
7.气敏调节,顺时针方向调节时,灵敏度高,反之,则灵敏度低。
(只限于带电脑监控器机型)。
8.本机当换气扇使用时,可维护室内空气清新。
二、使用注意事项:1.请用户注意本地区的电源电压,频率与产口使用所要求电压频率相符合。
2.吸油烟机要使用独立的电源插座,插座具有接地的三相插头,用户不可擅自改动。
不得改为两极插头,切记!切记!。
3.使用按键时,不要用力过猛,以免损坏按键开关。
4.使用过程中,如出现异常情况(异常噪音、气味、烟雾、发热等)应立即关闭电源,拔掉插头,如发现属机器故障,立即与当地经销商或维修点联系。
5.当需更换灯泡时,有先将电源插头拔掉。
6.烹饪时请勿让锅中燃火,以免燃烧坏吸油烟机机体,灶具空烧时应及时关机。
7.安全网罩因长期工作在油雾中,表面积油属正常现象,需要清洗时,请先关机并拔掉电源插头。
8.当油杯所盛的污油达到80%时,就必须倒弃,污油倒弃后可用清洁剂清洗油杯。
警告:1.禁止炉火直接烘烤吸油烟机。
2.电源电压低于180V,高于240V,都极易烧坏电机。
3.要经常清洗扇叶和其它部位上的油污和积垢。
4.吸油烟机的过滤器装置要经常取出进行清洁或更换。
sensmes CXW-218油烟机 说明书

sensmes CXW-218油烟机说明书
清洗前需要先拆卸清洗件,切断抽油烟机电源后把油烟机从吊装位置卸下,最好找个旧摩托车外胎或是类似的汽车外胎,使用相应工具对其进行解体,其顺序为:取出照明灯泡、集油盒、底面板、密封圈、叶轮,最后提出机体内芯。
然后进行浸泡清洗件,利用一个较大的容器,里边放置拆下的部件再倒入清洗液进行浸泡。
清洗液选用原料及配制方法是:清洁剂几滴、食醋50毫升,兑上热水进行混合并搅拌均匀。
在刷洗污件,需把经过浸泡后的油污部件用铁刷、毛刷蘸清洗液进行反复清洗,一般污染不重的抽油烟机通过刷洗就可以清洗干净。
对使用时间较久,油污严重的则要采取特殊清洗措施。
这些步骤其实看着很容易,但是具体操作起来很难。
没有专业的知识大家一定不要私自拆洗。
如果吸油烟机经常拆洗会存在装配不到位、加快磨损等风险,最后的结果只能是越拆声音越大,吸油效果越来越差。
A70 半嵌入式抽油烟机 中文操作手册说明书
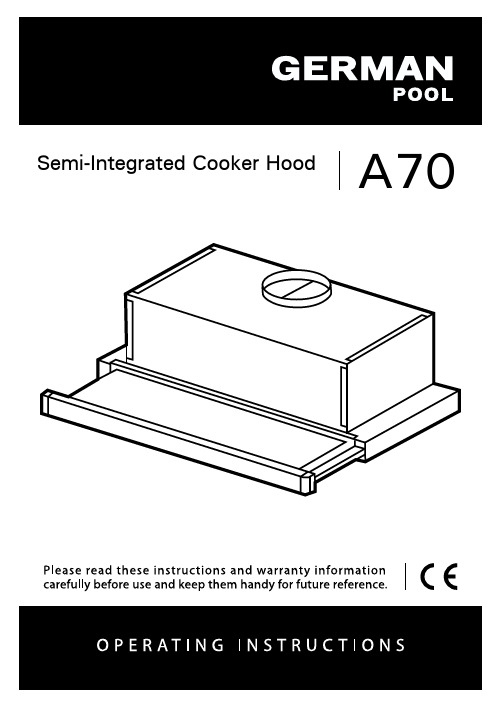
A70 Semi-Integrated Cooker HoodINDEXRECOMMENDATIONS AND SUGGESTIONS (3)CHARACTERISTICS (6)INSTALLATION (7)USE (9)MAINTENANCE (10)RECOMMENDATIONS AND SUGGESTIONSThe Instructions for Use apply to several versions of this appliance.Accordingly, you may find descriptions of individual features that do not apply to your specific appliance.INSTALLATION•The manufacturer will not be held liable for any damages resulting from incorrect or improper installation.• The minimum safety distance between the cooker topand the extractor hood is 650 mm (some models canbe installed at a lower height, please refer to theparagraphs on working dimensions and installation).• Check that the mains voltage corresponds to thatindicated on the rating plate fixed to the inside of thehood.• For Class I appliances, check that the domesticpower supply guarantees adequate earthing.Connect the extractor to the exhaust flue through a pipe of minimum diameter Ø 125 /5” , Ø 152/6” . The route of the flue must be as short as possible. • Do not connect the extractor hood to exhaust ducts carrying combustion fumes (boilers, fireplaces, etc.).• If the extractor is used in conjunction with non-electrical appliances (e.g. gas burningappliances), a sufficient degree of aeration mustbe guaranteed in the room in order to prevent thebackflow of exhaust gas. The kitchen must havean opening communicating directly with the openair in order to guarantee the entry of clean air.When the cooker hood is used in conjunction withappliances supplied with energy other than electric, the negative pressure in the room must not exceed 0,04 mbar to prevent fumes being drawn back into the room by the cooker hood.• In the event of damage to the power cable, it must be replaced by the manufacturer or by the technical service department, in order to prevent any risks.• If the instructions for installation for the gas hob specify a greater distance specified above, this has to be taken into account. Regulations concerning the discharge of air have to be fulfilled.• Use only screws and small parts in support of the hood.Warning: Failure to install the screws or fixing device in accordance with these instructions may result in electrical hazards.• Connect the hood to the mains through a two-pole switch having a contact gap of at least 3 mm.USE•The extractor hood has been designed exclusively for domestic use to eliminate kitchen smells.• Never use the hood for purposes other than for which it has been designed. • Never leave high naked flames under the hood when it is in operation. • Adjust the flame intensity to direct it onto the bottom of the pan only, making sure that it does not engulf the sides.• Deep fat fryers must be continuously monitoredduring use: overheated oil can burst into flames.• Do not flambè under the range hood; risk of fire.• This appliance can be used by children aged from8 years and above and persons with reducedphysical, sensory or mental capabilities or lack ofexperience and knowledge if they have been given supervision or instruction concerning use of the appliance in a safe way and understand the hazards involved. Children shall not play with the appliance. Cleaning and user maintenance shall not be made by children without supervision.• “CAUTION: Accessible parts may become hot when used with cooking appliances.”MAINTENANCE•Switch off or unplug the appliance from the mains supply before carrying out any maintenance work.• Clean and/or replace the Filters after the specified time period (Fire hazard). • The Grease filters must be cleaned every 2 months of operation, or more frequently for particularly heavy usage, and can be washed in a dishwasher. • The Activated charcoal filter is not washable and cannot be regenerated, and must be replaced approximately every 4 months of operation, or more frequently for particularly heavy usage.• Clean the hood using a damp cloth and a neutral liquid detergent.The symbol on the product or on its packaging indicates that this product may not be treated as household waste. Instead it shall be handed over to the applicable collection point for the recycling of electrical and electronic equipment. By ensuring this product is disposed of correctly, you will help prevent potential negative consequences for the environment and human health, which could otherwise be caused by inappropriate waste handling of this product. For more detailed information about recycling of this product, please contact your local city office, your household waste disposal service or the shop where you purchased the product.CHARACTERISTICSDimensionsComponentsRef. Q.ty Product Components1 1 Hood Body, complete with: Controls, Light, Blower,Filters8 1 Directional Air Outlet grille9 1 Reducer Flange Ø 125 / Ø 15220 1 Closing elementRef. Q.ty Installation Components12a 4 Screws 4,2 x 44,412b 2 Screws 4,2 x 12,712e 2 Screws 2,9 x 9,5Q.ty Documentation1Instruction ManualINSTALLATIONDrilling the Support surface and Fitting the HoodSCREW FITTING• The hood support surface must be 135 mm above the bottom surface of the wall units.• Drill the support with a ø 4,5 mm drill bit, using the drilling template provided.• Cut a hole ø 150 mm in size on the support surface, using the drilling template provided.• Fix using the 4 screws 12a (4,2 x 44,4) provided.SNAP-ON FITTING• The hood can be installed either directly on the bottom surface of the wall units using snap-on side supports.• Cut a fitted opening in the bottom surface of the wall unit, as shown.• Insert the hood until the side supports snap into place.• Lock in position by tightening the screws Vf from underneath the hood.Hood Type 45 50 55 60 70 80 90 L1360 410 460 510 610 710 810CLOSING ELEMENT• The space between the edge of the hood and the rear wall can be closed by applying the element 20provided, using the screws 12b.ConnectionsDUCTED VERSION AIR EXHAUST SYSTEM When installing the ducted version, connect the hood toor ø125 mm, the choice of which is left to the installer. • To install a ø 125 mm air exhaust connection, insert the reducer flange 9 on the hood body outlet.• Fix the pipe in position using sufficient pipe clamps (not supplied).• Remove possible charcoal filters.RECIRCULATION VERSION AIR OUTLET• Cut a hole ø 125 mm in any shelf that may be posi-tioned over the hood.• Insert the reducer flange 9 on the hood body outlet. • Connect the flange to the outlet on the shelf over the hood by using a flexible or rigid pipe ø125 mm. • Fix the pipe in position using sufficient pipe clamps (not supplied).• Fix the air outlet grid 8 on the recirculation air outlet by using the 2 screws 12e (2,9 x 9,5) provided. • Ensure that the activated charcoal filters have beeninserted.zELECTRICAL CONNECTION• Connect the hood to the mains through a two-pole switch having a contact gap of at least 3 mm.• When opening the sliding carriage for the first time after installing the hood, pull it out briskly until it clicks.USEControl panelL Light Switches the lighting systemon and off.M Motor Switches the extractor motoron and off.V Speed Sets the operating speed of theextractor:1. Low speed, used for a con-tinuous and silent airchange in the presence oflight cooking vapour.2. Medium speed, suitable formost operating conditionsgiven the optimum treatedair flow/noise level ratio.3. Maximum speed, used foreliminating the highestcooking vapour emission,including long periods. LM Motor Switches the extractor motoron and off.V Speed Sets the operating speed of theextractor:1. Low speed, used for a con-tinuous and silent airchange in the presence oflight cooking vapour.2. Medium speed, suitable formost operating conditionsgiven the optimum treatedair flow/noise level ratio.MAINTENANCEter efficiency).• When refitting the filters, make sure that the handle is visible on the outside.• Close the sliding suction panel.MAINTENANCECharcoal filter (Recycling version)REPLACING CHARCOAL FILTERSWarning: Turn the lights off and wait until the lamps cool down before you change the odour filter.• These filters are not washable and cannot be regenerated, and must be replaced approximately every four months or more frequently by particularly heavy use.• Pull out the sliding suction panel.• Remove the grease filters.• Remove the saturated carbon filter by releasing the fixing hooks• Fit the new filter by hooking it into its seating.• Replace the grease filters.•Close the sliding suction panel.LightingLIGHT REPLACEMENT28W-40W light.• Remove the metal grease filters.• Unscrew the bulbs and replace them with new ones having the same characteristics.•Replace the metal grease filters.請即進行保用登記﹗有關保用條款細則,請看本說明書最後一頁。
万宝油烟机说明书_1

万宝油烟机说明书篇一:抽油烟机产品说明书.抽油烟机说明书一、产品特色? 本产品材质采用? 医用级不锈钢? 防腐耐摔? 侧吸式? 不容易碰头,外观时尚? 采用现代工业自动控制技术、互联网技术与多媒体技术的完美组合,为现代智能厨房提供了样板二、产品优势? 安装在厨房健康节能? 吸油烟机炉灶上方? 能将炉灶燃烧的废物和烹饪过程中产生的对人体有害的油烟迅速抽走? 排出室外? 减少污染,净化空气,并有防毒、防爆的安全三、装配示意图四、售后服务全国联保,2年保修,7天包退,30天包换。
服务热线700820篇二:超人吸油烟机说明书篇三:豪华油烟机使用说明书中英对照豪华吸油烟机Luxurious Cooker Hood安装说明Installation Instruction1、安装工具准备,①冲击电钻(带钻头)②扳手③螺丝刀④尺1. Prepare installation tools: ①Impact Electric Drill (with drill) ②Spanner ③Screwdriver ④Ruler2、确定位置:吸油烟机平行安装于炉头正上方.底部距炉台安装参考高度650—750mm,可拆卸挡板安装参考尺寸430mm,可根据实际的安装情况适当调整。
安装孔距机体应垂直居中和保持水平。
(如煤气炉灶安装说明规定了较大的安装距离者,对此应予考虑,)例:吊顶装饰罩(无拆卸挡板的安装方法)吊顶装饰罩可拆卸挡板(有拆卸挡板的安装方法)2. Determine Installation Site: the hood should be installed over the cooker. The reference setting distance from the bottom to the cooker is 650-750mm. The reference dimension of the dischargeable baffle plate is 430mm. It can be adjusted according to practical installation situation. The mounting hole should align vertical centers and keep horizontal with the cooker hood.(For instance, if a longer distance is stipulated in the instruction manual of cooker, it should be considered.)E.g. suspending ceiling decorative covering (installation method without dischargeable baffle plate )Suspending ceiling decorative covering dischargeable baffle plate (installation method with dischargeable baffle plate )3、安装挂脚:按照挂脚的尺寸在墙壁的相应位置上.钻出直径为8mm (严禁钻孔过大,造成膨胀管松动而意外跌落).深度为50一60mm的四个孔,将膨胀管压入孔内.再用随机配备的St4X40木螺钉将挂脚可靠固定。
老板油烟机CXW-200-5701说明书

老板油烟机CXW-200-5701说明书
1.首先老板油烟机CXW-200-5701电源插座必须使用有可靠地线的专用插座,置于原因相信已经不用多说了,家电产品的用电安全才是第一位的。
2、为了保证排烟效果和使用安全,在安装时老板油烟机CXW-200-5701的安装高度应不低于650mm,尽可能安装在炉灶正上方。
为了获得良好的排烟效果,最好在烹饪前开启吸老板油烟机CXW-200-57011-2分钟。
3、在更换老板油烟机CXW-200-5701灯泡时,功率不要超过说明书上标示的最大值,否则容易导致连接灯座的电线和灯座的温升过高,加速电线绝缘层的老化,造成触电的潜在危险,甚至导致火灾。
4、当老板油烟机CXW-200-5701使用存留在集油杯中的污油存至80%时,应当及时清空,以免造成过满溢出的现象。
当每次烹饪结束后,最好继续开机1-2分钟,以便彻底排净残余油烟,当然,目前已经有很多老板油烟机CXW-200-5701都具备了延时关机的功能。
5、更换灯泡或清洗吸老板油烟机CXW-200-5701前,都应拔掉插头切断电源;清洗时请用中性洗涤剂和软布,以免损坏外壳表面或涂层。
此外,我们也要注意定期清洗滤油网,应该将油网取下后浸泡在中性洗涤剂
内约10分钟时间,再用软刷把污垢洗净后擦干,如果大家觉得总是清理油网很麻烦的话,也大可以选购提供送油网服务的老板油烟机CXW-200-5701。
6、最后,保持厨房良好的通风环境也很重要,一方面好的通风可以促进老板油烟机CXW-200-5701的排烟效果看,另一方面,也可以对燃气灶起到一定的助燃作用,但要注意的是,不要让厨房形成对流风,这样会影响老板油烟机CXW-200-5701的排烟能力。
- 1、下载文档前请自行甄别文档内容的完整性,平台不提供额外的编辑、内容补充、找答案等附加服务。
- 2、"仅部分预览"的文档,不可在线预览部分如存在完整性等问题,可反馈申请退款(可完整预览的文档不适用该条件!)。
- 3、如文档侵犯您的权益,请联系客服反馈,我们会尽快为您处理(人工客服工作时间:9:00-18:30)。
抽油烟机说明书
尊敬的用户:
感谢您选择使用我们的抽油烟机,并给予我们的产品信任。
为了确
保您能充分了解和正确使用我们的抽油烟机,我们编写了以下说明书,希望能为您提供清晰的使用指南。
一、产品概述
我们的抽油烟机是一种家用厨房电器,主要用于吸附和排除烹饪过
程中产生的油烟、异味和热气等有害物质,确保厨房空气的清洁与流通。
我们的产品结构合理、设计前卫,外观精致美观,操作简便,具
有以下特点:
1. 强劲的排风功能:通过高效电机及优质风叶的配合,实现了快速、高效的排风效果,有效清除油烟和异味,保持厨房空气清新。
2. 多档调速:内置多档风速调节功能,您可以根据不同的烹饪需求
选择适当风速,保证烹饪时的灵活性和舒适性。
3. 超静音设计:通过科学的降噪技术和优质材料的使用,使得我们
的抽油烟机在工作时噪音极低,不会对您的生活和休息造成干扰。
4. 易于清洁:我们的抽油烟机设计合理,可拆卸清洗,方便快捷,
确保产品始终保持洁净卫生。
二、安装说明
1. 安全须知:
在安装我们的抽油烟机之前,请务必仔细阅读并理解以下安全须知:
1.1 请确保安装环境通风良好,不要堵塞抽油烟机的进出风口。
1.2 请确保电气安装符合国家/地区的相关规范,避免因错误电气连
接引起安全隐患。
1.3 请在使用过程中,保持抽油烟机与可燃物体保持一定的距离,
避免因接触火源引起事故。
1.4 请勿将抽油烟机安装于高温、潮湿或易燃的环境中,避免影响
产品安全性能。
2. 安装步骤:
我们提供了详细的安装图解供您参考,在安装之前,您可以阅读以
下步骤:
2.1 确定安装位置:请根据您的厨房布局和操作需求,选择适当的
安装位置,确保与烹饪设备之间有足够的间隔。
2.2 安装支架:将抽油烟机支架固定于安装位置,确保支架水平牢固。
2.3 安装油烟机:将抽油烟机的连接口与支架连接好,确保稳定。
2.4 连接电源:根据产品说明书上的电气连接图,正确接入电源线,确保安全可靠。
2.5 安装检查:在完成以上步骤后,请检查安装是否牢固可靠,所
有电气接线是否正确无误。
请注意:以上仅为简要安装说明,请在具体操作前详细阅读附带的详细安装指南。
三、使用说明
1. 主要功能键介绍:
我们的抽油烟机分为多个主要功能键,方便您根据实际需求进行操作。
具体功能如下:
1.1 开关键:用于开启或关闭抽油烟机。
1.2 风速调节键:调整风速档位,提供多档风速调节。
1.3 照明灯键:控制照明开关。
1.4 定时关机键:设定定时关机功能。
2. 使用注意事项:
为了确保您在使用抽油烟机过程中的安全和舒适,我们提供以下注意事项,请您务必遵守:
2.1 请注意及时清洗油网:为了保持产品的正常工作和净化效果,请定期清洗抽油烟机的油网,并保持油网的清洁。
2.2 请勿触摸烟机内部:在使用抽油烟机过程中,请勿触摸抽油烟机的内部部件,避免发生触电等危险。
2.3 注意定期更换活性炭:若您的抽油烟机配备了活性炭过滤层,请按照说明书上的提示,定期更换活性炭以确保净化效果。
四、维护保养
为了延长抽油烟机的使用寿命和保持产品的性能,我们建议您按照以下维护保养指南进行操作:
1. 定期清洗:根据使用频率,定期拆卸清洗抽油烟机的外壳、油网和其他可拆卸部件,采用适当的清洁剂清洗,并晾干后安装回原位。
2. 注意防护:在日常使用中,请注意避免撞击抽油烟机,避免使用过硬的物品刮擦产品表面。
3. 电气安全:定期检查抽油烟机的电气连接,如发现线路损坏或者其他异常情况,请及时联系专业人员进行维修或更换。
五、故障排除
如果您在使用我们的抽油烟机时遇到问题,可以参考以下故障排除指南,排除简单故障:
1. 抽油烟机无法启动
1.1 请检查电源是否接触良好。
1.2 请检查电路是否正常,保险丝是否烧坏。
1.3 请检查开关是否损坏。
2. 抽油烟机噪音过大
2.1 请检查抽油烟机是否固定牢固,是否有松动。
2.2 请检查抽油烟机的风叶是否清洁,是否有异物进入。
请注意:如果您无法排除故障或者出现其他故障,请联系我们的客服人员进行咨询和维修。
六、注意事项
1. 本说明书仅适用于我们产品的相关使用说明,若您在使用过程中遇到其他特殊问题,请参考其他相关文件或咨询我们的客服人员。
2. 在进行拆卸、维修或清洗时,请务必断开抽油烟机的电源,避免触电等安全隐患。
3. 本产品仅供家庭厨房使用,切勿将产品用于其他场合。
感谢您耐心阅读我们提供的抽油烟机说明书,我们将持续改进和优化产品,为您提供更好的使用体验。
如有其他疑问或需求,请随时联系我们的客服人员,我们将竭诚为您服务!
祝您使用愉快!
此为抽油烟机说明书。