Casio_9750_实用测量程序 - 副本
Casio_9750实用测量程序-46页文档资料
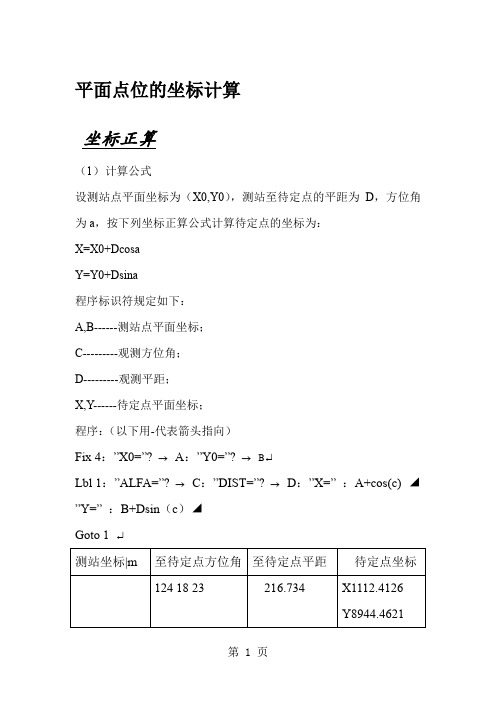
平面点位的坐标计算坐标正算(1)计算公式设测站点平面坐标为(X0,Y0),测站至待定点的平距为D,方位角为a,按下列坐标正算公式计算待定点的坐标为:X=X0+DcosaY=Y0+Dsina程序标识符规定如下:A,B------测站点平面坐标;C---------观测方位角;D---------观测平距;X,Y------待定点平面坐标;程序:(以下用-代表箭头指向)Fix 4:”X0=”?→A:”Y0=”?→B↵Lbl 1:”ALFA=”?→C:”DIST=”?→D:”X=”:A+cos(c) ◢”Y=”:B+Dsin(c)◢Goto 1 ↵坐标反算(1)计算公式按两个已知点A,B 的平面坐标Xa ,Ya, Xb,Yb,计算两点间的距离D 和方位角a ,又称为“坐标反算”,计算公式为A=arctanYb Ya Xb Xa --()()程序中的标识符规定如下: A,B,C,D ——A,B 点的平面坐标; E,F ——A,B 点的坐标增量; R ——AB 的方位角; S ——AB的平距。
(2)程序Fix4:“XA=”? → A :“YA=”? → B ↵Lbl1:“XB=”? → C :“YB=”? → D :C-A →E ;D-B →F :→S :tan-1(F/E )→R ↵If E 〈0:ThenR+180→R :Goto2:IfEnd :F 〈0⇒R+360—R ↵ Lbl2:“DIST=”:S ◢“ALFA=”:R ◢Goto1↵测边交会(1)计算公式设A,B为已知点,其平面坐标为Xa,Ya,Xb,Yb,P为待定点,观测平距D A(a),D B(b).从P点作AB(c)边的垂线,交AB于D点,设AD=e,PD=f.用下式计算辅助线段e,f的长度和待定点P的平面坐标:e=(a2+c2-b2)/2c f=x=xA+ecosaAB+fsinaABy=yA+esinaAB-fcosaAB程序中的标识符规定如下:A,B,C,D——已知点A,B的平面坐标;P,Q——测边交会的观测边长;X,Y——待定点P的平距坐标。
fx-9750GⅡ操作说明

免责申明:免费提供;仅供参考。
卡西欧(上海)贸易有限公司不对用户使用本程序发生的任何问题负责。
读者对本程序的问题请发电子邮件到775403338@ 邮箱咨询。
fx-9750GⅡ公路测量程序使用说明一、程序使用流程本程序数据和主程序是分开的,编程时将不同的工程数据存放到不同的数据文件里,如A匝道,文件名为A,将匝道A所有的曲线线元参数输入A文件里。
运行时只要运行文件名A的程序就可以了,具体运行流程见下图:二、数据文件的编写(一)交点法数据文件编辑交点法编写数据文件必须是对称型的,即直线段→缓和曲线段→圆曲线段→缓和曲线段→直线段,(如果任意一端没有直线段,则把直线段长度看做是0),另外圆曲线两侧缓和曲线的旋转常数必须相等,并且和直线段连接处的半径必须是无穷大。
交点法数据文件编写一般是根据设计图纸提供的平面曲线参数一览表提供的参数来编写,每个弯道包括:弯道起点方位角(C),交点X坐标(D),交点Y坐标(E),缓和曲线长度(F,当没有设缓和曲线时,F=0),交点转交(G,向左转弯,G为负值,向右转弯,G取正值),交点桩号(H),弯道圆曲线半径(R)。
下图是一段市政道路设计参数数据。
根据上图提供的数据,可以编辑成如下的数据文件:文件名:CHLNR在上图中,有两个条件转移语句即If L>0:Then 98°39°35.12°→C:4774.384→D: 2415.861→E:140→F:31°17°23°→G:410.007→H:600→R:IfEndIf L>1060:Then 129°56°58.19°→C:4206.421→D: 3093.946→E:70→F:-33°50°48°→G:1285.437→H:600→R:IfEnd……如果还有其他弯道,可以继续完后加。
在这些存放设计参数的语句前后的程序表达式是固定的。
Casio计算器测量程序

半边书生二○○四年三月总说明本套程序共包含平曲线、竖曲线、方位角等共个程序,是本人查阅大量测量书籍并结合工地实践历经半年编成,是一本原创、简捷、实用、功能强大的用于公路路线测量放样的CASIO 4X00型计算器程序集。
是一本用于公路工程测量的不可多得的工具册。
本集子中所有的范例均出自某二级公路,其参数附后。
从二○○二年五月初的平、竖曲线主体编完,也就是本集子的雏型出来以后,经过半年左右的酝酿、编写、修正、归纳,后续的各程序已基本成型。
从那时起至今,我又将新的灵感新的功能不断地融合到其中使之不断成长。
功能简介:A>平曲线可单独计算直-缓1-圆-缓2-直型不对称曲线,也可配合程序【ALL ROAD】计算一条路线的大地坐标(只需输入桩号、边中距即可得出该点的大地坐标)。
B>竖曲线可单独计算二次抛物线型竖曲线,也可配合程序【DATA】计算一条路线的各桩高程(只需输入该点的桩号即可得出该点的设计高程)。
C>方位角可单独计算两点之间的方位角和平距,也可配合程序【H.CURVE】直接得出测站点到放样点的平距和方位角。
D>超高(正在完善中)可根据相邻的两段曲线要素及路线设计标准自动计算各处中桩与边桩的高差。
(以中桩标高为设计标高)E>曲线要素复核可根据输入的曲线要素自动计算各个参数,以此与设计文件的参数对照用于检查设计文件的正确与否。
F>锥坡放样根据输入的值及点值自动计算出正交锥坡弧线上各点的大地坐标,直接输入仪器放出该点。
还可任意加密。
G>横断面面积计算(正在完善中…………)根据公路横断面的尺寸设定好参数,逐点输入各变化点的平距和高差程序能自己计算出该断面的挖填面积。
(不理想,没有解决半填半挖断面的问题,填方断面计算也不理想)H>求多边形所围面积程序只需输入变化点个数然后逐个输入各相邻变化点之间的平距和高差即可得出各点所围成的多边形面积。
具有自动闭合到第一点的功能,注意一定要是凸形多边形不要输入交叉多边形,理论上可以计算N个边的多边形。
fx9750卡西欧9750公路线元法计算程序

新版程序把线元法和交点法已经集成在一个模块中了,用户只需修改JD程序和ZA程序中的数据部分即可,其余不需作任何的改动。
2.因为每条路高程计算不尽相同,且比较复杂,现在可利用PC机EXCEL计算好打印成表格带到工地上使用,所以本版程序未对线路高程序进行专门的编程计算,而是利用统计计算模式中来输入桩号(第一列X)及左、右高程(第二、三列Y,Freq),这种输入数据的方式最为直观,易发现错误,也易修改,输入完毕后运行S 程序对数据按桩号进行排序,在程序中通过调用GG程序来进行内插计算,SG=-1得左标高,SG=1得右标高(若SG输入0,则可进行一般的线性内插计算)。
3.在JD程序和XY程序中,先将一个计算单元的数据置入矩阵F中(1行8列或1行9列),这样程序可读性极好。
4.相比原CASIO4850程序操作习惯,作了一点小小的改动,测站坐标存在Z[10],N中,X坐标原存在M中容易被误操作修改,而设计标高存在M中,这样易于修改,因为CASIO5800没有IN,OUT功能,很不方便。
4.程序利用Z[2]变量值来判断是采用交点法还是线元法模型计算,Z[2]=0为线元法,否则为交点法。
一、PQX程序:计算中边桩坐标及近似的桩号反算,在运行模式直接调用。
① Z*10+→S:”XO”?S:S→Z*10+:”YO”?N:Prog “AU”② Lbl 2:?L:Prog “Z”:Prog “E”:1n→O:90→S③ Lbl 4:”JJ”?S:”YC”?O:SO=0 =>Goto 2‘原来lbl 后没有标号4的。
④ O=-1 =>Goto 6⑤ “X,Y”:R+OCos(Z+S)→X▲U+OSin(Z+S)→Y▲Prog“D”:Goto 4⑥ Lbl 6:Z*7+→X:Z*8+→Y:”XF”?X:”YF”?Y:XY=0 =>Goto 4⑦ X→Z*7+:Y→Z*8+:Pol(X-R,Y-U+1p):Z+S-J→J:”YC,DL,L”:ICos(J)→O▲ISin(J)→I▲L+I▲Goto 6二、P程序:在程序中提供一个自由运算的模式。
大歪哥实战之白色卡西欧国际版9750GII 计算器刷机到9860GII系统详细操作步骤
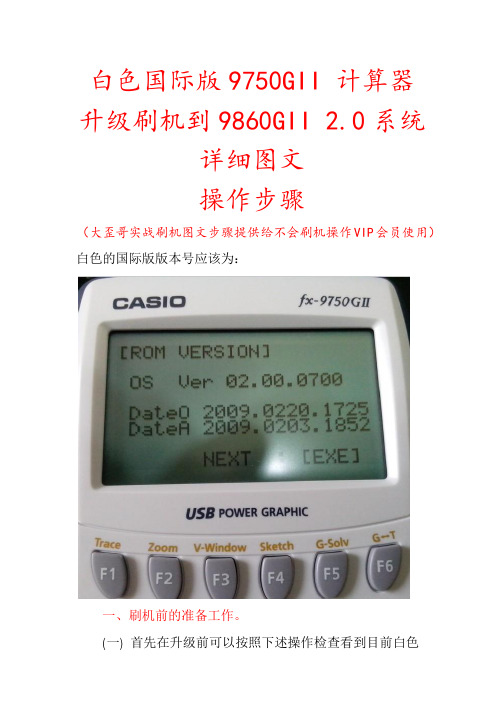
白色国际版9750GII 计算器升级刷机到9860GII 2.0系统详细图文操作步骤(大歪哥实战刷机图文步骤提供给不会刷机操作VIP会员使用)白色的国际版版本号应该为:一、刷机前的准备工作。
(一) 首先在升级前可以按照下述操作检查看到目前白色国际版9750的上述版本号,确认后,那么你就可以把你的9750GII用该文件进行安全滴升级了。
AC/ON开机后按MENU键,然后按“REPLAY方向键的向下键箭头”找到计算器SYSTEM模块菜单,然后EXE,按F4:Version 可以首先查看到版本,是如下显示:VersionOS2.00.0700然后EXIT,后按SHIFT+AC/ON关闭计算器,进行如下步骤操作进一步确定目前的机子版本号与上述是否吻合。
操作如下:1:用两个手指同时按下OPTN 、EXP不要松开放后,再用一个手指按AC/on这三个键,计算器屏幕将如下显示=DIAGNOSTIC MODE=Factory Use Only!Press :[EXIT]那么此时直接按F1键。
2、紧接着按数字键9 就可,目的是清除计算器的RAM。
3、再然后按数字键4就可以得到版本号,出现DataO和DataA 字样,DataA显示就是是:2009.0203.1852。
如果这些都和开头的版本号对应,那么就可以准备开始刷机了。
(二) 电脑上(最好是在WINDOWS XP系统上当然WINDOWS7 32位版本系统上也可,64位系统就是不能行的,注意)进行安装FA-124 V2.0版本这个计算器与电脑的通讯软件(随计算器的光盘或者网上百度都可搜索到下载),安装完毕这个软件,目的就是同时也自动安装了计算器与电脑连接的驱动程序CEGS502了。
那么紧接着先关闭计算器状态下,第一次将你的计算器与你的这台(安装过FA-124软件的)电脑进行连接,第一次电脑会提示自动安装驱动软件的提示界面,选择自动安装下一步就是了,待电脑显示CEGS502驱动安装完毕(注意:第一次连接会这样提示安装该驱动,以后再连接就不会提示了的),那么计算器屏幕上就会显示几个选项,计算器上按F1键,计算器屏幕就会显示如下“接收”状态Receiving。
CASIO9750计算器程序 JDF
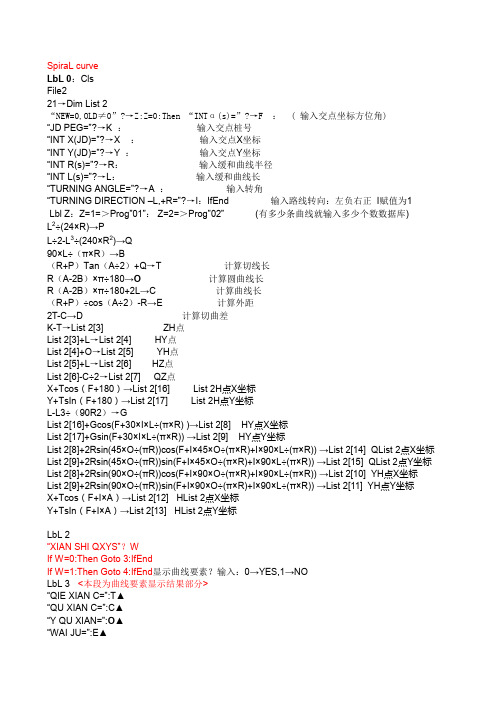
SpiraL curveLbL 0:ClsFile221→Dim List 2“NEW=0,OLD≠0”?→Z:Z=0:Then “INTα(s)=”?→F : ( 输入交点坐标方位角)“JD PEG=”?→K :输入交点桩号“INT X(JD)=”?→X :输入交点X坐标“INT Y(JD)=”?→Y :输入交点Y坐标“INT R(s)=”?→R:输入缓和曲线半径“INT L(s)=”?→L:输入缓和曲线长“TURNING ANGLE=”?→A :输入转角“TURNING DIRECTION –L,+R=”?→I:IfEnd 输入路线转向:左负右正I赋值为1Lbl Z:Z=1=>Prog”01”: Z=2=>Prog”02” (有多少条曲线就输入多少个数数据库)L2÷(24×R)→PL÷2-L3÷(240×R2)→Q90×L÷(π×R)→B(R+P)Tan(A÷2)+Q→T 计算切线长R(A-2B)×π÷180→O计算圆曲线长R(A-2B)×π÷180+2L→C 计算曲线长(R+P)÷cos(A÷2)-R→E 计算外距2T-C→D 计算切曲差K-T→List 2[3] ZH点List 2[3]+L→List 2[4] HY点List 2[4]+O→List 2[5] YH点List 2[5]+L→List 2[6] HZ点List 2[6]-C÷2→List 2[7] QZ点X+Tcos(F+180)→List 2[16] List 2H点X坐标Y+TsIn(F+180)→List 2[17] List 2H点Y坐标L-L3÷(90R2)→GList 2[16]+Gcos(F+30×I×L÷(π×R) )→List 2[8] HY点X坐标List 2[17]+Gsin(F+30×I×L÷(π×R)) →List 2[9] HY点Y坐标List 2[8]+2Rsin(45×O÷(πR))cos(F+I×45×O÷(π×R)+I×90×L÷(π×R)) →List 2[14] QList 2点X坐标List 2[9]+2Rsin(45×O÷(πR))sin(F+I×45×O÷(π×R)+I×90×L÷(π×R)) →List 2[15] QList 2点Y坐标List 2[8]+2Rsin(90×O÷(πR))cos(F+I×90×O÷(π×R)+I×90×L÷(π×R)) →List 2[10] YH点X坐标List 2[9]+2Rsin(90×O÷(πR))sin(F+I×90×O÷(π×R)+I×90×L÷(π×R)) →List 2[11] YH点Y坐标X+Tcos(F+I×A)→List 2[12] HList 2点X坐标Y+TsIn(F+I×A)→List 2[13] HList 2点Y坐标LbL 2“XIAN SHI QXYS”?WIf W=0:Then Goto 3:IfEndIf W=1:Then Goto 4:IfEnd显示曲线要素?输入:0→YES,1→NOLbL 3 <本段为曲线要素显示结果部分>“QIE XIAN C=”:T▲“QU XIAN C=”:C▲“Y QU XIAN=”:O▲“WAI JU=”:E▲“QIE QU CHA=”:D▲“List 2H PEG=”:List 2[3] ▲“X(List 2H)=”:List 2[16] ▲“Y(List 2H)=”:List 2[17] ▲“HY PEG=”:List 2[4] ▲“X(HY)=”:List 2[8] ▲“Y(HY)=”:List 2[9] ▲“QList 2 PEG=”:List 2[7] ▲“X(QList 2)=”:List 2[14] ▲“Y(QList 2)=”:List 2[15] ▲“YH PEG=”:List 2[5] ▲“X(YH)=”:List 2[10] ▲“Y(YH)=”:List 2[11] ▲“HList 2 PEG=”:List 2[6] ▲“X(HList 2)=”:List 2[12] ▲“Y(HList 2)=”:List 2[13] ▲GoTo 0LbL 4 <本段为待求点桩号计算部分>“INT P PEG=”?H 输入待求点桩号If H<List 2[3]:Then GoTo D:IfEndIf H≥List 2[3]And H<List 2[4]:Then GoTo AELse If H≥List 2[4] And H<List 2[5]:Then GoTo BELse If H≥List 2[5] And H≤List 2[6]:Then GoTo C :IfendIfend : IfendIf H>List 2[6]:Then GoTo E:IfendLbL D {待求点位于ZH前的直线段上时}“PIAN JIAO = ” ? →V 输入边桩与路线中心线夹角:左负右正“DR = ”? →W 路基右侧边桩与路中法线距离“DL = ”? →T 路基左侧边桩与路中法线距离List 2[3]-H→JList 2[16]+J cos(F+180)→M▲List 2[17]+J sin(F+180)→N▲M+W×cos(F+180+V) →List 2[18]N+W×sin(F+180+V) →List 2[19]M+T×cos(F+180-V) →List 2[20]N+T×sin(F+180-V) →List 2[21]F →G▲“ X(R)= ”: List 2[18] ▲“ Y(R)= ”: List 2[19] ▲“ X(L)= ”: List 2[20] ▲“ Y(L)= ”: List 2[21] ▲GoTo 4LbL A {待求点位于List 2H到HY段上时}“PIAN JIAO = ” ? →V 输入边桩与路线中心线夹角:左负右正“DR = ”? →W 路基右侧边桩与路中法线距离“DL = ”? →T 路基左侧边桩与路中法线距离H–List 2[3]→JJ–J5 ÷(90×R2×L2)→SList 2[16]+S cos(F+30×I×J2÷(π×R×L)→M▲List 2[17]+S sin(F+30×I×J2÷(π×R×L)→N▲M+W×cos(F+90×I×J2÷(π×R×L +V) →List 2[18]N+W×sin(F+90×I×J2÷(π×R×L +v) →List 2[19]F+90×I×J2÷(π×R×L+V) →G▲M+T×cos(F+90×I×J2÷(π×R×L -V) →List 2[20]N+T×sin(F+90×I×J2÷(π×R×L -V) →List 2[21]“ X(R)= ”: List 2[18] ▲“ Y(R)= ”: List 2[19] ▲“ X(L)= ”: List 2[20] ▲“ Y(L)= ”: List 2[21] ▲GoTo 4LbL B {待求点位于HY到YH段上时}“PIAN JIAO = ” ? →V 输入边桩与路线中心线夹角:左负右正“DR = ”? →W 路基右侧边桩与路中法线距离“DL = ”? →T 路基左侧边桩与路中法线距离H–List 2[4]→JList 2[8]+2Rsin(90×J÷(π×R)cos[F+90×I×J÷(π×R)+90×I×L÷(π×R)]→M▲List 2[9]+2Rsin(90×J÷(π×R)sin[F+90×I×J÷(π×R)+90×I×L÷(π×R)]→N▲M+Wcos(F+90×I×L÷(π×R)+180×I×J÷(π×R)+V) →List 2[18]N+Wsin(F+90×I×L÷(π×R)+180×I×J÷(π×R)+V) →List 2[19]F+90×I×J2÷(π×R)+180×I×J2÷(π×R)→G▲M+Tcos(F+90×I×L÷(π×R)+180×I×J÷(π×R)-V) →List 2[20]N+Tsin(F+90×I×L÷(π×R)+180×I×J÷(π×R)-V) →List 2[21]“ X(R)= ”: List 2[18] ▲“ Y(R)= ”: List 2[19] ▲“ X(L)= ”: List 2[20] ▲“ Y(L)= ”: List 2[21] ▲GoTo 4LbL C {待求点位于YH到HList 2段时}“PIAN JIAO = ” ? →V 输入边桩与路线中心线夹角:左负右正“DR = ”? →W 路基右侧边桩与路中法线距离“DL = ”? →T 路基左侧边桩与路中法线距离List 2[6] –H →JJ–J5÷(90×R2×L2)→SList 2[12]+Scos(F+I×A+180-30×I×J2÷(π×R×L)→M▲List 2[13]+Ssin(F+I×A+180-30×I×J2÷(π×R×L)→N▲M+Wcos(F+I×A-90×I×J2÷(π×R×L)+V) →List 2[18]N+Wsin(F+I×A-90×I×J2÷(π×R×L)+V) →List 2[19]F+I×A-90×I×J2÷(π×R)→G▲M+Tcos(F+I×A-90×I×J2÷(π×R×L)-V) →List 2[20]N+Tsin(F+I×A-90×I×J2÷(π×R×L)-V) →List 2[21]“ X(R)= ”: List 2[18] ▲“ Y(R)= ”: List 2[19] ▲“ X(L)= ”: List 2[20] ▲“ Y(L)= ”: List 2[21] ▲GoTo 4LbL E {待求点位于ZH前的直线段上时}“PIAN JIAO = ” ? →V 输入边桩与路线中心线夹角:左负右正“DR = ”? →W 路基右侧边桩与路中法线距离“DL = ”? →T 路基左侧边桩与路中法线距离H-List 2[6]→JList 2[12]+J cos(F+A*I)→M▲List 2[13]+J sin(F+A*I)→N▲M+W×cos(F+A*I+V) →List 2[18]N+W×sin(F+A*I+V) →List 2[19]F+A*I →G▲M+T×cos(F+A*I-V) →List 2[20]N+T×sin(F+A*I-V) →List 2[21]“ X(R)= ”: List 2[18] ▲“ Y(R)= ”: List 2[19] ▲“ X(L)= ”: List 2[20] ▲“ Y(L)= ”: List 2[21] ▲GoTo 4程序库(子程序)01 文件名If Z=1:Then 30120.568(JD的里程)→K:86°43°45.47°(曲线起始方位角)→F:38500237.59(XJD)→X:506789.072(YJD)→Y:3200(曲线半径)→R:270(缓和曲线长)→L:7°51°19。
TXT版CASIO9750GⅡ-9860GⅡSD测量程序集
DHQXJS1(子程序名1)
IfH≤F-θ:ThenGoto5:ElseIfH≥F-θ+Z+fn2+T:ThenGoto6:ElseIfH≤F-θ+Z:ThenGoto1:ElseIfH≥F-θ+Z+fn2:ThenGoto3:IfEnd:Goto2:Lb11:H-F+θ→I:90÷π÷R÷Z→Y:C+DYI→U:∫(cos(YX),0,I)2 2→G:∫(sin(YX),0,I)→O:A-θcosC+GcosC-DOsinC→N:B-θsin2 C+GsinC+DOcosC→I:Goto4:Lb12:H-F+θ→I: 180(I-.5Z)÷π÷R→Y:C+DY→U:RsinY+.5Z-Z∧3÷240÷R2→G:R(1-cos Y)+Z÷24÷R→O:2
坐标反算桩号、边距
N?2(进入坐标反算桩号、边距).
J?31508.810(输入已知点X坐标).
P?54274.014(输入已知点Y坐标).
H?0(输入在本程序数据库计算范围之内的任意桩号).
H=1032.415(显示待求点所计算的里程桩号).
S=19.913 (显示待求点所计算的边距左为“-”、右为“+”).
CASIO fx-9750GⅡ-9860GⅡSD程序集
全标段(直线、圆曲线、缓和曲线坐标计算程序)
QDHQXJS(主程序名)
Lb1 9:“1.HS→ XY”:“2.XY→ HS”:“N”?→ N: “θ”?→ θ:“r”?→ r: If N=1:Then Goto1:IfEnd:Goto2:Lb11:“H”?→H:“S”?→ S:HS:Ifθ=1:ThenProg“QDHQXJS3”:Goto3:IfEnd :Prog“QDHQXJS4”:Goto 3:Lb13:Prog“DHQXJS1”: “U=”:U▲DMS◢“X=”:X◢“Y=”:Y◢Q”?→Q: IfQ=0:ThenGoto6:ElseIfQ=2:Then Goto5:IfEnd:Goto9:Lb16: “P”?→P:“K”?→ K:X→O:Y→I:PK:U+K→U:Lb18:“J”?→ J:“W”?→ W:“M”?→M:JWM:“L=”:O+.5MJ cosU÷sinP+Wcos(U+P)÷sinP→ L◢“N=”:I+.5MJsinU÷sinP+Wsin(U+P)÷sinP→N◢IfW≠0:ThenGoto8:ElseIfJ≠0:ThenGoto8:IfEnd:Goto9 :Lb15:“P”?→ P:“K”?→K:X→O:Y→I:PK:U+K→U:Lb17:“L”?→ L:“N”?→N:LN:(N-I+OtanU-Ltan(U+P))÷(tanU-tan(U+P))→X:I+(X-O)tanU→Y:√((X-O)+(Y-I)22))→K:Y-I→M:Mcos-1((X-O)÷K)÷AbsM→J:IfJ<0:ThenJ+360→J:GotoE:IfEnd:J→J:GotoE:Lb1E:IfJ-U>90:Then“K=”:-K→K◢GotoF:ElseIfU-J>270:Then“K=”:K→K◢GotoF:ElseIfJ>U-90:Then“K=”:K→K◢GotoF : IfEnd: “K=”:-K→K Goto F:Lb1 F:√( (L-X)+(N-Y)2 2)→S:N-Y→M:Mcos-1 ((L-X)÷S)÷AbsM→
卡西欧9750坐标正反算及程序常用键使用说明
坐标反算ST(主程序名)“A”?→ A:“B”?→ B:LbI 0:“C”?→ C:“D”?→ D:√((C-A)2+(D-B)2))→S:D-B→M:Mcos-1((C-A)÷S)÷Abs M→T:If T<0:Then T+360 →T:Goto 1:IfEnd :T →T:Goto 1:LbI 1: “T=”:T▲DMS ◢“S=”:S◢Goto 0程序运行示例及说明运行主程序“ST”第一步:A? 742589.425(输入起点或测站点的“X”坐标).第二步:B? 463404.387(输入起点或测站点的“Y”坐标).第三步:C? 742669.0657 (输入放样点的“X”坐标)第四步: D? 463435.9536 (输入放样点的“Y”坐标).第五步:T= 21°37′17.49″(显示放样点的计算方位角).第六步:S= 85.6685(显示放样点的计算边长).第171页坐标正算XY(主程序名)“A”?→ A:“B”?→ B: “C”?→ C:“F”?→ F:ABCF:LbI 0:“H”?→ H:“S”?→ S: HS:“X=”:A+(H-F)cosC-SsinC→ X◢“Y=”: B+(H-F) sin C+ScosC→ Y◢Goto 0程序运行示例及说明运行主程序“XY”第一步:A? 742589.425(输入起点或测站点的“X”坐标).第二步:B? 463404.387(输入起点或测站点的“Y”坐标).第三步:C? 21°37′17.49″(输入直线段的方位角或测站点至测点的边长方位角)第四步: F? 0(输入直线段起点桩号或测站点的桩号F=0)第五步:H? 85.6685 (输入直线段上待求点桩号或测站点至测点的边长长度).第六步:S? 0 (输入直线段上待求点的边距【左“-”,右“+”】或为测站时S=0). 第七步:X=742669.0657 (显示计算坐标).第八步:Y=463435.9536 (显示计算坐标).程序常用键使用说明Ac/oN(OFF)→M E N U→PRGM→EXE→{F1(EXE)运行程序、F2(EDIT)修改程序、F3(NEW)编辑程序、F4(DEL)删除某一个程序、F5(DEL-A) 删除全部程序、F6翻页→{F1(SRC)搜索程序、F2(REN)对程序文件名重新命名。
卡西欧 9750G Plus graphics calculator 说明书
Introduction to Casio BASICCasio BASICPART 1: Creating a ProgramTo create a new program press then locate the program icon, press , press to create a new program. You will then be asked to enter a name for your program, also you may create a password at this time (WARNING: if you put a password on your program you will not be able to use the debugger).PART 2: Variable BasicsA variable is something which holds a value. The most commonly used are the letters A~Z and r,_. There are others, but they are not covered in this section. To store a value into a variable you must use the key, like this:CODE1->A // Assigns 1 to AIt should look like this:CODE1->A~D // Assigns 1 to A B C & DVariables are the most important aspect of programming.PART 3: Basic LoopsLoops are used to repeat blocks of code. There are several types of loops in Casio BASIC: Goto/Lbl, Do/lpWhle, For/Next, and While/WhileEnd. Here is an example of a Goto/Lbl loop:CODE1->A //Assigns 1 to ALbl 1A+1->A //Adds 1 to the variable A and stores new valueGoto 1 //Returns to Lbl 1This loop will execute infinitely, Adding 1 to A each time (actually it will stop when the value of A is greater than 99*10^99 because you will get a mem error).Here is an example of a For loop; note that it does not take as many lines:CODEFor 1->A to 100 Step 1//this loop assigns 1 to A then adds 1 to A until it equals 100Next //Goes back to the start of the loop, adds the step to the variable.Anything between the For and next statement will be executed until the expression evaluates true (A equals 100). By changing the value of Step you can change how much A is incremented by.The While loop checks to see if the expression is true then executes the code. After the code has been executed it returns to the top, checks the expression, and if it is false jumps out of the loop and continues with executing the program. This is an example of a While loop.CODE1->AWhile 1=1 //1 always equals 1 so the expression always evaluates to TrueA+1->AWhileEndSince the while loop evaluates the expression before executing the code it is possible that if the expression is false before loop begins (ex: 1=2) then the loop will never occur, it will just skip right over the code and continue with the program.Unlike a while loop a Do/LpWhle loop will always execute at least once since it evaluates the expression after the code has been executed. A Do/LpWhle loop looks like this.CODE1->ADo //Start of the Do/LpWhle loopA+1->ALpWhle A<100 //Loops while A is less than 100PART 4: Selection StatementsSelection Statements are used to make programs have differing outcomes, instead to executing the same way every time they are run. A selection statement checks an expression, sees if it is True or False, then if True executes the rest of the statement otherwise it skips to below the statement and continues with execution. There are two types of selection statements on the calculator. They are the If/Else statement and the => arrow.An If/Else statement works like thisCODE1->AIf A=1 //expression to be evaluatedThen “HI” //result if expression is true“HOW ARE YOU”Else “BYE” //result if expression is false“SEE YOU LATER”If End //end of statementResult:Since A is 1 the statement evaluates to true, thereforeQUOTE (Program Output)HIHOW ARE YOUis printed. If you replaced the first line with 0->A then the if statement would evaluate to False, andQUOTE (Program output)BYESEE YOU LATERwould be printed.An If statement can contain many different things, and can be many lines long, they are the keystone to making a game, and before going on you should feel comfortable using them.The => arrow is also very useful, it is a single line selection statement that takes up less space but can do less than a normal if/else.This is the same code as above, except using the => arrow instead of the If statement.CODE1->AA=1=>”HI”A=1=>“HOW ARE YOU”A<>1=>”BYE” // <> means not equal toA<>1=>”SEE YOU LATER”In general, the best time to use a if statement is when you have at least two lines of code to be put inside, otherwise use the => arrow.PART 5: Advanced LoopsNesting is when you take one loop and put it inside another. Here is an example: CODE0->CFor 1->A To 10 //Step can be omitted instead of using Step 1For 1->B To 10A+B+C->CNextNextC represents the output sign, it displays whatever is before it and Pauses until [EXE] is pressed.By executing this code you will get this output:QUOTE (Program Output)1100//caused byDisplays the final value of C.As you can see, the second loop executes completely for each iteration (loop) of the first loop.Nesting also applies to selection statements, you can nest if or => inside eachother as needed.Example:CODEA<1=>A>0=>”HI”If A<1Then if A>0Then “HI”End IfEnd IfPart 6: Logical OperatorsAs you have just seen, there are times when you will want more than one condition in a selection or loop, you can nest the statements or you can use a logical operator: AND OR, NOT.AND and OR are operators which can be used in selection statements to specify additional conditions, therefore the code above could be written:CODEA<1 and A>0=>”HI”Instead of:CODEA<1=>A>0=>”HI”The OR operator allows you to specify alternate conditions which are evaluated independently and if any are true then the entire statement is considered true. This means you can do this:CODEIf A=1 Or B=1Then “TRUE”End IfWhen this executes it will print TRUE if A or B equals 1.The NOT operator can also be used in selection statements, though it is not usednearly as often. NOT returns False if the statement is true (or 1) and True if the statement is False (or 0) so:CODEIf Not (A=1)Then “TRUE”End IfThis will print true if A is any number but 1. In this case the Not statement is used as an <> (not equal to) statement, but it has other uses. We will cover more on this later.Part 7: Input BasicsYou might want to get information from the user. The simplest way to get input from the user is to use the ? command.Syntax: ?->(Variable)Description: this command causes a ? to appear on the screen, execution pausesuntil the user enters data and hits , then the data is put into the variable. This is a good way to ask yes or no questions, with the user having to enter 1 for yes and 0 for no.Another way you can use the ? command is to put a prompt before it: “Continue (1=YES 0=NO)”?->CThis causes the text to be displayed with a ? after it and waits for data.Part 8: Key InputSometimes you will want to know what key the user is pressing, to do this you must use the Getkey command.Syntax: Getkey->(variable) or if Getkey=(key number)Description: Getkey returns a different value for each key pressed, if no key is pressed then it returns 0, here is a simple program used to display the value of a key.CODELbl 1Locate 1,1,GetkeyGoto 1The only key which does not return a value is AC/On.Part 9: Advanced LoopsA simple loop:CODEWhile A<>BWhileEndA nested loop:CODEWhile A<>BDoLpWhile A=BWhileEndA nested loop is just a loop inside of a loop, just like a nested if. what most people have trouble with is the execution of nested loops, if you have programming experience then you will all ready know this but if your new to field take a look at the sample below:CODELbl 11->A1->B1->C //counter var1->D //counter varDoA+B->AWhile D<=5 //loops 5 timesB+A->BIsz DWhileEnd1->DIsz CLpWhile C<3 //loops 3 timesA+BCODEWhile A=A //endless loopIsz ABreak"THIS ISN'T SHOWN, IT ISN'T EVEN LOOKED AT BY THE PROGRAM" "NEITHER IS THIS"WhileEnd"ESCAPE FROM THE LOOP" //Break goes to herenow we will look at how Break works in nested loopsCODEWhile A<>BDoBreakLpWhile A=A//Break goes to hereWhileEnd //loops like normalAs you can see, Break only exits the current loop, and when that loop comes around again and if Break isn't executed (if it’s in an If statement) then the loop does not terminate and continues like normal. Get it?CASIO Basic examplesExample 1:====SUMDICE===Lbl 1“First number”? -> AIf Int (A) AThen Goto 1IfEnd“Second number”? -> BAxBThe usefulness of the results in the simulation is limited because the outcomes are not stored anywhere, since the variable S is always changing during each loop. This is why it is a good idea to store data in lists (sometimes called arrays), where it can then be analysed later. This is the purpose of this lesson.In order to store the data in a list, we must first set the dimensions of the list. This means telling the calculator how many elements there are to be stored.Since we are using the variable C as the number of simulations, this will be used as the dimensions of list 1.Lets set C equal to 5….C -> 5Then add the line C -> Dim List 1The commands Dim and List are found in the LIST menu, which is in the OPTN menu. Press OPTN, followed by LIST (F1). Just about any action that relates to lists will be found in this menu.A Bit of Extra HelpEnter RUN mode from the Main Menu. Enter this line and press EXE.C -> Dim List 1This line says that I want to have 5 ‘empty’ elements in List 1 (they are in fact filled with the value of 0).Press MENU and then enter STAT mode. You will see that there are 5 ‘empty’ elements in List 1.You will notice that this command has created 5 ‘empty’ elements in list 1. As a rule, whenever you want data to be stored in a list (during the execution of a program), you must first create empty elements using the command described above. This is, if you tried to enter data in position 6, you would receive an error message.CODEFor 1 -> Z to CInt (6Ran#)+1 -> MInt (6Ran#)+1 -> NM + N -> SWhen the program first comes to the For statement, it will set Z to 1 and go through and execute everything on the way to the Next command. This means it will get to S -> List 1[Z]and send the value of S (which has been set as M+N) to List 1, row Z, which at the moment is 1. After this, the program will move on to the next line, which is the Next command in this case.Once it gets to the Next command, the program will go back to the For command and do it again, except Z will now be set to 2. So then the new value of S will be sent to List 1, row Z, which is now 2. This will continue over and over again until Z=C.Notice how having the S -> List 1[Z]command within the For statement utilises the way Z increases by 1 each time.The maximum number of elements that this particular calculator canhandle in 255.PICAXE circuits1. Electrical communications:TTL-level (High=5V and Low=0V), asynchronous serial half-duplex communication, connects to a PC´s RS-232 COM-port with a MAX232 or equivalent level-converter circuit.•Baud-rate: 9600 bps•Parity: none•Byte-size: 8 bits•Stop-bits: FROM Casio: 2 bits TO Casio: 1 bitThe Casio-plug is a standard 2.5mm stereo jack with the following pin-designations:•Sleeve Ground•Ring Data to Casio•Tip Data from Casio2. Casio to Casio cross-over cable2.5 mm stereo plug 2.5 mm stereo plug3. Casio to PC RS232 interface2.5 mm stereo plug fromCasio connected to a PC D9female plug.BC547C can substitute forBC337 NPN transistors.LED’s in series with Rx and TX can indicate communication to and from PC4. Casio to PicaxePlace small signal diode 1N4148 (bar toward Picaxe) in series with output TO Casio inside the 3.5mm stereo plug.6. Casio 9750G Plus Code: RECEIVE picaxe data into a List:255 -> Dim List 1255 -> Dim List 21 -> BLbl 1"Get readings (1 = YES)"? -> AA= 1 => Goto 2Goto 1Lbl 2Receive (R)// R x 0.123 -> A convert to degree celcius or whatever unitsGetkey -> CIf C 1 47Then Goto 3IfEndIf B < 256Then B-1 -> List1[B]A -> List2[B]B+1 -> BIfEndLbl 3ClrTextLocate 1,1, B-1Locate 6,1, AIf B = 256Then Locate 1,2, “LIST FULL!”IfEndGoto 2How It Works•List 1 and List 2 is created with 255 spaces (rows) assigned to them•Once the user inputs “1” the Casio displays data values from the PICAXE but only puts them into LIST 2 (y axis) if the EXIT button is pressed. List 1 is for plotting the x axis 0 – 255 time intervals.•From the MENU select STATs (2 on main menu)•press F1 (GRPH) then F6 (SET) to set up the graphing options.•Go down to graph type and press F6 to get to other graph types then choose box (for a box and whisker).•Press EXIT back to the list (you should be able to see your data in the list), press F1 to get a box and whisker graph, good for working out mean, upper quartile and range.The data collected can be transformed to temperature, etc by adding line in blue above (remove // remark symbol)Students can try to fit a x2 or other curve and explain7. Casio 9750G Plus Code: SEND keystrokes to picaxe ypod to control CASI Lbl 1Getkey -> AIf A> 0Then Int((A-26); 2.5 +0.2) -> A // ; means divided bySend (A)IfEndGoto 1How It Works•CASI has an 08M slave that listens for Casio keystrokes•CASI 08M interrupts a 14M master with the keystroke•CASI turns on a L293D motor controller chip to move CASI in the appropriate direction•SRF05 sonar range finder prevents obstacle collisions8. Casio 9750G packet encoding:Modified from article by Erik Grindheim, August ~ October 2001 There are four different types of data packets in use to transfer variables, in addition to the single-byte packets. This section describes the structure of these packets in detail:Request packet:Byte no (1-50) ASCII HEX ($)1-4:REQ$3A $52 $45 $515$006-7VM (Variable)PC (Picture)LT (List)MT (Matrix)$56 $4D <-- This is the bytes we want... $50 $43 ( Byte no 12-49 below is based ) $4C $54 ( on Variable transfers, VM. ) $4D $54 ( )8-11all $FF12A-Z / r / è(The name of the Variable:)$41 - $5A / $CD / $CE13-49all $FF50Checksum= $01 + not((sum bytes 1-49)- $3A)Variable description packet:Byte no (1-50) ASCII HEX ($)1-4:VAL$3A $56 $41 $4C5$006-7VM$56 $4D8$009if the variable is reset/unused: $00 **if variable is in use (normal): $0110$0011the same value as byte no 9: $00 or $0112A-Z / r / è13-19all $FF20-27Variable$56 $61 $72 $69 $61 $62 $6C $6528 C or R$43 or $52(If the variable has an imaginarypart: C-complex. Otherwise: R-real)29$0A30-49all $FF50Checksum= $01 + not((sum bytes 1-49)- $3A)**note: If bytes 9 and 11 has the HEX-value 00 thismeans that the variable has not been usedafter last "Alpha Memory" reset. Then noValue packet will be transmitted at all.After this packet comes the End packet.Variable packet, Real numbers:Byte no (1-50) ASCII HEX ($)1:$3A2-5$00 $01 $00 $016$00-$09 (BCD 0 and BCD 0-9 (integer part)) 7-13$00-$99 (BCD for 14 digits (decimal part)) 14SignInfoByte. Bit set if...:bit 7 - Variable has an imaginary partbit 6 & 4 - Value (real part) is negativebit 0 - Absolute value of (real partof) value is 1,0... or morebits 1, 2, 3 and 5 are always 0 / Low15Exponent, 00-99Exp.: Byte:+99 99 \+01 01 -} byte 14 bit 0 = 1 (High) **00 00 /-01 99 \-02 98 -} byte 14 bit 0 = 0 (Low)-99 01 /16Checksum= $01 + not((sum bytes 1-15)- $3A)**note: If the variable is (exactly) 0,0then the exponent is 00 (instead of minusinfinite) but this bit (bit 0 in byte14) is still low because variable valueis less than 1.The smallest value the Casio accepts is ± 1.00000000000000 × 10 -99The greatest number the Casio accepts is ± 9.99999999999999 × 10 +99Zero is stored as + 0.00000000000000 × 10 +00Or, at a general form: ± I.decimals × 10 +EEIn the Value packet, byte no. 6 is containing the integer part I, always from $01 to $09 (except if the variable value is exactly 0,0…).Bytes no. 7 to 13 contain the 14 decimals represented as BCD data.The exponent EE is represented in byte no. 15 and bit 0 of the SignInfoByte (byte no. 14).The sign indicating whether the value is negative or positive is held in bits 6 and 4 of the SignInfoByte.Variable packet, Complex numbers:Byte no (1-50) ASCII HEX ($)1-15Equal to bytes 1-15 in the 16 byteslong Value packet for real numbers. Thesebytes only describe the real part of thevariable, while the next 10 bytes describethe imaginary part of the complex number: 16$00-$09 (BCD 0 and BCD 0-9 (integer part)) 17-23$00-$99 (BCD for 14 digits (decimal part)) 24SignInfoByte. Bit set if...:bit 7 - Always set to 1 (imaginary)bit 6&4 - Value (img. part) is negativebit 0 - Absolute value of (img. partof) value is 1,0... or morebits 1, 2, 3 and 5 are always 0 / Low25Exponent for the imaginary part; 00-99Exp.: Byte:+99 99 \+01 01 -} byte 24 bit 0 = 1 (High)00 00 /-01 99 \-02 98 -} byte 24 bit 0 = 0 (Low)-99 01 /26Checksum= $01 + not((sum bytes 1-25)- $3A)End packet (aways the same!):Byte no (1-50) ASCII HEX ($)1-4 :END $3A $45 $4E $445-49 all $FF50 V $56 (checksum, always the same value forall End packets no matter what otherpackets have been sent)Checksum calculation:As an example let’s show how the checksum of the End packet is calculated. This value will always remain the same since nothing in this packet changes from timeto time. First we add all the previous 49 bytes. This gives us a sum of $E4 (the excess carry digits are thrown away). Then we subtract $3A and the result is $AA. We invert it (=$55) and add $01. The result is $56, which is the checksum-byte; byte no. 50.•When the command is issued the Casio sends an “attention request” byte, $15•The external device must reply with a “device present” byte, $13 within 0.5 ~ 1 second or a Com ERROR message is displayed•The Casio sends a Request packet which consist of 50 bytes.•The external device receives this and confirms with one byte, $06.•The Casio confirms that it’s ready for a Variable-description packet with $06 •The external device sends a Variable-description packet consisting of 50 bytes. Byte 12 in this packet (variable name) seems to be totally ignored by the Casio, as the variable is stored under the name indicated in the Request packet anyway. Still it’s recommended to send back the same name/byte as received in the Request packet byte 12.•The Casio confirms that it’s ready (for a Value packet or an End packet, depending on byte 9 and 11 in the previous packet) with $06• A Value packet is then sent from the external device. It is still consisting of either 16 or 26 bytes, depending on whether the variable also contains an imaginary part (complex number) or not. If the variable is empty this packet is not sent at all (length: 0 bytes). This means that the actual “AlphaMemory” variable in the Casio is deleted. This will free 10 (real) or 20(complex) bytes of memory in the Casio. In calculations the deletedvariable’s value equals zero (0).•If a Value packet was sent then the Casio confirms (as usual) with $06 (if the variable is empty there is no Value packet, and this byte is not senteither.)•To close the communication cycle the external device sends an End packet of 50 bytes. The end packet is always the same; none of the bytes change their value.•When the command is issued the Casio sends an “attention request” byte, $15•The external device must reply with a “device present” byte, $13 within 0.5 ~ 1 second or a Com ERROR message is displayed•The Casio starts to send the Variable-description packet, which consists of50 bytes.•The external device receives this and confirms with $06.•The Casio sends its Value packet, consisting of either 16 or 26 bytes. Packet length depends on whether the variable also contains an imaginary part(complex number) or not. If the variable has never been assigned a value since the last reset of “Alpha Memory” this packet will not be sent at all. •The external device receives this packet and confirms with $06. (If an empty variable is sent, then there is no Value packet, and this byte is not senteither.)•To close the communication cycle the Casio sends an End packet of 50 bytes. The end packet is always the same; none of the bytes change their value.。
利用CASIO 9750计算PFR并联操作反应器总体积
“K ”? — + K
“E ”? —+E I Ⅳ > U
@ 提 示 反 应 速 率 常 数 K , 存 储 于 变 量 K 中 并 @ 提 示 输 入 膨 胀 率 E, 存 储 于 变 量 E 中 并
The n“FA LSE : 0 1 > V O ” V Go o tl I End f
董 凯
( 枣庄学 院 化学与化工系 , 山东 枣庄 27 6 ) 7 10
[ 摘
要] 本文利用 C SO 95 A I 7 0图形计算器编程计算 P R并联操作反应器总体积 ; F 举例计算了 : 恒容条件下反应 器 R 1
出 口关键组分浓度 C 及反应级 数 N对反应器 总体 积的影响 ; A1 变容条件 下反应器 R1出 I关 键组分浓度 C 1对反应 Z l A 器总体积 的影 响 ; 膨胀率对反应器 总体积的影响 ; 对所得 的数 据作 了理论分析. [ 关键词 ] 图形计算器 ; F 反应器体积 P R; [ 中图分 类号] Q S . T O25 [ 文献标识码 ] A [ 文章编号] 04— 0 7 2 1 )2— 17— 4 10 7 7 (0 10 0 0 0
@清 空 显 示 屏
@ 提 示 输 入 V。 并 存 储 于 变 量 u 中 , @ 提 示 输 人 V 并 存 储 于 变 量 V 中 @ 提 示 输 入 c 并 存 储 于 变 量 B 中 @ 提 示 输 入 C , 存 储 于 变 量 A 中 并
@ 提 示 输 入 C… 并 存 储 于 变 量 C 中 @ 提 示 输 入 反 应 级 数 N, 存 储 于 变 量 N 中 并
2 1 年 4月 01 第2 8卷 第 2期
枣庄学院学报
J RNA F Z Z OU L O A0 HUA I RSTY NG UN VE I
- 1、下载文档前请自行甄别文档内容的完整性,平台不提供额外的编辑、内容补充、找答案等附加服务。
- 2、"仅部分预览"的文档,不可在线预览部分如存在完整性等问题,可反馈申请退款(可完整预览的文档不适用该条件!)。
- 3、如文档侵犯您的权益,请联系客服反馈,我们会尽快为您处理(人工客服工作时间:9:00-18:30)。
不切合实际坐标正算(1)计算公式设测站点平面坐标为(X0,Y0),测站至待定点的平距为D,方位角为a,按下列坐标正算公式计算待定点的坐标为:X=X0+DcosaY=Y0+Dsina程序标识符规定如下:A,B------测站点平面坐标;C---------观测方位角;D---------观测平距;X,Y------待定点平面坐标;程序:(以下用-代表箭头指向)Fix 4:”X0=”?→A:”Y0=”?→B↵Lbl 1:”ALFA=”?→C:”DIST=”?→D:”X=”:A+cos(c) ◢”Y=”:B+Dsin(c)◢Goto 1 ↵坐标反算(1)计算公式按两个已知点A,B 的平面坐标Xa ,Ya, Xb,Yb,计算两点间的距离D 和方位角a ,又称为“坐标反算”,计算公式为A=arctanYb Ya Xb Xa --()()程序中的标识符规定如下: A,B,C,D ——A,B 点的平面坐标; E,F ——A,B 点的坐标增量; R ——AB 的方位角; S ——AB 的平距。
(2)程序Fix4:“XA=”?→A:“YA=”?→B↵Lbl1:“XB=”?→C:“YB=”?→D:C-A→E;D-B→F:→S:tan-1(F/E)→R↵If E〈0:ThenR+180→R:Goto2:IfEnd:F〈0⇒R+360—R↵Lbl2:“DIST=”:S◢“ALFA=”:R◢Goto1↵测边交会(1)计算公式设A,B为已知点,其平面坐标为Xa,Ya,Xb,Yb,P为待定点,观测平距D A(a),D B(b).从P点作AB(c)边的垂线,交AB于D点,设AD=e,PD=f.用下式计算辅助线段e,f的长度和待定点P的平面坐标:e=(a2+c2-b2)/2c f=x=xA+ecosaAB+fsinaABy=yA+esinaAB-fcosaAB程序中的标识符规定如下:A,B,C,D——已知点A,B的平面坐标;P,Q——测边交会的观测边长;X,Y——待定点P的平距坐标。
A (508.2132,500.1184) B(615.1862,596.6530) P(661.8619,450.8289) Da=161.361 Db=153.112(2)程序D—INTERSECTFix4:“XA=”?→A:“YA=”→B:“XB=”?→D:“DA=”?→P:“DB=”?→Q:C-A→G:D-B→H:→I:(P2+I2-Q2)/2/I→E→F:H/I→M:G/I→N↵“X=”:A+EN+FM◢“Y=”:B+EM-FN◢“END”↵测角交会(前方交会)(1)计算公式测角交会又称“前方交会”。
设A,B为已知点,其坐标为xA,yA,xB,yB,P为待定点,分别在A,B点向P点观测水平角a,b,按下式计算待定点的坐标:x=(xAtana+xBtanb+(yA- yB)tanatanb)/tana+tanby=(yAtana+yBtanb+(xA-xB)tanatanb)/tana+tanb上式称为“前方交会正切式”,由于在各种交会定点中广泛应用,其交会计算部分编制子程序,可供多个主程序调用。
程序中的标识符规定如下:A,B,C,D——已知点A,B的平面坐标;P,Q——交会角a和b;X,Y——待定点P的平面坐标。
试计算下列数据:A(659.2320,355.5370),B(406.5932,654.0511) ,P(869.1977,735.2277) a=69 11 03 b=59 42 39(2)主程序A—INTERSECT(调用子程序INTERSEC)主程序A—INTERSECTFix4:“XA=”?→A:“YA=”?→B:“XB=”?→C:“YB=”?→D:“ALFA=”?→P:“BETA=”?→Q:tan(P)→P:tan(Q)→Q:Prog“INTERSEC”↵“X=”:X◢“Y=”:Y◢“END ” ↵ 子程序INTERSEC(AP+CQ+(D-B )PQ )/(P+Q )→ X : (BP+DQ+(A-C )PQ )/(P+Q )→ Y ↵如图1所示,已知量列于下表中,其中1α= 0'''404157,0'''1751902β=,0'''2591136α= 0'''2690623β=,求P 点坐标并简要说明求解过程?边角后方交会(1) 计算公式在待定点C 向两已知点A ,B 观测平距Da ,Db 及水平角K ,计算C 点的坐标,如图。
由于有多余观测,计算过程中可作观测值的检核。
设AB 的平距为Dc ,先用三角的余弦定律计算水平角P ,Q ;即P=arccos ((222a c bD D D +-)/(2a c D D )Q=arccos ((222b c aD D D +-)/(2b c D D )用下式检验角度闭合差,并令其显示:angf =K+P+Q-180°如果角度闭合差在容许范围内,则反起符号,平均改正各水平角。
用改正后的P ,Q 角,按前方交会公式计算待定点C 的坐标。
程序中的标识符规定如下:A ,B ,C ,D ——已知点A ,B 的平面坐标;E ,F ——观测平距Da ,Db ; K ——观测水平角K ;P ,Q ——根据三角形三边长算得的交会角P ,Q ; X ,Y ——待定点C 的平面坐标。
(2) 主程序AD —INTERSECT(调用子程序INTERSEC) Fix4:“XA=”? →A :“YA=”? →B :“XB=”? →C :“YB=”?→D :“DA=”? →E :“DB=”? →F :“ANGLE=”? →K ↵→H :cos-1((E ²+H ²-F ²)/(2EH))→P :cos-1((F ²+H ²-E ²)/(2FH) →Q ↵K+P+Q-180 →G :“F-ANGLE=”:G ▶DMS ◢tan (P-G/3)→P :tan (Q-G/3)→Q :Prog “INTERSEC ”: “X=”:X ◢“Y=”:Y ◢ “END ” ↵平面坐标变换建筑坐标换算为大地坐标(1)计算公式工程建筑的设计一般采用建筑坐标系,是一种独立坐标系。
其坐标轴与建筑物的主轴线相平行或一致,便于设计、计算与施工放样。
建筑坐标系与城市或国家坐标系(总称为大地坐标系)需要进行连测,即测定建筑坐标系的原点的大地坐标(00,x y),以及建筑坐标系纵轴在大地坐标系的方位角(α),据此可以进行坐标换算。
设XOY为大地坐标系的坐标轴,X`O`Y`为建筑坐标系的坐标轴,如图。
已知P点的建筑坐标为,p px y'',可按下式换算为城市坐标,p px y:Xp=X0+X`pcosα-Y`psinαYp=Y0+X`psinα+Y`pcosα在程序中,用XG,YG代表大地坐标,用XA,YA代表建筑坐标。
程序中的标识符规定如下:A——建筑坐标系纵轴在大地坐标系的方位角;E,F——建筑坐标系的原点的大地坐标;U,V——点的建筑坐标;X,Y——点的大地坐标。
(2)子程序(ARCH-GEOD)Fix4:“ALFA=”?→A:“X0=”?→E:“Y0=”?→F↵Lbl1:“XA=”?→U:“YA=”?→V:“XG=”:E+Ucos(A)-Vsin(A)◢“YG=”:F+Usin(A)-Vcos(A) ◢Goto1↵设CDO为大地坐标系的坐标轴,XYO’为建筑坐标系的坐标轴,如图2所示,已知P点的建筑坐标为'P x,'P y,则写出建筑坐标系换算为大地坐标P x,P y以及相应程序代码,并对补充完整下列表格。
公式:程序自定义标识符及代码为:大地坐标换算为建筑坐标(1) 计算公式如果已知P 点的城市坐标Xp ,Yp ,则可按下式换算为建筑坐标,p px y '':X`p=(X p -X 0)cos α+(Y p -Y 0)sin α Y`p=-(X p -X 0)sin α+(Y p -Y 0)cos α 程序中的标识符规定如下:A ——建筑坐标系纵轴在大地坐标系的方位角; E ,F ——建筑坐标系的原点的大地坐标; U ,V ——点的大地坐标; X ,Y ——点的建筑坐标。
(2) 程序(GEOD-ARCH)Fix4:“ALFA=”? →A :“X0=”? →E :“Y0=”? →F ↵ Lbl1:“XG=”? →U :“YG=”? →V: “XA=”:(U-E)cos (A )+(V-F )sin (A )◢ “YA=”:(E-U )sin (A )+(V-F )cos (A )◢ Goto1↵面积计算按多边形角点坐标计算面积(1) 计算公式 在图中,J1,J2,J3,J4为多边形角点,Ji点的平面坐标为Xi,Yi。
多边形的每一条边和坐标轴、坐标投影线组成一个个梯形。
多边形的面积P是这些梯形面积的和或差,即P=12 [(X1+X2)(Y2-Y1)+(X2+X3)(Y3-Y2)-(X3+X4)(Y3-Y4)-(X4+X1)(Y4-Y1)]将上式整理后,得到:P=12[X1(Y2-Y4)+X2(Y3-Y1)+X3(Y4-Y2)+X4(Y1-Y3)]对于任意的n边形,可以写出下例按角点坐标计算面积的通用公式:P=121niix=∑Xi(1iY+-1iY-)(1)P=121niiy=∑Yi(1iX+-1iX-)(2)P=121ni=∑(Xi+1iX+)(1iY+-Yi)(3)P=121ni=∑(Xi1iY+-1iX+Yi) (4)以上四种公式中,式1和式2适合于手工计算,式3和式4适合于编制计算机(器)程序。
计算式,从输入第一点坐标开始,按顺时针方向依次输入各角点坐标,至最后一点。
公式中的循环参数i=1~n ,当用到i=1或i=n 时,公式中需用到X0,Y0或11,,n n X Y ++这些坐标值按下式调用: X0=Xn ,1n X +=X1 Y0=Yn ,1n Y +=Y1程序中的标识符规定如下:A ,B ,C ,D ——多边形第一个角点的平面坐标及其保留值;E ,F ——依次储存各点平面坐标; N ——多边形的角点数; P ——多边形的面积。
(2)程序AREA-POLYFix3:“POINTNUMBER=”? →N :“X1=”? →A :“Y1=”? →B : A →C :B →D :0→P ↵Lbl1:If N=1:Then A →E :B →F :Goto2:IfEnd ↵ “X(I)=”? →E:“Y(I)=”? →F ↵Lbl2:P+(C+E)(F-D)/2→P :N-1→N :N=0⇒Goto3↵ E →C :F →D :Goto1↵ Lbl3:“AREA(M ²)=”:P ◢ “AREA(MU)=”:1.5P/1000◢ “END ” ↵1公顷= 亩1亩= 平方米1亩= 平方公里1平方公里= 公顷编程后试用下述坐标检验:A(255.724,527.040),B(274.166,584.619),C(273.143,599.387 ),D(262.245,609.406),E(234.396,620.027),F(224.303,588.3 98),G(245.783,581.139),H(230.944,536.009)已知ABCD四个点,其坐标分别为A(253.964,529.212), B(275.146,581.679),C(245.743,581.179),D(230.954,536.109 ),求得ABD所围成三角形的面积为()ABCD四边形的面积为()。