SEED-XDS560PLUS Version使用指南
SEED-XDS560PLUS仿真器安装、使用指南
电话:
010-59796855
传真:
010-62161218
iv
目录
阅前必读........................................................................................................................... iii 目录................................................................................................................................... 1 SEED-XDS560PLUS 仿真器安装................................................................................. 2
版权© 2010,北京合众达电子技术有限责任公司
ii
前言
阅前必读
简介:
此手册描述了 SEED-XDS560PLUS 仿真器的安装、使用。SEED-XDS560PLUS 是 适用于德州仪器全系列DSP 处理器开发平台的高速仿真器。
所有由北京合众达电子技术有限责任公司生产制造的硬件和软件产品,保修期为从发货 之日起壹年。在保修期内由于产品质量原因引起的损坏,北京合众达电子技术有限责任公司 负责免费维修或更换。当在保修期内软件进行了升级,北京合众达电子技术有限责任公司将 免费提供。
1.2 安装步骤 ............................................................................................................. 3 1.2.1 安装软件: TMDSCCSALL-1 (CCS v3.3) ........................................... 3 1.2.2 安装 SEED-XDS560PLUS 仿真器驱动 .............................................. 3 1.2.3 安装 SEED-XDS560PLUS 仿真器硬件设备 ....................................... 6
SEED-XDS560v2仿真C6000芯片使用指南

SEED-XDS560v2仿真C6000芯片使用指南
由于CCS本身的原因,在现有的CCS版本下(CCS4.1.3及其以上版本)使用SEED-XDS560v2仿真器仿真C6416和DM642等C6000芯片时,需要先进行一项配置工作,具体使用方法如下:
使用USB进行仿真
1.通过JTAG电缆将仿真器与板卡相连。
2.通过USB电缆将仿真器与PC相连。
3.给仿真器上电,给板卡上电,等待仿真器启动完毕。
4.仿真器启动完毕后,打开SEEDXDS560V2_C6000Config.exe(位于CCS安装路径
下..\ccsv4\common\uscif),如下图所示。
6.打开CCS,对C6416或者DM642等C6000芯片进行相应的仿真操作。
使用网络进行仿真
1.通过JTAG电缆将仿真器与板卡相连。
2.通过USB电缆将仿真器与PC或者有效使用的路由器相连。
3.给仿真器上电,给板卡上电,等待仿真器启动完毕。
4.仿真器启动完毕后,通过SEEDXDS560V2_Config.exe(位于CCS安装路径
下..\ccsv4\common\uscif)获取IP地址。
5.打开SEEDXDS560V2_C6000Config.exe(位于CCS安装路径下..\ccsv4\common\uscif),
选择“NET configuration”,并填写所获取的IP地址。
本例设置IP为192.168.253.183,如下图所示。
7.打开CCS,对C6416或者DM642等C6000芯片进行相应的仿真操作。
[原]TMS320F28335项目开发记录2_CCS与JTAG仿真器连接问题汇总
![[原]TMS320F28335项目开发记录2_CCS与JTAG仿真器连接问题汇总](https://img.taocdn.com/s3/m/528b71fc102de2bd960588cb.png)
[原]TMS320F28335项目开发记录2_CCS与JTAG仿真器连接问题汇总CCS与仿真器连接问题实际使用过程中,仿真器和CCS连接可能出现这样或那样的问题,也许你的连接很成功,没碰到过什么问题,但我的问题的确不少,可能与电脑配置有关吧,也可能与人品有关吧;下面的自己的一些错误和解决方法总结,不一定对,但也算是一种解决方法,分享给大家:问题:1. jtag连接不上,报错:The controller has detected a dead JTAG clock.The user must turn-on or connect the JTAG clock for the target.连接dm8147没有问题,连接dsp f28335出现此问题;通过不接仿真器测试发现jtag的复位引脚11脚持续的发出低电平,该脚输入WID信号,WID信号输入有问题;所以,还是硬件28335板子硬件上的问题;最后得出:芯片没有问题,是JTAG硬件电路或其他电路的问题;看门狗的复位是由于Flash中没有程序,而复位的低电平脉冲不是造成仿真器连接不了的直接原因;仿真器连接不了,大部分原因是因为JTAG电路的问题,也不排除28335、虚焊、上电顺序等问题;最后查出JTAG上的引脚(TCK、RTCK)有问题!2. The controller has detected a target power loss.The user must turn-on or connect the power supply for the target.看看板子有没有上电。
3. Device is held in reset. Take the device out of reset, and retry the operation.不明原因。
4. The requested TCLK PLL frequency option is invalid.The utility or debugger has requested a selection ofthe JTAG PLL frequency or clock source that is invalid.The value of USCIF.TCLK_FREQUENCY is probably bad.手工设置jtag频率为0后报错5. Failure due to the controller command-finish taking too long.重启ccs或板子看看,一般可以解决。
SEED-XDS510PLUS仿真器安装、使用指南(CCS4.x)

商标:
SEED 是北京合众达电子技术有限责任公司的注册商标。 TI、XDS510 是 Texas Instruments 的注册商标。
III
Hale Waihona Puke 更多帮助: 网址:
合众达总公司 地址: 北京市海淀区中关村南大街 12 号寰太大厦 1201 号 邮编: 100081 电话: 010-59796855 传真: 010-62161218
序列 1 2 3 名称 SEED-XDS510PLUS仿真器 电缆-USB-MINI/5P 安装光盘 数量 1 1 1
5
IV
第1 章
SEED-XDS510PLUS 仿真器安装
1.1 安装说明 1.1.1 安装环境
为了安装SEED-XDS510PLUS仿真器,系统应满足如下所述的最小要求:
Windows XP Professional SP3 Code Composer Studio™4.1.3 及以下版本。
1.1.2 SEED-XDS510PLUS 仿真器所支持的 DSP 系列
TMS320F28xx TMS320VC54xx TMS320VC55xx TMS320C64xx TMS320C67xx TMS320DM64x TMS320C643x TMS320DM64xx TMS320DM270 TMS320DM320 TMS320DM35x OMAP
4. 重新命名配置文件的名字,单击“Finish” 。
1
5. 配 置 “ Connection ” 选 择 “ SEED XDS510PLUS Emulator ” , 配 置 “ Device ” 选 择 “TMS320DM642” ,而后单击“Save” 。
SEED-XDS560v2PLUS配置工具使用指南
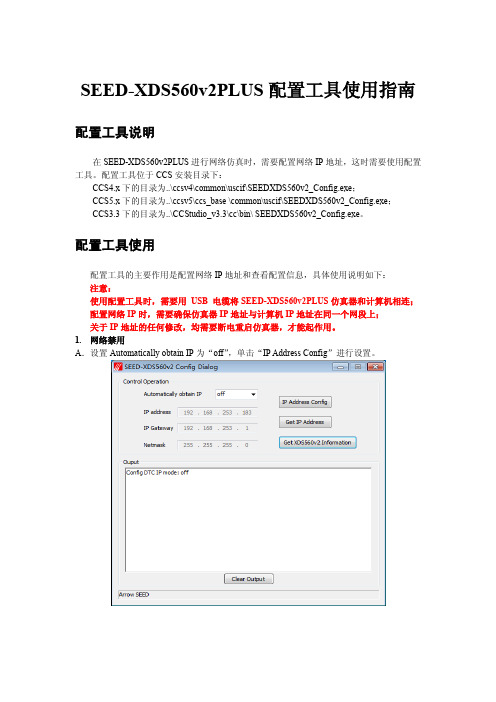
SEED-XDS560v2PLUS配置工具使用指南配置工具说明在SEED-XDS560v2PLUS进行网络仿真时,需要配置网络IP地址,这时需要使用配置工具。
配置工具位于CCS安装目录下:CCS4.x下的目录为..\ccsv4\common\uscif\SEEDXDS560v2_Config.exe;CCS5.x下的目录为..\ccsv5\ccs_base \common\uscif\SEEDXDS560v2_Config.exe;CCS3.3下的目录为..\CCStudio_v3.3\cc\bin\ SEEDXDS560v2_Config.exe。
配置工具使用配置工具的主要作用是配置网络IP地址和查看配置信息,具体使用说明如下:注意:使用配置工具时,需要用USB 电缆将SEED-XDS560v2PLUS仿真器和计算机相连;配置网络IP时,需要确保仿真器IP地址与计算机IP地址在同一个网段上;关于IP地址的任何修改,均需要断电重启仿真器,才能起作用。
1.网络禁用A.设置Automatically obtain IP为“off”,单击“IP Address Config”进行设置。
B.重启仿真器,单击“Get IP Address”,发现网络已经禁用。
2.静态配置IP地址A.设置Automatically obtain IP为“static”;在IP address中设置所需的IP,本次设置为192.168.253.183;在IP Gateway中设置网关,本次设置为192.168.253.1;在Netmask中设置子网掩码,本次设置为255.255.255.0;单击“IP Address Config”进行设置。
B.断电重启仿真器,单击“Get IP Address”,发现网络静态IP已经配置成功。
注意:配置的IP不可与其他IP地址发生冲突,必须为可用IP,否则仿真器无法仿真。
3.动态配置IP地址A.设置Automatically obtain IP为“dhcp”,单击“IP Address Config”进行设置。
XDS560快速安装

XDS560快速安装XDS560 JATAG Scan-based 仿真器快速开始参考指南安装XDS560仿真器此向导按以下的顺序描述XDS560仿真器的安装步骤:1.安装XDS560仿真器的硬件2.安装XDS560仿真器的Windows设备驱动程序3.确认Code Composer Studio IDE 已经安装到计算机4.安装XDS560仿真器的软件5.配置Code Composer Studio IDEXDS560 仿真器套装包括:z XDS560 PCI卡z XDS560下载电缆z安装光盘z XDS560快速开始参考指南(本文档)Code Composer Studio (CCStudio)IDE安装CD在2.1版本以后将包含已升级的XDS560仿真器软件。
安装要求:z Code Composer Studio IDE 2.1或更高版本z一个全尺寸PCI插槽z主频233MHz或更高的奔腾(或与之兼容的)CPU(中央处理器)(推荐使用相当于500MHz或更高主频的奔腾III处理器)z本地CD-ROM驱动器支持的操作系统:Windows 98Windows 98 Service Park IWindows 98SEWindows MEWindows NT|4.0 Service Park 6aWindows 2000 Service Park 1 or higherWindows XP Home EditionWindows XP Professional Edition减小人身伤害的危险为了最大限度的减小造成人身伤害的风险,确保在安装XDS560仿真器的时候已关闭您计算机的电源并且拔掉计算机的电源线。
减小电击和着火的危险为了最大限度的减小电击和着火的危险,请您确定所有您用于和德州仪器公司器件接口的主要器件都在能量上得到限制,并且得到下列一个或多个组织的认证:UL,CSA,VDE或TUV。
减小静电放电的危害必须使用指定的操作方法和工具(材料)以防止设备损坏。
SEED应用程序用户手册说明书
Seed App User ManualSeed PC Application AvailableD4241-EN Rev A November 12, 20182SEED User ManualD4241-ENTopcon Agriculture AmericasW5527 Hwy 106 Fort Atkinson, WI 53538USATel: 800-225-7695E-mail:*******************Topcon Agriculture International Topcon Agriculture Europe B.V.J.F. Kennedylaan 235 NL-5981 WZ PanningenThe Netherlands Tel: +31 (0)77 462 92 64E-Mail:********************D4241-EN SEED App User Manual Rev A SCCAll rights reserved. Reproduction of any part of this manual in any form whatsoever without Topcon Agriculture Americas express written permission is forbidden. The contents of this manual are subject to change without notice. All efforts have been made to assure the accuracy of the contents of this manual. However, should any errors be detected, Topcon Agriculture Americas would greatly appreciate being informed of these errors. The above notwithstanding, Topcon Agriculture Americas can assume no responsibility for errors in this manual or their consequence.© Copyright! 2018 Topcon Agriculture Americas, Fort Atkinson (U.S.A.).D4241-ENSEED User Manual3Table of Contents1.0 TOPCON SEED PC APPLICATION .................................................................................................................. 42.0 INTRODUCTION ...................................................................................................................................................... 5 2.1 Purpose ...................................................................................................................................................................... 5 2.2 Technical Specifications ....................................................................................................................................... 5 2.3 Exposure to Radio Frequency ............................................................................................................................. 5 2.4 Prior to Operation .................................................................................................................................................... 5 2.5 Check system before use .................................................................................................................................. 5 2.6 Additional Document Information and Support .............................................................................................. 63.0 Downloading TopCon SEED app ................................................................................................................ 64.0 How Register TopCon SEED App .............................................................................................................. 75.0 Adding Commodities ........................................................................................................................................ 86.0 Overview of Transfer Screen .................................................................................................................... 107.0 Add, Select or Edit Commodities ........................................................................................................... 118.0 Add, Select Grower ........................................................................................................................................ 129.0 Add, Select Farm or Field ........................................................................................................................... 14 10.0 Add, Edit, Select Field .............................................................................................................................. 16 11.0Select My Operations (17)10.1 Machines ............................................................................................................................................................... 17 10.2 Storage Areas ....................................................................................................................................................... 19 10.3 Providers ............................................................................................................................................................... 20 10.4 Activities . (22)1.0 TOPCON SEED PC APPLICATION1. Using Login:https://2. To create account, click “Sign Up” then enterinformation required.3. Overview of main screen:a. Overview—Inventory, planting summaryb. Growers—Growers summeryc. Farms—Farm summaryd. Fields—Field summarye. Commodities—Commodity summaryf. Machines—Machine summaryg. Storage—Storage summaryh. Providers—Provider summary4 SEED User Manual D4241-END4241-EN SEED User Manual52.0 INTRODUCTIONExposure to energy from radio frequencies is an important safety issue. As this product uses the WiFi and Cellular system of a smartphone or tables please consult with the safety information provided with the device that the App operates with.2.4 Prior to OperationRead and understand this manual and learn all controls before you use the equipment. Check that the area is clear of people, animals, and obstacles before starting any work. Identify possible hazards.2.5 Check system before useBefore using the App with the Digi-Star weighing system read the Operator’s Manual for the Digi -Star Scale Indicator and the ERM-WiFi system. Follow all instructions.Digi-Star cannot be held responsible for deviations and problems arising from incorrect use of the scaleindicator, incorrect calibration, or settings. Furthermore Digi-Star cannot be held responsible for deviations and problems arising from technical problems to the system.2.6 Additional Document Information and SupportDigi-Star website: Technical Support: Toll Free 800-225-7695 (US & Canada); +1-920-563-9700Additional Document Information listed below;ST3410 Operators Manual—D4218-EN3.0Downloading TopCon SEED app1. Go to the App Store, then searchfor “TopCon SEED”.2. Begin download of the TopConSEED app.3. Press to open the app.6 SEED User Manual D4241-EN_________________________________________________________________________D4241-ENSEED User Manual 74.0 How Register TopCon SEED App1. First, create account and registerthe TopCon SEED app.2. Press the “SIGN UP” bar at thebottom on screen.3. Next, fill in required information:a. Email Addressb. First Namec. Last Named. Create a Password4. Then press the “SIGN UP” bar.5. Enter the email address, then thepassword that was created.6. press the “SUBMIT” bar to log into theTopCon SEED app.5.0Adding CommoditiesCommodities are seeds being planted in the field and stored inbuildings. Examples; Corn, Soybeans, Oats.1. Select unit of measure, US orMetric.2. Press the bar to “AddCommodities”.Note:Press “Skip” located in topright corner to skip this section ifno change to units orcommodities are needed.8 SEED User Manual D4241-EN1. Fill in required information:a. Varietyb. Seed Typec. Seeds per poundd. Pounds per Unite. Storage Locationf. Lot #g. A photo of the label on seedbag or box can be added (notrequired).2. Press “DONE” found in the topright corner of screen.3. Press bar “Add AnotherCommodity” to add anothercommodity.Press “NEXT” to go back to themain screen.D4241-EN SEED User Manual 910SEED User ManualD4241-EN6.0 Overview of Transfer Screen7.0 Add, Select or Edit Commodities1. Press “commodity” at the bottomof screen.2. Press the “+” up in top rightcorner to add new commodity.OrPress on the toview details of the commodity.3. To edit the commodity, press“Edit” up in the right-hand corner.8.0Add, Select GrowerThe Grower, person(s) planting, growing & Harvesting the crops.4. Press the line of information you wishto edit. Then edit the commodityinformation.5. When editing is complete, then press“Done” in the top right-hand corner.1. Press “Field” shown at bottom ofscreen to select Fields mainscreen.2. Then press the Growers Name tobe selected. The Grower selectedhas a check mark next to theGrower’s name.3. To add new Grower, press the “+”in top right-hand corner.4. Then press “Fields” located in theupper left-hand corner to go backto the Fields screen.1. The selected Grower will havethe Farm(s) and Field(s) listed. Note: Farm names cannot be edited or deleted.9.0Add, Select Farm or FieldWhen grower is chosen, then select the farm. Farms will be listed under the grower that has been chosen.1. Press “Jims Farm” to list farmsunder Grower.2. Press farm name to select farm.Selected farm has a check marknext to name.4. Press “+” in upper right-handcorner to add new farm.5. Add new farm name, then press“OK”.6. Then press “<Fields” in upperleft-hand corner to go back to the Fields screen.10.0Add, Edit, Select Field1. Press “Field#5” to view Fielddetails.Note:Press the “+” up in top right cornerto add new Field.2. Press “Edit” in upper right-handcorner to edit field11.0Select My OperationsThese operations are for the customer to add, edit or view Machines, Storage Areas & Providers.10.1 Machines2. Press;a. Grower Nameb. Farm Name (select from drop down)c. Field Named. Area3. Then press “Done”.1. Press Machines. This will list themachines you have added. Example:Planter#1, Seed Tender#1, SeedTender#2.2. Press “Planter#1” to view details. Note:Press “+” to add new machine to list.1. Press “Edit” to change machineinformation.2. Press “Done” when editing iscomplete._________________________________________________________________________ 10.2 Storage Areas1. Press “Storage Areas”. A list ofstorage areas can be viewed.2. Select “Corn Storage” to viewdetails.3. Press “Edit” in upper right-handcorner._________________________________________________________________________10.3 Providers1. Press “Storage Description” toedit. Press “Location” to edit.2. Then press “Done”.1. Press “Providers”.2. Seed suppliers will be listed.3. Press “The Seed Company” toview details.Note:Press “+Add” in upper right-hand corner to add new seed suppliers.1. Press “edit” to change theProvider information.2. Press “Done” in the upper right-hand corner.10.4 Activities1. The Activity screen shows all thehistory of the commodities beingmove. Shows the customer thedate, commodity and weightbeing transferred._________________________________________________________________________ NOTES:_________________________________________________________________________。
蔬菜种植机 使用指南
蔬菜种植机使用指南The Vegetable Planting Machine User GuideIntroduction:The Vegetable Planting Machine is a state-of-the-art agricultural equipment designed to simplify and enhance the process of vegetable cultivation. This user guide aims to provide comprehensive instructions on how to effectively use the machine, highlighting its features, benefits, and proper maintenance procedures. By following these guidelines, users can maximize the efficiency and productivity of their vegetable farming operations.Assembly and Setup:Before using the Vegetable Planting Machine, it is crucial to properly assemble and set it up. Begin by carefully unpacking all the components and checking for any damages. Refer to the instruction manual for step-by-stepguidance on assembling the machine. Ensure that all parts are securely connected and tightened. Once assembled, find a suitable location for the machine, preferably on a flat and well-drained surface. Adjust the planting depth and spacing according to the specific vegetable being planted. Proper setup is essential for optimal performance and accurate planting.Operating the Machine:To operate the Vegetable Planting Machine, first, ensure that the soil is properly prepared and free from any debris or obstacles. Start the machine by following the instructions provided in the user manual. Familiarize yourself with the different controls, such as the speed adjustment and planting depth settings. Carefully guide the machine along the designated planting rows, making sure the seeds are being evenly distributed and planted at the desired depth. Regularly monitor the seed hopper to avoid running out of seeds during operation. Adjust the planting speed and depth as necessary to accommodate different soil conditions and vegetable varieties.Benefits of Using the Vegetable Planting Machine:The Vegetable Planting Machine offers numerous benefits to vegetable farmers. Firstly, it significantly reduces the time and labor required for manual planting, allowing farmers to cover larger areas in a shorter period. This efficiency translates into increased productivity and higher crop yields. Additionally, the machine ensures precise and uniform seed placement, minimizing seed wastage and promoting optimal growth. By eliminating the need for manual seedling transplantation, it also reduces the risk of transplant shock and damage to young plants. Overall, the Vegetable Planting Machine streamlines the planting process, saving farmers time, effort, and resources.Maintenance and Care:To ensure the longevity and optimal performance of the Vegetable Planting Machine, regular maintenance is essential. After each use, thoroughly clean the machine, removing any dirt, debris, or plant residues. Inspect allmoving parts for signs of wear or damage and promptly replace any worn-out components. Lubricate the machine as recommended by the manufacturer to prevent rust and ensure smooth operation. Store the machine in a dry and secure location when not in use, protecting it from harsh weather conditions. Regularly check the seed hopper and planting mechanisms for any blockages or malfunctions. By following these maintenance procedures, users can extend the lifespan of the machine and avoid costly repairs or replacements.Conclusion:The Vegetable Planting Machine is a valuable tool for modern vegetable farming, offering efficiency, precision, and increased productivity. By carefully following the assembly, setup, and operating instructions provided inthis user guide, farmers can harness the full potential of this innovative equipment. The machine's benefits, such as time and labor savings, precise seed placement, and reduced transplant shock, make it a worthwhile investment for vegetable growers. Regular maintenance and care are crucial to ensure the machine's longevity and optimal performance.With the Vegetable Planting Machine, farmers can streamline their operations, maximize yields, and contribute to sustainable agriculture practices.。
SEED-XDS560PLUS_FAQs20111201
Q25: JTAG线为何一拽坏了? ................................................................................................................................ 7 Q26: JTGA线坏了,能自己更换吗? .................................................................................................................... 7 Q27:能否使用市场购买的USB线呢?................................................................................................................ 7 Q28: 为何USB线与仿真器连接处松动?............................................................................................................. 7 Q29:TI公司的仿真器同SEED仿真器的区别? ................................................................................................... 7 Q30:连接仿真器后,PC显示连接到一个未知设备? ...................................................................................... 7 Q31:SEED-XDS560PLUS支持Trace功能吗? ....................................................................................................... 7 Q32:SEED-XDS560USB与SEED-XDS560PLUSv2.8 的区别是什么? ................................................................... 7 安装过程相关FAQ .......................................................................................................................................................... 7 Q33:为何装过其他公司的 560 系列仿真器驱动后,安装我公司的仿真器无法使用? .............................. 7 Q34: SEED-XDS560PLUS驱动能否在LINUX系统下安装? .................................................................................... 7 Q35:SEED-XDS560PLUS驱动能否在WIN7 系统下安装?.................................................................................. 7 Q36: 如果使用USBorPCI点击Done时跳出对话框如下图所示,什么原因? ................................................... 8 Q37:为何安装CCS3.3 后,运行升级包CCS_v3.3_SR11_81.6.2.exe后,运行程序SEED-XDS560Plus Emulator for CCS3.3 Below.exe,默认选择CCS3.3.82。为何运行USBorPCI.exe,选择CCS3.3.82 出现下面的错误? .. 8 Q38:使用 CCS3.3 的仿真环境,如果装完驱动后,打开CCS3.3 软件,直接报如下错误,没有进入CCS界面 是仿真器坏了吗? ................................................................................................................................................. 8 Q39: 装好CCS的一个版本,并且安装驱动调试正常。但是安装了CCS的升级包后(例如从CCS3.3.81 版本 升级到CCS3.3.82 版本),无法正常使用怎么办? ............................................................................................ 9 Q40:如果使用SEED-XDS560PLUS,想使用SEED-XDS560PCI或者TI-XDS560 PCI时怎么办? ......................... 9 Q41:仿真器驱动支持CCS3.2、CCS3.0 版本的CCS吗? ................................................................................... 10 Q42:仿真器驱动支持CC3X/4X软件,能仿真VC33 吗? ................................................................................ 10 Q43: 仿真器驱动支持CCS3.1 版本的CCS吗? ................................................................................................... 10 Q44: CCSv4 版本的驱动也和CCS3.3 版本的驱动也分为两个吗? ................................................................ 10 Q45: 装完驱动后,一定需要电脑重启吗? ..................................................................................................... 10 Q46:一台电脑上能装多个版本的CCS吗? ...................................................................................................... 10 调试过程相关FAQ ........................................................................................................................................................ 10 Q47:为何仿真器能正常连接Davinci、OMAP系列板卡,但是无法加载out文件? .................................... 10 Q48:用XDS560PLUS仿真F2407 时,打开CCS后,能顺利连接板卡,然后disconnect但不关CCS,将板卡断 电后,并将JTAG口重新插入,重新上电后需Retry三次才连接正常吗? ...................................................... 11 Q49: DM642 属于Davinci系列,为何在CCS3.3 的版本软件中找不到其选项? ............................................. 11
蔬菜种植机 使用指南
蔬菜种植机使用指南英文回答:Vegetable planting machines are efficient and convenient tools for farmers to cultivate and harvest various types of vegetables. These machines are designed to automate the process of sowing seeds, applying fertilizers, and watering the plants. They not only save time and labor but also ensure uniformity in planting, leading to higher crop yields.One of the key features of a vegetable planting machine is its seed dispenser. This mechanism accurately places the seeds at the desired depth and spacing, ensuring optimal germination and plant growth. With the help of sensors and adjustable settings, farmers can control the amount of seeds being dispensed, allowing for precise planting.Another important component of a vegetable planting machine is the fertilizer applicator. This device evenlydistributes fertilizers along the planting rows, providing the necessary nutrients for the plants' growth. By automating the fertilization process, farmers can save time and ensure that each plant receives the appropriate amountof nutrients.Furthermore, vegetable planting machines are equipped with irrigation systems to water the plants. These systems can be adjusted to deliver the right amount of water at the right time, promoting healthy plant growth and reducing water wastage. Some advanced machines even have sensorsthat monitor soil moisture levels and automatically adjust the irrigation accordingly.In addition to these main features, vegetable planting machines often come with other useful functionalities. For instance, some machines have weed control mechanisms that remove unwanted vegetation without damaging the crops. Others may have built-in sensors to detect and removestones or other debris that could hinder plant growth.Using a vegetable planting machine is relatively simple.Farmers need to prepare the soil by tilling and leveling it before operating the machine. They then load the seeds and fertilizers into the respective compartments of the machine. Once everything is set up, farmers can start the machineand guide it along the planting rows. The machine will automatically dispense seeds, apply fertilizers, and water the plants as it moves forward.The benefits of using a vegetable planting machine are numerous. Firstly, it saves a significant amount of timeand labor compared to manual planting. Farmers can cover larger areas in less time, allowing them to focus on other important tasks. Secondly, the machine ensures uniformityin planting, which leads to more consistent crop growth and higher yields. Lastly, by automating the process, the machine reduces the risk of human error and improvesoverall efficiency.中文回答:蔬菜种植机是农民种植和收获各种蔬菜的高效便捷工具。
- 1、下载文档前请自行甄别文档内容的完整性,平台不提供额外的编辑、内容补充、找答案等附加服务。
- 2、"仅部分预览"的文档,不可在线预览部分如存在完整性等问题,可反馈申请退款(可完整预览的文档不适用该条件!)。
- 3、如文档侵犯您的权益,请联系客服反馈,我们会尽快为您处理(人工客服工作时间:9:00-18:30)。
SEED-XDS560PLUS Version使用指南
安装完SEED-XDS560PLUS驱动,重新启动计算机,可以看到SEED-XDS560PLUS Version位于CCS安装目录下,桌面有其快捷方式。
SEED-XDS560PLUS仿真器的硬件版本有三个版本,分别为SEED-XDS560PLUS v2.6、SEED-XDS560PLUS v2.8和SEED-XDS560PLUS v2.8.01。
这三个版本的仿真器的驱动并不互相兼容。
其中,SEED-XDS560PLUS v2.6、SEED-XDS560PLUS v2.8两个版本的驱动是完全兼容,使用一个驱动。
SEED-XDS560PLUS v2.8.01是单独一个驱动。
具体详情可以看FAQ 的说明。
SEED-XDS560PLUS Version的作用就在于确认正在使用的SEED-XDS560PLUS仿真器的硬件版本,并根据不同的版本选择相应的驱动。
当前的缺省状态是使用SEED-XDS560PLUS v2.8.01版本的仿真器。
注意:在使用SEED-XDS560PLUS Version之前,PC机必须已经安装好仿真器驱动,并且必须处于USB状态(相对于PCI状态而言,可以通过配置工具USBorPCI进行设置)。
使用方法
1.用所提供的USB电缆将SEED-XDS560PLUS仿真器与电脑主机相连;
2.等待系统安装好SEED-XDS560PLUS仿真器的驱动;如果是第一次使用安装、使
用SEED-XDS560PLUS仿真器,则首先安装仿真器驱动;
3.SEED-XDS560PLUS仿真器的缺省状态为USB状态。
如果不确定当前仿真器的状
态,请使用配置工具USBorPCI进行设置。
4.单击打开SEED-XDS560PLUS Version,点击“Run”。
如果是SEED-XDS560PLUS v2.8.01版本,则显示为如下图所示:
如果是SEED-XDS560PLUS v2.6或者SEED-XDS560PLUS v2.8版本,则显示为如下图所示:
5.等待仿真器自动重启完成,则已经设置好所使用的仿真器的驱动。