MusicXML简明教程
muse制谱软件使用教程

m u s e制谱软件使用教程SANY标准化小组 #QS8QHH-HHGX8Q8-GNHHJ8-HHMHGN#Muse 曲谱软件帮助文档(百度下载卢海江修改编辑整理)目录Muse 简介缪斯音乐软件是音乐123软件的新版本,我们为了走国际化道路,故从开始改名为缪斯(英文名字:Muse )新版本中保留了原来的核心特点:以曲谱的排版为主快捷的输入经过半年来的用户意见的搜集整理,我们在原来版本上做了很大的改动。
该版本增加了许多新的特点:更加灵活多变的排版方式支持更快捷的输入方式(脚本输入)支持屏幕鼠标点击的直观的编辑修改支持屏幕下面的键盘快捷输入将五线谱、简谱、吉他谱、歌词和谐融合方便的多音轨编辑,使软件更加专业化与WORD相类似的单页多页浏览方式,便于阅读打印附加手机铃声生成工具,将乐谱转成各种手机的铃声输入码版本增加的新功能有:脚本编辑和屏幕编辑相对应的光标定位快捷键的设定渐强符号MIDI文件输出文本的插入(限专业版)文字装饰的插入(限专业版)每行的自由控制(限专业版)支持屏幕下面的键盘快捷输入曲谱输入Muse 有两种输入方式:脚本输入方式和屏幕输入方式。
脚本输入方式快捷,控制功能更强,一些特殊的控制方式只在脚本输入方式下提供。
而屏幕输入方式更直观易用,特别适合乐理比较弱一点的用户。
两种输入方式的结合使得曲谱编辑更加迅速,简单。
脚本输入方式2.1.1脚本概述muse曲谱软件主要采用了abc符号系统。
每篇曲谱由版本信息、描述头和曲谱主体构成,其中版本信息是乐谱的第一行,这是为了和以后的MUSE软件区分而准备的,在本版本中要写成”%MUSE2”,注意不能是汉字的全角符,而应该是英文字符。
描述头主要包含曲谱的一般性信息如:标题,作者等。
描述头应该以标题字段开始并且以调号字段结束,紧接着是曲谱主体部分。
2.1.2描述头描述头是由许多字段组成,每个字段标记一项非音乐的信息,如:作曲者、调式等。
大多数字段只能出现在描述头中,但有些也可以在曲谱主体中出现,如:调式、拍号。
西贝柳斯打谱软件简易教程.

西贝柳斯打谱软件简易教程.西贝柳斯打谱软件简易教程一、功能简介MIDlinp ut (M IDI 输入注意 :为了方便起见 , 重点的英文词语就不再翻译。
MIDI input有两种方式:Flcxi-timc 是 Sibclius 独一无二的乐谱系统 , 是一种生动灵活的动态输入方式 , 完全 . 弓你用 MIDI 键盘实际演奏的效果一样 , 你根本不用敲打拍子 , 或机械地演奏 ,你』 {须用双手尽情而自然地弹奏 , Sibelius 就会自动地跟着你的速度渐快或崭。
渐慢。
■然,这种力’式要求你用作曲家的大脑去思考并像演奏家一样去演奏, 如若不能,你可选用另外一种方式。
Step-Time 输入, 也就是步进输入,它的作用是让你一只于在电脑小键盘 .卜选择需要的音符长短 (节奏和演奏技法 ( articulation , 另 -II 手在 MIDI 键盘上弹出所需的音高。
如果你实在没有键盘基础,也不用着急,请看下文。
(2、 Mouse&Keystrokes(鼠标和按键输入在没有 MIDI 键盘或没有键盘基础的情况下 , 用鼠标选择一个音符时值 , 可同时选择演奏技法 ( articulation,然后直接点 lli 乐谱上的所须音高位置,就可以输入你所需要的音符了。
为了提高输入速度,可使用电脑键盘代替 . 用 C 、 D 、 E 、 F 、 G 、 A 、 B 对应撼本音级 , 指定具体的音高位置 , 音符时值和演奏技法 ( articulation同样用小键盘选择。
■然,对于很熟悉的用户米说,还有很多其它的键盘快捷方式,以后大家会慢慢熟悉。
(3、扫描输入Sibelius 中的“ PhotoScore' ’程序可以准确地识别扫描出来的乐谱。
l ’蒯读一个页面的乐谱J{须几秒钟的时问,然后就可以进行编辑, 变调、播放、提取分谱、打印等, 就像足你自己输入的一样。
PhotoScore 的专业版还有很多其它的特征:如连线阅读、演奏技法( articulation阅读、文本阅读等等。
基于事件模型的MusicXML解析器

1
武汉科技学院计算机科学学院 2009 年毕业设计论文
1.2 发展状况
现在,有许多的音频文件格式,但是并不是所有的数据格式对音乐数据交换 有意义,因为这里我们谈到的音乐数据指的是电子乐音和电子乐谱。我们接触到 的大多数都是音频格式,记录声音是直接的或间接的记录声音的波形,直接的记 录波形的方式对音乐数据 的表示作用不大,几乎不大可能从波形中得到乐谱信 息,一段 8.8kHz 的高音质 CD 虽然完全重现了声音,但是那些 0 和 1 用来表示波 形的数据只是记录的混合后的波形数据,无法得到乐器,拍号,节奏等音乐特征 信息。间接的记录波形,从间接的数据中利用软件模拟出波形的方式,恰当的中 间数据更容易帮助分析乐谱, MIDI 是间接记录声音的方式,它在电子音乐交换 中具有重要地位, 在电子乐器交换中具有重要的地位。MIDI(musical instrument digital interface)[4-7] 是一种工业的电子乐器通讯协议, MIDI 不直接记录声 音波形,只传输音调和音乐强度数字信息,MIDI 文件的数据特点便于分析乐谱, 但乐谱分析往往不能正确还原乐谱,毕竟 MIDI 只记录了声音信息,乐谱的小节, 音乐符号具体的表现没有记录,一般的基于 MIDI 的解释都是基于音轨的分析方 法,同时各种软件开发商定制的文件格式辅助存储音乐符号信息,开发者的思想 直接影响乐谱信息。从音乐家在电子乐器视谱演奏,再从录制的 MIDI 中用各种 软件分析乐谱和原谱对照谱子很可能大相径庭,各不相同。早期的乐谱软件都是 基于 MIDI, 同时为了弥补对乐谱呈现的短处, 这些软件都会对 MIDI 进行在包装 , 设计数据结构辅助存贮乐谱信息,各种软件厂商缺乏统一,使得这些乐谱只能部 分的工作在桌面程序中,无法实现阵阵意义的网络音乐服务。笔者大量接触过著 名的 cakewalk 和 guitar pro 乐谱软件,它们就是分别自定义了文件格式 .wrk 和.gtp 用于辅助存贮乐谱信息,guitar pro 是功能强大的吉他谱软件,为了满 足吉他的特点,被包装的 MIDI 文件上有很多的细节处理,如:为了表现扫弦的 过程和方向,和弦各级音都按时间进行了散列,而在 cakewalk 中和弦被认为是 在同一时间点上产生的声音事件,当把 MIDI 文件从一种软件导出,再在另外一 种软件中导入时,乐谱完全不堪入目。 基于 MIDI 在乐谱交换上的不足,人们又开发了新的数据交换格式,这个时 期最具有代表性的是 NIFF[8](notation interchange file format), 它将 音乐
music算法的直观解释

music算法的直观解释一、简介Music算法是一种用于音乐信号处理的算法,它通过对音乐信号进行特征提取和分析,从而实现对音乐的理解和创作。
该算法由美国科学家PaulE.Jacobs及其研究团队开发,并在音乐信号处理领域得到了广泛应用。
二、基本原理Music算法通过分析音乐信号的频率、振幅、时长等特征,对音乐的结构和情感进行分析和建模。
该算法基于音频信号的时域和频域分析,通过计算音频信号的傅里叶变换,将音频信号从时域转换到频域,从而实现对音频信号的频率成分的分析。
三、主要步骤1.音频信号采集:使用麦克风或其他音频采集设备采集音乐信号。
2.预处理:对音频信号进行噪声消除、音量调整等预处理操作,以提高算法的准确性。
3.傅里叶变换:将音频信号从时域转换到频域,以便于分析频率成分。
4.特征提取:从频域分析中提取音乐信号的特征,如频率、振幅、时长等。
5.模型训练:使用提取的特征对音乐的结构和情感进行分析和建模,建立音乐分类模型。
6.音乐创作:根据分类模型,使用算法生成符合音乐风格和情感的音乐片段。
四、优势与局限Music算法在音乐信号处理方面具有以下优势:1.准确性高:通过对音乐信号的全面分析,能够准确提取音乐的结构和情感特征。
2.高效性:Music算法能够快速处理大量音乐数据,并生成符合要求的音乐片段。
3.可扩展性:Music算法可以与其他音乐算法相结合,实现更复杂和多样化的音乐创作。
然而,Music算法也存在一定的局限:1.依赖训练数据:Music算法的性能受训练数据的质量和数量影响较大。
2.无法处理复杂音乐风格:Music算法在处理复杂音乐风格时可能存在一定难度。
3.缺乏个性化:目前Music算法生成的曲目往往是按照一定规则生成的,缺乏个性化和情感表达。
五、未来发展随着人工智能技术的不断发展,Music算法在音乐信号处理领域的应用前景广阔。
未来研究方向包括:1.提高算法的泛化能力:通过改进模型架构和优化训练方法,提高Music算法对不同音乐风格的适应能力。
官方示例Music+Store(音乐商店)简易中文教程

MVC3官方示例Music Store(音乐商店)--简易中文教程前言:本文来源于微软MVC3官方教程.在可以下载到最新版本的源码和英文PDF教程.和英文教程一样,本文将分成十章节来介绍这个音乐商店的建立.导航目录:▪(一)前期准备,新建MVC项目▪(二)控制器▪(三)视图与模型▪(四)数据访问▪(五)使用脚手架功能创建编辑页面▪(六)使用Data Annotation为模型进行验证▪(七)成员和权限▪(八)Ajax刷新效果的购物车▪(九)注册和支付▪(十)最终版本修正与发布综述:原文:The MVC Music Store is a tutorial application that introduces and explains step-by-step how to use MVC and Visual Web Developer for web development. We’ll be starting slowly, so beginner level web development experience is okay.The application we’ll be building is a simple music store. There are three main parts to the application: shopping, checkout, and administration.翻译:MVC音乐商店是一个示例应用程序,它将一步一步介绍和说明如何使用 MVC和Visual Web Developer进行Web开发。
本教程会慢慢讲解,因此,即使你是一名初学者也没问题。
我们要开发的是一个简单的音乐商店,主要包括三个主要功能:购物,支付,管理。
原文:Visitors can browse Albums by Genre:翻译:访客可以根据专辑类别浏览唱片原文:They can view a single album and add it to their cart:翻译:可以查看单个唱片并且加入到购物车:原文:They can review their cart, removing any items they no longer want:翻译:可以查看购物车,并且移除不需要的商品:原文:Proceeding to Checkout will prompt them to login or register for a user account.翻译:支付订单的时候会提示用户注册或者登陆帐号。
xaml教程
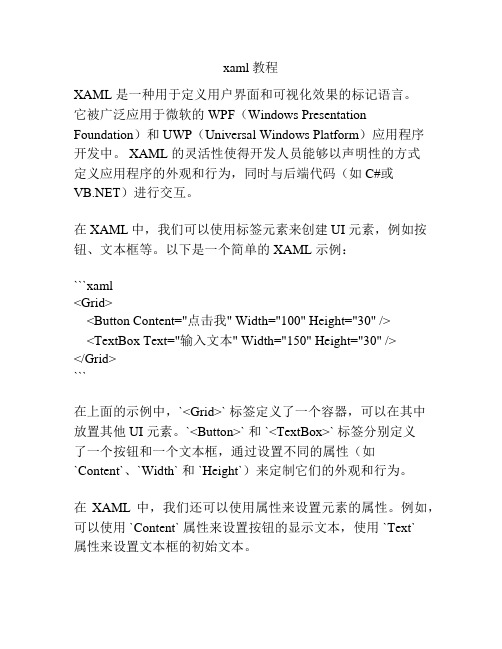
xaml教程XAML 是一种用于定义用户界面和可视化效果的标记语言。
它被广泛应用于微软的 WPF(Windows Presentation Foundation)和 UWP(Universal Windows Platform)应用程序开发中。
XAML 的灵活性使得开发人员能够以声明性的方式定义应用程序的外观和行为,同时与后端代码(如C#或)进行交互。
在XAML中,我们可以使用标签元素来创建 UI 元素,例如按钮、文本框等。
以下是一个简单的 XAML 示例:```xaml<Grid><Button Content="点击我" Width="100" Height="30" /><TextBox Text="输入文本" Width="150" Height="30" /></Grid>```在上面的示例中,`<Grid>` 标签定义了一个容器,可以在其中放置其他 UI 元素。
`<Button>` 和 `<TextBox>` 标签分别定义了一个按钮和一个文本框,通过设置不同的属性(如`Content`、`Width` 和 `Height`)来定制它们的外观和行为。
在XAML 中,我们还可以使用属性来设置元素的属性。
例如,可以使用 `Content` 属性来设置按钮的显示文本,使用 `Text`属性来设置文本框的初始文本。
除了定义 UI 元素,XAML 还支持绑定和样式等高级特性。
通过设置数据绑定,我们可以将后端数据与 UI 元素关联起来,实现数据的双向同步。
样式允许我们定义一组共享的外观属性,可以在应用程序中多个元素之间共享和重用。
总而言之,XAML 是一种强大的界面定义语言,具有灵活性和可扩展性,能够帮助开发人员创建出现丰富、交互性强的用户界面。
XAML开发者入门教程说明书
About the T utorialWelcome to the XAML tutorial for beginners. This tutorial puts greater emphasis on real-time implementation of the concept rather than discussing just the theory part.The primary objective of this tutorial is to provide you a better understating of what you can do with XAML development irrespective of the platform you are using. AudienceThis tutorial has been designed for all those readers who want to learn XAML and to apply it instantaneously in different type of applications.PrerequisitesBefore proceeding with this tutorial, you should have a basic understanding of XML, Web Technologies, and HTML.Disclaimer & CopyrightCopyright 2018 by Tutorials Point (I) Pvt. Ltd.All the content and graphics published in this e-book are the property of Tutorials Point (I) Pvt. Ltd. The user of this e-book is prohibited to reuse, retain, copy, distribute, or republish any contents or a part of contents of this e-book in any manner without written consent of the publisher.We strive to update the contents of our website and tutorials as timely and as precisely as possible, however, the contents may contain inaccuracies or errors. Tutorials Point (I) Pvt. Ltd. provides no guarantee regarding the accuracy, timeliness, or completeness of our website or its contents including this tutorial. If you discover any errors on our website or in this tutorial, please notify us at **************************iT able of ContentsAbout the Tutorial (i)Audience (i)Prerequisites (i)Table of Contents .................................................................................................................................... i i 1.XAML – OVERVIEW .. (1)How XAML Works (1)Advantages of XAML (1)2.XAML – ENVIRONMENT SETUP (3)Installation (3)First Step towards Implementation (7)3.WRITING XAML APPLICATION ON MAC OS (11)XAML – C# Syntax (11)Syntax Rules for Object Element (12)4.XAML VS C# CODE (13)5.XAML VS. (17)6.XAML – BUILDING BLOCKS (21)Objects (21)Resources (21)Styles (21)Templates (22)Animations and Transformations (23)7.XAML – CONTROLS (25)Button (27)Calendar (34)iiComboBox (45)ContextMenu (50)DataGrid (57)DatePicker (66)Dialog Box (71)GridView (74)Image (80)ListBox (84)Menu (89)PasswordBox (94)Popup (98)ProgressBar (101)ProgressRing (105)RadioButton (109)RichEditBox (115)ScrollViewer (123)SearchBox (129)Slider (133)TextBlock (138)TimePicker (141)ToggleButton (146)ToolTip (149)Window (152)8.XAML – LAYOUTS (157)Stack Panel (157)Wrap Panel (160)iiiCanvas Panel (167)Grid (170)Nesting of Layout (175)9.XAML – EVENT HANDLING (177)10.XAML – DATA BINDING (184)One-Way Data Binding (184)Two-Way Data Binding (187)11.XAML – MARKUP EXTENSIONS (189)12.XAML – DEPENDENCY PROPERTIES (193)13.XAML – RESOURCES (197)Resource Scope (198)Resource Dictionaries (199)14.XAML – TEMPLATES (202)Control Template (202)Data Template (204)15.XAML – STYLES (210)Control Level (214)Layout Level (215)Window Level (216)Application Level (218)16.XAML – TRIGGERS (221)Property Triggers (221)Data Triggers (223)iv17.XAML – DEBUGGING (228)UI Debugging Tools for XAML (231)18.XAML – CUSTOM CONTROLS (234)User Control (234)Custom Controls (238)vXAML 1XAML stands for Extensible Application Markup Language. It’s a simple and declarative language based on XML.∙ In XAML, it very easy to create, initialize, and set properties of an object with hierarchical relations.∙ It is mainly used for designing GUIs.∙It can be used for other purposes as well, e.g., to declare workflow in Workflow Foundation. XAML can be used in different platforms such as WPF (Windows Presentation Foundation), Silverlight, Mobile Development, and Windows Store App. It can be used across different .Net framework and CLR (common language runtime) versions. How XAML WorksXAML is a declarative language in the sense it defines the WHAT and HOW you want to do. XAML processor is responsible for the HOW part to find out. Let's have a look at the following schema. It sums up the XAML side of things:The figure illustrates the following actions:∙The XAML file is interpreted by a platform-specific XAML processor. ∙ The XAML processor transforms the XAML to internal code that describes the UI element.∙The internal code and the C# code are linked together through partial classes definitions and then the .NET compiler builds the app. 1.XAMLAdvantages of XAMLOne of the longstanding problems that all of us face with GUI design can be solved by using XAML. It can be used to design UI elements in Windows Forms applications.In the earlier GUI frameworks, there was no real separation between how an application looks like and how it behaves. Both the GUI and its behavior were created in the same language, e.g. C# or , which would require more effort from the developer to implement both the UI and the behavior associated with it.Earlier GUI FrameworksWith XAML, it is very easy to separate the behavior from the designer code. Hence, the XAML programmer and the designer can work in parallel. XAML codes are very easy to read and understand.XAML Framework2XAML 3Microsoft provides two important tools for XAML:∙Visual Studio ∙ Expression BlendCurrently, both the tools can create XAML, but the fact is that Visual Studio is used more by developers while Expression Blend is still used more often by designers.Microsoft provides a free version of Visual Studio which can be downloaded from https:///en-us/downloads/download-visual-studio-vs.aspx Note: For this tutorial, we will mostly be using WPF projects and Windows Store App. But the free version of Visual Studio doesn’t support Windows Store App. So for that purpose, you will need a licensed version of Visual Studio.InstallationFollow the steps given below to install Visual Studio on your system:1. After downloading the files, run the installer. The following dialog box will be displayed.2.XAML 2.Click on the Install button and it will start the installation process.43.Once the installation process completes successfully, you will see the followingscreen.54.Close this dialog box and restart your computer if required.5.Now open Visual studio from the Start Menu which will show the following dialogbox. It will take some time for the first time, only for preparation.6Once all is done, you will see the main window of Visual Studio.7First Step towards ImplementationLet us start with a simple implementation. Follow the steps given below:1.Click on File > New > Project menu option.82.The following dialog box will be displayed:3.Under Templates, select Visual C# and select WPF Application. Give a name to theproject and click the OK button.94.In the mainwindow.xaml file, the following XAML tags are written by default. Youwill understand all these tags later in this tutorial.By default, a grid is set as the first element after page.Let's add a button and a text block under the Grid element. This is called object element syntax, a left angle bracket followed by the name of what we want to instantiate, for example a button, then define a content property. The string assigned to the Content will be displayed on the button. Now set the height and width of the button as 30 and 50 respectively. Similarly initialize the properties of the Text block.Now look at the design window. You will get to see a button. Now press F5 to execute this XAML code.When you compile and execute the above code, you will see the following window. Congratulation! You have designed your First Button.11XAML12XAML applications can be developed on Mac as well. On Mac, XAML can be used as iOS and Android applications. To setup the environment on Mac, go to . Click on Products and select the Xamarin Platform. Download Xamarin Studio and install it. It will allow you to develop applications for the various platforms.XAML – C# SyntaxIn this chapter, you will learn the basic XAML syntax/rules to write XAML applications. Let’s have a look at a simple XAML file.As you can see in the above XAML file, there are different kinds of tags and elements. The following table briefly describes all the elements. 3.XAMLSyntax Rules for Object ElementSyntax rules for XAML is almost similar to XML. If you take a look at an XAML document, then you will notice that actually it is a valid XML file. However, an XML file cannot be a valid XAML file. It is because in XML, the value of the attributes must be a string, while in XAML, it can be a different object which is known as Property element syntax.∙The syntax of an Object element starts with a left angle bracket (<) followed by the name of the object, e.g. Button∙Define some Properties and attributes of that object element∙The Object element must be closed by a forward slash (/) followed immediately bya right angle bracket (>).Example of simple object with no child element:Example of object element with some attributes:Example of an alternate syntax to define properties (Property element syntax):Example of Object with Child Element: StackPanel contains Textblock as child element13XAML14You can use XAML to create, initialize, and set the properties of objects. The same activities can also be performed using programming code.XAML is just another simple and easy way to design UI elements. With XAML, it is up to you to decide whether you want to declare objects in XAML or declare them using code. Let’s take a simple example to demonstrate how to write in XAML: In this example, we have created a stack panel with a Button and a Text block and defined some of the properties of button and text block such as Height, Width, and Margin. When the above code is compiled and executed, it will produce the following output:4.Now look at the same code which is written in C#.15When the above code is compiled and executed, it will produce the following output. Note that it is exactly the same as the output of XAML code.16Now you can see that how simple it is to use and understand XAML.17XAML18In this chapter, we will write the same example in so that those who are familiar with can also understand the advantages of XAML.Let’s take a look at the the same example again which is written in XAML: In this example, we have created a stack panel with a button and a Text block and defined some of the properties of the button and the text block such as Height, Width, and Margin. When the above code is compiled and executed, it will produce the following output:5.Now look at the same code which is written in :19When the above code is compiled and executed the output is exactly the same as the output of XAML code.You can now visualize how simple it is to work with XAML as compared to .In the above example, we have seen that what we can do in XAML can also be done in other procedural languages such as C# and .Let’s have a look at another example in which we will use both XAML and . We will design a GUI in XAML and the behavior will be implemented in .In this example, a button is added to the main window. When the user clicks this button, it displays a message on the message box. Here is the code in XAML in which a Button Object is declared with some properties.In , the button click event (behavior) is implemented. This event displays the message on the messagebox.When the above code is compiled and executed, it will display the following screen:Now click on the above button that says "Click Me". It will display the following message:2122XAML23This chapter will describe some of the basic and important building blocks of XAML applications. It will explain how∙ to create and initialize an object,∙ an object can be modified easily by using resources, styles, and templates, ∙to make an object interactive by using transformations and animations.ObjectsXAML is a typically declarative language which can create and instantiate objects. It is another way to describe objects based on XML, i.e., which objects need to be created and how they should be initialized before the execution of a program. Objects can be∙ Containers (Stack Panel, Dock Panel)∙ UI Elements / Controls (Button, TextBox, etc.) ∙Resource DictionariesResourcesResources are normally definitions connected with some object that you just anticipate to use more often than once. It is the ability to store data locally for controls or for the current window or globally for the entire applications.StylesXAML framework provides several strategies to personalize and customize the appearance of an application. Styles give us the flexibility to set some properties of an object and reuse these specific settings across multiple objects for a consistent look.∙In styles, you can set only the existing properties of an object such as Height, Width, Font size, etc.∙ Only the default behavior of a control can be specified.∙Multiple properties can be added into a style.In the first diagram, you can see the same height and width properties are set for all the three button separately; but in the second diagram, you can see that height and width which are same for all the buttons are added to a style and then this style is associated with all the buttons.6.XAMLT emplatesA template describes the overall look and visual appearance of a control. For each control, there is a default template associated with it which gives the appearance to that control. In XAML, you can easily create your own templates when you want to customize the visual behavior and visual appearance of a control.In the following screenshot, there are two buttons, one is with template and the other one is the default button.24Now when you hover the mouse over the button, it also changes the color as shown below. With templates, you can access more parts of a control than in styles. You can specifyboth existing and new behavior of a control.Animations and T ransformationsAnimations and transformations inside the Windows Runtime can improve your XAML application by building interactivity and movement. You can easily integrate the interactive25look and feel in your XAML application by using the animations from Windows Runtime animation library. Animations are used∙to enhance the user interface or to make it more attractive.∙to attract the attention of the user to a change.In the following screenshot, you can see a square:When you hover the mouse over this square, it will expend in all directions as shown below.267.XAMLThe XAML User Interface framework offers an extensive library of controls that supports UI development for Windows. Some of them have a visual representation such Button, Textbox, TextBlock, etc.; while other controls are used as containers for other controls or content, for example, images. All the XAML controls are inherited from System.Windows.Controls.Control.The complete inheritance hierarchy of controls is as follows:Here is the list of controls which we will discuss one by one in this chapter.28In this chapter we will discuss all these controls with implementation.ButtonThe Button class represents the most basic type of button control. The hierarchical inheritance of Button class is as follows:Given below are the most commonly used properties of Button.293031End of ebook previewIf you liked what you saw…Buy it from our store @ https://32。
WPF入门(一)XAML基础知识
MainWindow 这个类是 partial 声明的,所以它可以出现在多个地方,MainWindow.xaml 和 MainWindow.xaml.cs 编译完会合并到一起 InitializeComponent() 就是由 xaml 生成的 启动时的窗口是由 App.xaml 的 StartupUri 属性决定的,指向的是 xaml 文件,不是命名空间
以 C# 代码绑定事件
public MainWindow() {
InitializeComponent();
//两种方法绑定事件 //方法一 this.button1.Click += this.button1_Click; //方法二 this.button1.Click += new RoutedEventHandler(this.button1_Click); }
</Rectangle>
标签扩展
标签扩展与 Attribute = Value 非常类似,使用 {} 例子,添加命名空间 xmlns:sys="clr-namespace:System;assembly=mscorlib"
<Window.Resources> <sys:String x:Key="stringHello">Hello WPF!</sys:String>
Human h = this.FindResource("human") as Human; if(null != h) {
MessageBox.Show(); }
字符串值转化为其它类型
如何智能的转化类型? 将 Child 的值转化为对象
MusicXML简明教程
MusicXML简明教程MusicXML简明教程1MusicXML简介MusicXML(Music Extensible Markup Language ⾳乐扩展标记语⾔)是⼀个开放的基于XML的⾳乐符号⽂件格式,⽤于进⾏⾳乐交换和⾳乐分发。
MusicXML旨在创建⼀个通⽤的普通西⽅⾳乐记谱格式。
1.1MusicXML形成背景不同⾳乐软件之间的⽂件的交互存在困难。
之前仅有的通⽤交换格式——MIDI,并不能完全满⾜⾳乐软件对做谱的需求。
为了克服MIDI在记谱上的的局限,在MusicXML前相继出现了NIFF(Notation Interchange File Format⾳乐符号交换⽂件格式)、SMDL(Standard Musical Document Language标准⾳乐⽂件语⾔)。
前者⽤图像的形式呈现⾳乐数据,在记谱数据上优于MIDI,但是在⾳乐表现和分析运⽤上劣于MIDI;后者过于复杂,且从未被进⾏商业实现。
因此⼀直以来未曾找到适⽤于⾳乐交换和分发的⾳乐格式。
MuxicXML的诞⽣解决了这些问题。
1.2MusicXML特点MusicXML具有以下⼀些特点:●⽀持17世纪以来的西⽅⾳乐记谱法●基于标准XML技术●⽬前⽀持的软件超过140种●⽀持记谱、分析、信息检索、表现实现●基于两个学院派⾳乐格式:MuseData、Humdrum●对各种⾳乐应⽤软件,不是最优,但是是最充⾜最合适的⾳乐格式1.3MusicXML优势对基于Web的⾳乐记谱,MusicXML有其独特的优势。
XML格式对Web,Web数据库,元数据和信息检索都能提供有效的⽀持,因此MusicXML具有⾼度的互联⽹友好性。
2MusicXML使⽤范例2.1MusicXML结构介绍MusicXML通过元素elements来表现⾳乐语义,当需要呈现的⾳乐内容超过⼀个部分的时候,通过使⽤元素可以创建分层结构。
属性attributes主要⽤于以下⼀些⽅⾯:●指明时候有元素开始和结束,例如连奏slurs元素和多连⾳tuplets元素●识别元素,例如在⼩节编号measure numbers和符杠等级beam levels中●建议元素怎样被显⽰●建议元素怎样以最好的⽅式转化成MIDI或者其他声⾳⽂件。
从MIDI到MusicXML
从MIDI到MusicXML作者:杨万钧来源:《演艺科技》2014年第07期【摘要】结合MIDI、ePub 、MusicXML等常见的乐谱信息交换格式的优缺点,介绍计算机乐谱信息交换格式的发展历程。
【关键词】 MIDI;ePub;MusicXML;电子乐谱;信息交换文章编号: 10.3969/j.issn.1674-8239.2014.07.010在计算机音乐的发展中,计算机记谱软件之间的信息交换一直都是音乐工作者关注的问题,不同时期所出现的乐谱信息交换格式,为音乐工作者的创作与协作提供了不同的便利,也对音乐的发展和传播起到了重要的作用。
1 记谱软件之间信息交换的现状计算机记谱是电子音乐和计算机音乐的重要分支,在电子音乐和计算机音乐的发展中占有重要地位。
不同的记谱软件在开发和设计过程中,会根据记谱法的类型和设计思路的不同,在乐谱信息的表达上形成各自的特点,数据表达形式也各不相同,形成了各种不同格式的乐谱文件。
另一方面,任何软件都会有一个生命周期,记谱软件在不同时期都会有不同的产品和版本。
所以,在很长一段历史时期中,各种不同格式乐谱文件以及不同版本的记谱软件相互不兼容,不能相互读取与应用。
因此,在计算机记谱领域,一直都期待能有一种通用且有效的标准,可以让乐谱在不同记谱软件之间方便地转换和交换,提高作品的创作效率和使用效率。
实际上,没有任何一个软件可以完成用户的所有需求,每个软件和系统都有其优势与不足,而且不同软件在设计上也都有其着重点,因而不同的软件可以满足用户的不同需求。
在计算机记谱软件中,既有功能复杂的专业商业软件,也有功能简洁的免费开源的自由软件,各有其优缺点。
商业软件功能强大、操作便利,但通常售价都非常高昂。
不同记谱软件通常在界面设计和操作方式也有较大差异,因而对于用户而言,如果要同时掌握多个不同的专业记谱软件进行记谱和专业创作,很容易在使用中混淆不同记谱软件的功能,降低操作的效率。
因此,用户应尽量深入地掌握一个功能完善的记谱软件,减少学习和转换的时间,降低经济成本。
- 1、下载文档前请自行甄别文档内容的完整性,平台不提供额外的编辑、内容补充、找答案等附加服务。
- 2、"仅部分预览"的文档,不可在线预览部分如存在完整性等问题,可反馈申请退款(可完整预览的文档不适用该条件!)。
- 3、如文档侵犯您的权益,请联系客服反馈,我们会尽快为您处理(人工客服工作时间:9:00-18:30)。
MusicXML简明教程1MusicXML简介MusicXML(Music Extensible Markup Language 音乐扩展标记语言)是一个开放的基于XML的音乐符号文件格式,用于进行音乐交换和音乐分发。
MusicXML旨在创建一个通用的普通西方音乐记谱格式。
1.1MusicXML形成背景不同音乐软件之间的文件的交互存在困难。
之前仅有的通用交换格式——MIDI,并不能完全满足音乐软件对做谱的需求。
为了克服MIDI在记谱上的的局限,在MusicXML前相继出现了NIFF(Notation Interchange File Format音乐符号交换文件格式)、SMDL(Standard Musical Document Language标准音乐文件语言)。
前者用图像的形式呈现音乐数据,在记谱数据上优于MIDI,但是在音乐表现和分析运用上劣于MIDI;后者过于复杂,且从未被进行商业实现。
因此一直以来未曾找到适用于音乐交换和分发的音乐格式。
MuxicXML的诞生解决了这些问题。
1.2MusicXML特点MusicXML具有以下一些特点:●支持17世纪以来的西方音乐记谱法●基于标准XML技术●目前支持的软件超过140种●支持记谱、分析、信息检索、表现实现●基于两个学院派音乐格式:MuseData、Humdrum●对各种音乐应用软件,不是最优,但是是最充足最合适的音乐格式1.3MusicXML优势对基于Web的音乐记谱,MusicXML有其独特的优势。
XML格式对Web,Web数据库,元数据和信息检索都能提供有效的支持,因此MusicXML具有高度的互联网友好性。
2MusicXML使用范例2.1MusicXML结构介绍MusicXML通过元素elements来表现音乐语义,当需要呈现的音乐内容超过一个部分的时候,通过使用元素可以创建分层结构。
属性attributes主要用于以下一些方面:●指明时候有元素开始和结束,例如连奏slurs元素和多连音tuplets元素●识别元素,例如在小节编号measure numbers和符杠等级beam levels中●建议元素怎样被显示●建议元素怎样以最好的方式转化成MIDI或者其他声音文件。
简而言之,元素用来描述数据,属性用来描述元数据。
2.2MusicXML例子常用的MusicXML的例子如以下实例图。
实用中具体每个元素代表的含义和作用见具体元素模块中的说明。
分部信息:<scor e-par t i d="P2"><par t-nam e>Pi ano</par t-nam e><scor e-i nst r um ent i d="P2-I2"><i nst r um ent-nam e>Acoust i c G r andPi ano</i nst r um ent-nam e></scor e-i nst r um ent><m i di-i nst r um ent i d="P2-I2"><m i di-channel>2</m i di-channel><m i di-pr ogr am>1</m i di-pr ogr am><vol um e>80</vol um e><pan>0</pan></m i di-i nst r um ent></scor e-par t>分部描述:包括分布名称,I D,乐器名称,乐器I D。
谱号:<cl ef num ber="1"><si gn>G</si gn><l i ne>2</l i ne></cl ef><cl ef num ber="2"> <si gn>F</si gn><l i ne>4</l i ne></cl ef>谱号第2根线开始的高音谱号第4根线开始的低音谱号调号,拍号:<at t r i but es><di vi si ons>2</di vi si ons><key><f i f t hs>3</f i f t hs><m ode>m aj or</m ode></key><t i m e sym bol="cut"><beat s>2</beat s><beat-t ype>2</beat-t ype> </t i m e></at t r i but es>包含曲谱的调号,节拍信息。
五线谱规格:小节信息:<m easur e num ber="2" w i dt h="354"><at t r i but es><t i m e><beat s>4</beat s><beat-t ype>4</beat-t ype> </t i m e></at t r i but es><not e><r est/><dur at i on>32</dur at i on><voi ce>1</voi ce></not e></m easur e>小节信息:包括小节的编号,宽度,节拍信息,音符信息音符、指示记号信息:<di r ect i on pl acem ent ="bel ow "> <di r ect i on-t ype> <dynam i cs def aul t -y="-80"> <p/> </dynam i cs> </di r ect i on-t ype> <st af f >1</st af f > <sound dynam i cs="54"/> </di r ect i on>指示记号:强度记号,包括符号显示和符号声音信息的设定<not e def aul t -x="26"> <pi t ch> <st ep>F</st ep> <oct ave>4</oct ave> </pi t ch> <dur at i on>3</dur at i on> <voi ce>1</voi ce> <t ype>quar t er </t ype> <dot /><acci dent al >nat ur al</acci dent al ><st em def aul t -y="1">up </st em > <l yr i c def aul t -y="-80" num ber ="1"> <syl l abi c>begi n</syl l abi c> <t ext >l ei </t ext > </l yr i c> </not e>单个音符:包括音符的音高、时长、以及显示信息。
与音符相关的符号,歌词等信息。
名单信息: <cr edi t page="1"><cr edi t -w or ds def aul t -x="1280" def aul t -y="1500" Font -si ze="10" hal i gn="r i ght " val i gn="bot t om ">J ohannes Br ahm s</cr edi t -w or ds> </cr edi t >名单信息:包括曲谱名、作曲、作词、编曲、创建人等信息<m ovem ent -t i t l e>W i e M el odi en zi eht esm i r (Page 1)</m ovem ent -t i t l e><cr edi t page="1"><cr edi t -w or ds def aul t -x="680" def aul t -y="1580" f ont -si ze="14" j ust i f y="cent er " val i gn="t op">Op. 105, N o. 1</cr edi t -w or ds> </cr edi t >。