安徽基石置业有限公司49%国有股权
Tektronix P6204 FET Probe 说明书

Instruction Manual
P6204 FET Probe, 10M OHM, 10X, ID 070-6949-03
Warning The servicing instructions are for use by qualified personal only. To avoid personal injury, do not perform any servicing unless you are qualified to do so, Refer to the Safety Summary prior to performing service.
THIS WARRANTY IS GIVEN BY TEKTRONIX WITH RESPECT TO THIS PRODUCT IN LIEU OF ANY OTHER WARRANTIES, EXPRESSED OR IMPLIED. TEKTRONIX AND ITS VENDORS DISCLAIM ANY IMPLIED WARRANTIES OF MERCHANTABILITY OR FITNESS FOR A PARTICULAR PURPOSE. TEKTRONIX’ RESPONSIBILITY TO REPAIR OR REPLACE DEFECTIVE PRODUCTS IS THE SOLE AND EXCLUSIVE REMEDY PROVIDED TO THE CUSTOMER FOR BREACH OF THIS WARRANTY. TEKTRONIX AND ITS VENDORS WILL NOT BE LIABLE FOR ANY INDIRECT, SPECIAL, INCIDENTAL, OR CONSEQUENTIAL DAMAGES IRRESPECTIVE OF WHETHER TEKTRONIX OR THE VENDOR HAS ADVANCE NOTICE OF THE POSSIBILITY OF SUCH DAMAGES.
Infineon HC-49 UP SMD Crystal 产品说明书

Packaging Options Tape & Reel
Nominal Frequency 25.000MHz
Load Capacitance 18pF
ELECTRICAL SPECIFICATIONS
Nominal Frequency
Time Maintained Above: - Temperature (TL) - Time (tL)
Peak Temperature (TP)
Target Peak Temperature (TP Target)
Time within 5°C of actual peak (tp)
Ramp-down Rate
Moisture Sensitivity Level
Level 1
| Specification Subject to Change Without Notice | Rev F 8/28/2009 | Page 4 of 5
E1SFA18-25.000M TR
Recommended Solder Reflow Methods
Peak Temperature (TP)
Target Peak Temperature (TP Target)
Time within 5°C of actual peak (tp)
Ramp-down Rate
3°C/second Maximum
150°C 175°C 200°C 60 - 180 Seconds 3°C/second Maximum
E1SFA18-25.000M TR
Pb RoHS
E1S F A 18 -25.000M TR
PI49FCT3803QE中文资料
CLK3
GND CLK2
14/04
元器件交易网
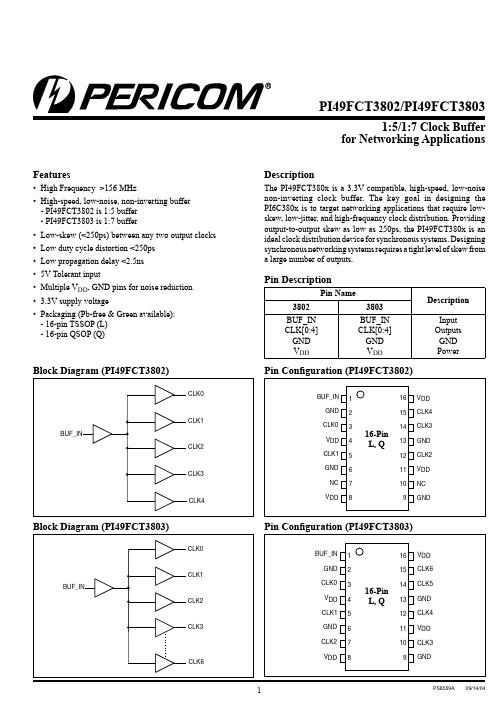
PI49FCT3802/PI49FCT3803 1:5/1:7 Clock Buffers for Networking Applications Maximum Ratings
(Above which the useful life may be impaired. For user guidelines, not tested.) Storage Temperature...........................................................–65°C to +150°C VDD Voltage ............................................................................ –0.5V to 5.5V Output Voltage......................................................................... –0.5V to 5.5V Input Voltage ........................................................................... –0.5V to 5.5V DC Output Current ............................................................–60mA to +60mA Power Dissipation ............................................................................. 500mW
邻氯苯腈技术说明书
邻氯苯腈技术说明书全文共四篇示例,供读者参考第一篇示例:邻氯苯腈是一种重要的有机合成中间体,广泛应用于医药、农药、染料等领域。
本文将介绍邻氯苯腈的合成方法及相关技术参数,帮助读者更好地了解该化合物的制备过程。
一、邻氯苯腈的合成方法邻氯苯腈的合成通常采用氯苯和氰化钠为原料,在无水乙醇中进行反应。
具体步骤如下:1. 氯苯与氰化钠在无水乙醇中反应生成氯苯腈。
2. 反应后,通过适当的工艺处理和提纯,得到结晶的邻氯苯腈产物。
3. 通过结晶、过滤和干燥等工艺步骤,得到纯度较高的邻氯苯腈成品。
二、邻氯苯腈的技术参数1. 化学名称:邻氯苯腈2. 分子式:C7H4ClN3. 结构式:4. 分子量:137.57 g/mol5. 外观:白色结晶固体6. 熔点:53-55°C7. 沸点:251-253°C8. 稳定性:稳定,遇水分解9. 用途:主要用于有机合成中间体,可用于制备农药、医药、染料等化合物。
三、邻氯苯腈的应用领域四、邻氯苯腈的市场前景第二篇示例:邻氯苯腈是一种用途广泛的有机化合物,它具有良好的化学稳定性和热稳定性,常被用作染料、医药和农药的中间体等。
邻氯苯腈的生产工艺技术在化工领域中具有重要的应用价值,本文将介绍邻氯苯腈的生产工艺及相关技术细节。
一、生产原料及方法邻氯苯腈的生产原料主要包括氯苯和氰化钠。
生产方法一般采用苯乙烯氰化法,主要步骤如下:1. 氯化苯:将氯气和苯在催化剂的作用下进行氯化反应,生成氯苯。
2. 氰化反应:将氯苯和氰化钠在碱性介质中反应,生成邻氯苯腈。
以上是邻氯苯腈的主要生产方法,其反应过程需要严格控制温度、压力和反应时间等参数,以提高反应效率和产率。
二、生产工艺流程邻氯苯腈的生产工艺流程主要包括原料准备、反应装置、生产控制、产品分离与提纯等步骤。
1. 原料准备:按照配方比例准备好氯苯和氰化钠等原料,严格控制原料质量和纯度。
2. 反应装置:选择适当的反应设备和设施,保证反应过程的安全性和稳定性。
Nektar SE49用户手册说明书
2IndexIntroduction3Box ContentSE49 Features Minimum System RequirementsGetting Started4Connection and PowerNektar DAW integrationUsing SE49 as a Generic USB MIDI Controller Keyboard, Octave, Transpose & Controls 5Octave ShiftTransposePitch bend and Modulation WheelsFoot Switch Setup Menu 6Control Assign 7Setting the MIDI ChannelSending a Program Change MessageSending a Bank LSB MessageSending a Bank MSB Message 8Transpose OctaveKeyboard Velocity Curves9 Panic Transpose Button Assignments10 Transport Control without Nektar DAW Integration11 USB Port Setup & Factory Restore12 CALIFORNIA PROP65 WARNING: This product contains chemicals known to the State of California to cause cancer and birth defects or other reproductive harm. For more information: /prop65Dispose of product securely, avoiding exposure to food sources and ground water. Only use the product in accordance with the instructions.Note: This equipment has been tested and found to comply with the limits for a Class B digital device, pursuant to part 15 of the FCC Rules. These limits are designed to provide reasonable protection against harmful interference in a residential installation. This equipment generates, uses and can radiate radio frequency energy and, if not installed and used in accordance with the instructions, may cause harmful interference to radio communications. However, there is no guarantee that interfer-ence will not occur in a particular installation. If this equipment does cause harmful interference to radio or television reception, which can be determined by turning the equipment off and on, the user is encouraged to try to correct the interference by one or more of the following measures:—Reorient or relocate the receiving antenna.—Increase the separation between the equipment and receiver.—Connect the equipment into an outlet on a circuit different from that to which the receiver is connected.—Consult the dealer or an experienced radio/TV technician for help.SE49 firmware, software and documentation are the property of Nektar Technology, Inc and subject to a License Agreement.© 2016 Nektar Technology, Inc. All specifications subject to change without notice. Nektar is a trademark of Nektar Technolog y, Inc.Nektar SE493IntroductionThank you for buying our SE49 controller keyboard from Nektar Technology.The SE49 controller comes with setup software for many of the most popular DAWs. This means that for supported DAWs, the setup work has largely been done and you can focus on expanding your creative horizon with your new controller. The Nektar DAW Integration adds functionality that makes the user experience more transparent when you combine the power of your computer with Nektar SE49.You also get a full version of Bitwig 8-Track software which of course feature SE49 integration.In addition, the SE49 range allow for complete user configurable MIDI control so if you prefer to create your own setups, you can do that too.We hope you will enjoy playing, using and being creative with SE49 as much as we have enjoyed creating it.Box ContentYour SE49 box contains the following items:∙The SE49 Controller keyboard ∙Printed Guide ∙A standard USB cable ∙Software license card If any of the items above are missing, please let us know via email: ***************************SE49 FeaturesMinimum System RequirementsAs a USB class compliant device, SE49 can be used from Windows XP or higher and any version of Mac OS X.The DAW integration files can be installed on Windows Vista/7/8/10 or higher and Mac OS X 10.7 or higher.∙ 49-note full-sized velocity sensitive keybed ∙ 1 MIDI assignable fader ∙ Octave up/down buttons with LED indicators ∙ Transpose up/down buttons assignable to other functions ∙ Octave and Transpose buttons can be switched to control transport on your DAW ∙ USB port (back) and USB bus powered ∙ Power on/off switch (back) ∙ 1/4” jack Foot Switch socket (Back) ∙ Nektar DAW Integration ∙ Bitwig 8-Track licenseGetting StartedConnection and PowerThe SE49 is USB Class compliant. This means there is no driver to install to get the keyboard set up with your computer.SE49 uses the built-in USB MIDI driver which is already part of your operating system on Windows andOS X as well as iOS (via the optional camera connection kit).This makes the first steps simple:∙ Locate the included USB cable and plug one end in to your computer and the other in to your SE49∙ If you want to connect a foot switch to control sustain, plug it in to the 1/4” jack socket on the back of the keyboard∙ Set the power switch on the back of the unit to OnYour computer will now spend a few moments identifying the SE49 and subsequently you will be able to set it up for your DAW.Nektar DAW IntegrationIf your DAW is supported with Nektar DAW integration software, you’ll need to first create a user account on our website and subsequently register your product to then gain access to the downloadable files applicable to your product.Start by creating a Nektar user account here: /registrationNext follow the instructions given to register your product and finally click on the “My Downloads” link to access your files. IMPORTANT: Make sure to read the installation instructions in the PDF guide, included in the downloaded package, to ensure you don’t miss an important step.Using SE49 as a Generic USB MIDI ControllerYou do not need to register your SE49 in order to use your controller as a generic USB MIDI controller. It will work asa USB class device on OS X, Windows, iOS and Linux.However there are several additional benefits to registering your product:∙ Notification of new updates to your SE49 DAW integration∙ PDF download of this manual as well as the latest DAW integration files∙ Access to our email technical support∙ Warranty service4Keyboard, Octave, Transpose & ControlsThe SE49 features a 49 note keyboard. Each key is velocity sensitive so you can play expressively with the instrument. There are 4 different velocity curves for the keyboard so you can chose a less or more dynamic curve to suit your playing style. In addition, there are 3 fSE49ed velocity settings.We recommend you spend a little time playing with the default velocity curve and then determine if you need more or less sensitivity. You can learn more about velocity curves and how to select them in the “Setup” section.To the left of the keyboard you find the Octave buttons.∙ With each press, the left Octave button will shift the keyboard down one octave.∙ The right Octave button will similarly shift the keyboard up 1 octave at a time, whenpressed.∙ Pressing both Octave buttons at the same time will reset the setting to 0.The maximum you can shift the keyboard is 3 octaves down and 4 octaves up covering theentire MIDI keyboard range of 127 notes.TransposeThe Transpose buttons are located below the Octave buttons. They work the same way:∙ With each press the left Transpose button will transpose the keyboard down one semi-tone.∙ The right Transpose button will similarly transpose the keyboard up 1 semi-tone at a time,when pressed.∙ Pressing both Transpose buttons at the same time will reset the transpose setting to 0 (only if transpose is assigned).You can transpose the keyboard -/+ 12 semi-tones. The Transpose buttons in addition can be assigned to control an additional 4 functions. Check the Setup section of this guide for more details.Pitch bend and Modulation WheelsThe two wheels below the Octave and Transpose buttons are by default used for Pitch bend and Modulation.The Pitch bend wheel is spring loaded and automatically reverts to it’s center position upon release. It’s ideal to bend note s when you are playing phrases that require this kind of articulation. The bend range is determined by the receiving instrument.The Modulation wheel can be freely positioned and is programmed to control modulation by default. The Modulation wheel in addition, is MIDI assignable with settings stored over power cycling so its retained when you switch the unit off.Foot SwitchYou can connect a foot switch pedal (optional, not included) to the 1/4” jack socket on the back of the SE49 keyboard. The correct polarity is automatically detected on boot-up, so if you plug in your foot switch after boot-up is complete, you may experience the foot switch working in reverse. To correct that, do the following:∙ Switch the SE49 off∙ Make sure your foot switch is connected∙ Switch the SE49 onThe polarity of the foot switch should now be automatically detected.56 Nektar SE49 User Guide Setup MenuThe Setup menu gives access to additional functions such as selecting Transpose button functions, control assign, selecting velocity curves and more. To enter the menu, press the [Octave Up]+[Transpose Up] together (the two buttons in the yellow box, right image).This will mute the MIDI output of the keyboard and instead the keyboard now is used toselect menus.When the Setup menu is active, the LED above the button will blink and its color is orangeto indicate setup is active.The chart below provides an overview of menus assigned to each key.Menu keys are the same for both SE49 and SE4961 but value entry using the keyboard is one octave higher on SE4961. Refer to the screen printing on the unit to see which keys to press to enter values.The functions are separated in to two groups. The first group spanning C1-G#1 covers general setup functions.The second group spanning C2-E2 covers the transpose button assignment options.On the following page we cover how each of these menus work. Note the documentation assumes you have an understanding of MIDI including how it works and behaves. If you are not familiar with MIDI, we recommend you study MIDI before making control assignment changes to your keyboard. A good place to start is the MIDI Manufacturers Association C1C2Control AssignYou can assign the Modulation wheel, the fader and even the foot switch pedal to any MIDI CC messages. Assignments are stored over power cycling so the keyboard is set up the way you left it, when you next switch it on.Here is how it works:∙ Press the [Octave Up]+[Transpose Up] buttons at the same time. The LED above the button will blink and the color is orange to indicate setup is active.∙ Press the low C#1 on your keyboard to select Control Assign.∙ Move or press a control to select the control you want to assign a MIDI CC message to.∙ Enter the MIDI CC value using the white number keys spanning G3–B4 (G4-B5 on SE4961).∙ Press Enter (C5) to accept the change and exit Setup.Setting the MIDI ChannelControls as well as the keyboard send their messages on a MIDI channel from 1 to 16. To change the MIDI channel do the following:∙ Press the [Octave Up]+[Transpose Up] buttons at the same time. The LED above the button will blink and the color is orange to indicate setup is active.∙ Press the low D1 on your SE49 keyboard to select MIDI Channel.∙ Enter the MIDI channel value you want (from 1 to 16) using the white number keys spanning G3–B4.∙ Press Enter (C5) to accept the change and exit Setup.Sending a Program Change MessageYou can send a MIDI program change message by doing the following:∙ Press the [Octave Up]+[Transpose Up] buttons at the same time. The LED above the button will blink and the color is orange to indicate setup is active.∙ Press the low D#1 on your SE49 keyboard.∙ Enter the program number you want (from 0 to 127) using the white number keys spanning G3–B4.∙ Press Enter (C5). This will send the message immediately and exit Setup.Sending a Bank LSB MessageTo send a Bank LSB message, do the following:∙ Press the [Octave Up]+[Transpose Up] buttons at the same time. The LED above the button will blink and the color is orange to indicate setup is active.∙ Press the low E1 on your SE49 keyboard.∙ Enter the Bank number you want (from 0 to 127) using the white number keys spanning G3–B4.∙ Press Enter (C5). This will send the message immediately and exit Setup.7Sending a Bank MSB MessageTo send a Bank MSB message, do the following:∙ Press the [Octave Up]+[Transpose Up] buttons at the same time. The LED above the button will blink and the color is orange to indicate setup is active.∙ Press the low F1 on your SE49 keyboard.∙ Enter the Bank number you want (from 0 to 127) using the white number keys spanning G3–B4.∙ Press Enter (C5). This will send the message immediately and exit Setup.TransposeYou can quickly set a transpose value in the Setup menu. This is ideal if the Transpose buttons are assigned to other functions or if you just need to change a value quickly.∙ Press the [Octave Up]+[Transpose Up] buttons at the same time. The LED above the button will blink and the color is orange to indicate setup is active.∙ Press the low F#1 on your SE49 keyboard.∙ Enter the transpose value number you want (from 0 to 12) using the white number keys spanning G3–B4 (G4-B5 on SE4961).∙ Press Enter (C5). This will change the Transpose setting immediately and exit Setup.OctaveYou can also change the octave setting on the keyboard by doing the following:∙ Press the [Octave Up]+[Transpose Up] buttons at the same time. The LED above the button will blink and the color is orange to indicate setup is active.∙ Press the low G1 on your SE49 keyboard.∙ Enter the octave value number you want entering 0 first for negative octave values (i.e. 01 for –1) and single digit values for positive values (i.e 1 for +1). You enter the values using the white number keys spanning G3–B4 (G4-B5 on SE4961).∙ Press Enter (C5). This will change the Octave setting immediately and exit Setup.8Keyboard Velocity CurvesThere are 4 different keyboard velocity curves and 3 fixed velocity levels to choose between, depending on how sensitive and dynamic you want the SE49 keyboard to play.Here is how you change a velocity curve:∙ Press the [Octave Up]+[Transpose Up] buttons at the same time. The LED above the button will blink and the color is orange to indicate setup is active.∙ Press the G#1 key on your keyboard to select Velocity Curve.∙ Enter the value corresponding to the velocity curve you want (1 to 7) using the white number keys spanning G3–B4.∙ Press Enter (C5). This will change the velocity curve setting immediately and exit Setup.PanicPanic sends out the all notes off and reset all controllers MIDI messages on all 16 MIDI channels.∙ Press the [Setup] button. The LED above the button will blink and the color is orange to indicate setup is active.∙ Press the A1 key on your keyboard to select Panic. The reset will happen immediately and SE49 will exit Setup mode.9Transpose Button AssignmentsThe transpose buttons can be assigned to control Transpose, MIDI Channel, Program change, and for supported DAW’s, Track Select and Patch Select.The process of assigning a function to the transpose buttons is the same for all 5 options and works as follows:∙ Press the [Setup] button. The LED above the button will blink and the color is orange to indicate setup is active.∙ Press the key on your SE49 keyboard (C2-E2) that corresponds to the function you want to assign to the buttons.∙ Press Enter (C5). This will accept the change and exit Setup.Note: Track Change and Patch change requires that the Nektar DAW integration file is installed for your DAW. The buttons will not change the track in your DAW or patches in your virtual instruments unless installation has been completed correctly.10Transport Control without Nektar DAW IntegrationThe Nektar DAW Integration files automatically map the Octave and Transpose buttons so they can be used to control transport. If your DAW is not supported directly , you may still be able to control your DAWs transport controls using MIDI Machine Control.Here is how you set up the SE49 keyboard to send MIDI Machine Control messages∙ Press the [Setup] button. The LED above the button will blink and the color is orange to indicate setup is active.∙ Press the A2 key on your SE49 keyboard.∙ Press the numeric key to enter 3∙ Press Enter (C5). This will accept the change and exit Setup.Provided your DAW is set up to receive MMC, you can now control transport functions by first pressing [Octave Down]+ [Transpose Down] at the same time. The 4 buttons now are assigned to control the following:To revert the 4 buttons to their main functions, press button combination [Octave Down]+[Transpose Down] again.MMC is supported by DAWs such as Pro Tools, Ableton Live and many more.11USB Port Setup & Factory RestoreUSB Port SetupSE49 has one physical USB port however there are 2 virtual ports as you may have discovered during the MIDI setup of your music software. The additional port is used by the SE49 DAW software to handle communication with your DAW. You only need to change the USB Port Setup setting if the SE49 setup instructions for your DAW specifically advises that this should be done.Factory RestoreIf you need to restore factory settings for example if you by mistake managed to change the assignments needed for DAW integration files, here is how you do that.∙ Make sure your SE49 is switched off∙ Press the [Octave up]+[Octave down] buttons and hold them∙ Switch your SE49 on1213。
L4938E资料

PR
1 2 3 4 5 6 7 8 9 10
D94AT076A
20 19 18 17 16 15 14 13 12 11
SI VS1 VS2 GND GND GND GND N.C. OUT2 ADJ
PR CT EN GND GND RES SO OUT1
1 2 3 4 5 6 7 8
D94AT075A
Unit °C/W °C/W
Note 3: Typical value soldered on a PC board with 8cm copper ground plane (35mm thick).
PIN FUNCTIONS
PIN (DIP 12+2+2) 14 15 16 1 2 3 4, 5, 12, 13 6 7 8 9 10 11 PIN (SO 12+4+4) 18 19 20 1 2 3 4, 5, 6, 7, 14, 15, 16, 17 8 9 10 11 12 13 PIN PowerSO20 3 4 5 6 7 8 1,10,11,20 14 15 16 17 18 2,9,19 Name VS2 VS1 S1 PR CT EN GND RES SO OUT 1 ADJ OUT 2 NC Function Supply Voltage (400mA Regulator) Supply Voltage (100mA Regulator, Reset, Sense) Sense Input Reset Theresold Programming Reset Delay Capacitor Enable (low will activate the 400mA regulator) Ground Reset Output Sense Output 100mA Regulator Output Feedback of 400mA Regulator 400mA Regulator Output Not Connected
shpl-49的药理学分类
shpl-49的药理学分类SHPL-49是一种药物化合物,其药理学分类是一项重要的研究领域,通过深入了解SHPL-49的药理学分类,可以帮助我们了解其对身体的作用机制,从而更好地应用于临床实践和药物研发。
SHPL-49属于一类特定的药物化合物,它具有多种药理学活性和效应。
在药理学上,SHPL-49具有多种分类,其中包括药物类型、作用机制以及药物目标等。
首先,从药物类型的角度来看,SHPL-49可以被归类为一种抗癌药物。
这是因为SHPL-49在细胞生长和分裂过程中发挥着抑制作用,可以阻断癌细胞的增殖,从而起到抗癌的作用。
此外,SHPL-49还具有抗炎、免疫调节和抗氧化等药理学活性,从而使其在癌症治疗中发挥更为综合的效果。
其次,从作用机制的角度来看,SHPL-49主要通过干扰细胞信号传导通路来发挥其药理学效应。
具体来说,SHPL-49可以通过抑制细胞内的一些信号传导分子或酶的活性,从而影响细胞的生物活性和增殖能力。
例如,SHPL-49可以抑制一些关键的酶活性,如蛋白激酶、RNA酶和DNA聚合酶等,从而抑制癌细胞的生长和分裂。
此外,SHPL-49还可以通过调节DNA的甲基化水平来改变基因的表达,从而影响细胞的生物学行为。
此外,SHPL-49还可以作用于人体的一些特定生物标志物和分子靶点。
例如,SHPL-49可以作用于细胞表面的受体分子,如细胞信号受体和药物靶点等。
通过与这些受体分子相互作用,SHPL-49可以改变受体的活性状态,影响细胞的信号传导和生物学行为。
此外,SHPL-49还可以干扰细胞内的一些信号通路,影响细胞的功能和代谢活动。
SHPL-49的药理学分类对于临床应用和药物研发至关重要。
通过深入了解SHPL-49的分类,可以更好地选择患者和疾病,设计和调整治疗方案,提高治疗效果和患者的生存率。
同时,对于药物研发人员来说,了解SHPL-49的分类可以帮助他们更好地理解和剖析其作用机制,并在此基础上进行药物结构改造和优化,从而开发出更有效和安全的抗癌药物。
奇冠PI49N诊断卡的说明书
电脑诊断卡--奇冠PI49N 诊断卡说明书最近朋友给了一块诊断卡,没有说明书,我就在网上找了一点,以备后用。
五、用户必读1、故障代码含义速查表是按代码值从小到大排序,卡中出码顺序由电脑主板上BIOS确定;2、四位代码中分为两组两位代码。
前两位(千位和百位)为一组;后两位(十位和个位)为另一组。
您分别查看这两组代码的含义说明既不仅知道被测计算机故障自检不能通过的部件(由千位和百位显示);并且知道计算机故障自检到最后所通过的部件(由十位和个位显示);ﻭ3、未定义的代码表中未能列出;ﻭ4、对于不同BIOS(常用的AMI、Award、Ph oenix)同一代码所代表的意义则不同,因此应弄清您所检测的电脑是属于哪一种类型的BIOS,您可查阅您的电脑使用手册,或从电脑主板上的BIOS芯片上直接查看,也可以在启动的屏幕中直接看到;5、有少数电脑主板的PCI槽只送出一部分代码,但ISA槽则有完整自检代码输出。
且目前已发现有极个别原装机电脑主板的ISA槽无代码输出,而PCI槽则有完整代码输出,故建议您在查看代码不成功时,将本双槽卡换到另一种插槽试一下。
另外,同一块电脑主板的不同PCI槽,有的槽有完整代码送出,如DELL810台式电脑主板上只有靠近CPU的一个PCI槽有完整代码显示,一直变化到“00”或“FF”,而其它PCI槽走到“38”后则不继续变化;ﻭ6、复位信号所需时间ISA与PCI不一定同步,故有可能ISA开始出代码,但PCI的复位灯还未熄,故PCI代码停在起始代码上;ﻭ7、由于电脑主板品种和结构的多样性及BIOS POS T代码不断更新,令紧接在代码后面的查找故障部件和范围的准确性受到影响,故《代码含义速查表》中说明的故障部件和范围只能作为参考;5V、+12V、OSC和FRAME、CLK、RUN、-5V和+3V3、-12V、六、指示灯功能速查表ﻭ+BIOS和IRDY、RST灯名信号名称说明ﻭCLK 总线时钟不论ISA或PCI只要电脑(无CPU等)接通电源就应常亮,否则CLK信号坏。
Philips Q-Line 49英寸4K UHD Android显示屏说明书
Philips Signage Solutions Q-Line Display49"3840 x 2160 (4K UHD)Ultra HD49BDL3050QShow moreSimple, smart, sharp 18/7 display.Turn up the stopping power with the Q-Line UHD Android display that goes big on resolution. Benefit from fast, hardware-free installation and superb picture quality. Easily display online and local content.Superb picture. Smooth performance •Ultra-HD. Rich images. Stunning contrast•IPS panel: rich color consistency from every angle •Android SoC processor. Native and web appsEffortless setup. Total control.•Remote system management through CMND•CMND & Deploy. Install and launch apps remotely•CMND & Create. Develop and launch your own content •Operate, monitor and maintain with CMND & Control Cost-effective system solution•Energy-saving automatic backlight control•Integrated media player. Easily schedule USB content•Integrated HTML5 browser. Play and control online content •Internal memory. Upload content for instant playHighlights Powered by AndroidControl your display via an Internet connection. Android-powered Philips Professional Displays are optimized for native Android apps, and you can install web apps directly to the display too. A new Android OS ensures the software is kept secure and remain to the latest specification for longer.CMNDTake control of your Philips Professional Display network. CMND lets you manage, update, maintain, and play via one easy-to-use interface. From installation to daily operation.CMND & ControlRun your display network over a local (LAN)connection. CMND & Control allows you toperform vital functions like controlling inputsand monitoring display status. Whether you'rein charge of one screen or 100.CMND & CreateTake control of your content with CMND &Create. A drag-and-drop interface makes itsimple to publish your own content-whetherit's a daily specials board or branded corporateinformation. Preloaded templates andintegrated widgets ensure your stills, text, andvideo will be up and running in no time.CMND & DeployQuickly install and launch any app-even whenyou're off-site and working remotely. CMND& Deploy lets you add and update your ownapps, as well as apps from the PhilipsProfessional Display App Store. Simply scanthe QR code, log in to the store, and click onthe app you want to install. The app isautomatically downloaded and launched.Internal memorySave and play content without the need for apermanent external player. Your Philipsprofessional display has an internal memory,which allows you to upload media into thedisplay for instant playback. The internalmemory also functions as a cache for onlinestreaming.Issue date 2022-07-14Version: 12.1.212 NC: 8670 001 42313EAN: 87 12581 74363 5© 2022 Koninklijke Philips N.V.All Rights reserved.Specifications are subject to change without notice. Trademarks are the property of Koninklijke Philips N.V. or their respective owners.SpecificationsPicture/Display•Diagonal screen size: 48.5 inch / 123.2 cm •Panel resolution: 3840 x 2160•Optimum resolution: 3840 x 2160 @ 60 Hz •Brightness: 350 cd/m²•Contrast ratio (typical): 1200:1•Response time (typical): 9 ms •Aspect ratio: 16:9•Viewing angle (H / V): 178 / 178 degree •Pixel pitch: 0.27963 x0.27963 mm •Display colors: 1.07 Billion•Picture enhancement: 3/2 - 2/2 motion pull down, 3D Combfilter, Progressive scan, 3D MAdeinterlacing, Dynamic contrast enhancement, Color Enhancement, Color Temperature Adjustment, De-interlacer, Noise Reduction, Smart Picture•Operating system: Android 5.0.1•Panel technology: IPSSupported Display Resolution•Computer formatsResolutionRefresh rate 640 x 480 60, 72, 75Hz 720 x 400 70Hz 800 x 600 60, 75Hz1024 x 76860, 75Hz 1280 x 768 60Hz 1280 x 800 60Hz 1280 x 1024 60Hz 1360 x 768 60Hz 1600 x 1200 60Hz 1920 x 1080 60Hz 3840 x 2160 30, 60Hz •Video formatsResolutionRefresh rate 480i 30, 60Hz 480p 30, 60Hz 576i 25, 50Hz 576p 25, 50Hz 720p 50, 60Hz 1080i 25, 30Hz 1080p 50, 60Hz 2160p 30,50, 60HzConnectivity•Video input: DVI-D, VGA (Analog D-Sub), HDMI (x2), USB 2.0 (x2)•Audio input: 3.5 mm jack•Audio output: Audio Left/Right (RCA)•External control: RS232C (in/out) 2.5 mm jack, IR (in/out) 3.5 mm jack, RJ45Convenience•Screen saving functions: Pixel Shift, Low Brightness •Keyboard control: Lockable•Network controllable: LAN (RJ45), RS232•Energy saving functions: Smart Power•Placement: Landscape (18/7), Portrait (12/7)•Remote control signal: Lockable•Ease of installation: Remote Control Lock •Memory: 8GB eMMC•Other convenience: Kensington lock, VESA mount (400x400mm)•Signal loop through: IR Loopthrough, RS232•Tiled Matrix: Up to 10 x 15Dimensions•Bezel width: 11.9 (Top/Left/Right) 14.4 (Bottom)mm•Set dimensions (W x H x D): 1099.2 x 631.9 x 62.4 mm•Set dimensions in inch (W x H x D): 43.28 x 24.88 x 2.46 inch •Product weight: 11.4 kg •Product weight (lb): 25.13 lb •Wall Mount: 400 x 400 mm, M6Operating conditions•Altitude: 0 ~ 3000 m•Temperature range (operation): 5 ~ 40 °C •Temperature range (storage): -20 ~ 60 °C •Relative humidity: 20 ~ 80 (operation),10 - 90%(storage) %•MTBF: 50,000 hour(s)Power•Mains power: 100 ~ 240 VAC, 50 ~ 60 Hz •Consumption (On mode): 125 W •Standby power consumption: <0.5W •Power Saving Features: Smart PowerSound•Built-in speakers: 2 x 10W RMSAccessories•Included accessories: AC Power Cord, RS232 cable, Quick start guide, IR sensor cable (1.8M),Batteries for remote control, Remote Control •Optional accessories: Table top stand•Included Accessories: RS232 daisy-chain cable, USB Cover and screw x1•Stand: BM05923/BM02542/BM05922Multimedia Applications•USB Playback Video: ASF, AVI, DAT, FLV, MKV, MP4, MPEG, MPG, TS, VOB, WEBM, WMV •USB Playback Picture: BMP, JPEG, JPG, PNG •USB Playback Audio: AAC, M4A, MP3, WMA Miscellaneous•Warranty: 3 year warranty•On-Screen Display Languages: Arabic, Simplified Chinese, Traditional Chinese, English, French, German, Italian, Polish, Russian, Spanish, Turkish, Japanese, Czech, Danish, Dutch, Finnish, Norwegian, Portuguese, Swedish•Regulatory approvals: CE, UL/cUL, CB, FCC, Class B, BSMI, CCC, EAC, EMF, EnergyStar 7.0, PSB, CECPInternal Player•Storage: 8GB eMMC•CPU: ARM Quad-core processor •Memory: 2GB DDR3。
RN49P1FS资料
Note:
Using continuously under heavy loads (e.g. the application of high temperature/current/voltage and the significant change in temperature, etc.) may cause this product to decrease in the reliability significantly even if the operating conditions (i.e. operating temperature/current/voltage, etc.) are within the absolute maximum ratings. Please design the appropriate reliability upon reviewing the Toshiba Semiconductor Reliability Handbook (“Handling Precautions”/“Derating Concept and Methods”) and individual reliability data (i.e. reliability test report and estimated failure rate, etc).
Ta = 100°C 1000
-100
Ta = 100°C
25 100 -25 EMITTER COMMON VCE = -5V 10 -0.1
-10
25 -25 EMITTER COMMON IC/IB = 20
-1
-10
-100
-1 -0.1
-1
-10
- 1、下载文档前请自行甄别文档内容的完整性,平台不提供额外的编辑、内容补充、找答案等附加服务。
- 2、"仅部分预览"的文档,不可在线预览部分如存在完整性等问题,可反馈申请退款(可完整预览的文档不适用该条件!)。
- 3、如文档侵犯您的权益,请联系客服反馈,我们会尽快为您处理(人工客服工作时间:9:00-18:30)。
安徽基石置业有限公司49%国有股权转让情况汇报根据市委、市政府关于深化国企改革精神,以及市国资委的统一部署,我司迅速启动所属房地产开发企业的退出工作。
现将安徽基石臵业有限公司(以下简称基石公司)49%国有股权转让工作汇报如下:一、基本情况安徽基石臵业有限公司成立于2005年11月,注册资本人民币1亿元,合肥政务文化新区投资公司出资4900万元,占比例49%;安徽信达房地产公司出资1500万元,占比例15%,安徽信达银地臵业有限公司(其中,安徽信达房地产公司持有该公司51%股权)出资3600万元,占比例36%。
基石公司开发的“合肥市政务文化新区新城国际”项目地处东流路南、潜山路东,总用地面积47019.00平方米(70.5亩),项目绿地率40%,建筑密度17.54%,容积率3.0,规划总建筑面积19.23万平方米,其中地上14.11万平方米,地下5.13万平方米。
新城国际一期开发项目A楼、B楼,可售面积9.41万平方米。
2006年12月开工,2007年5月进入预售阶段,至2010年9月,还剩余地下停车位308个,办公商业8233平方米未销售。
C楼建筑面积6.9万平方米,主要为办公、商业,正处于建设中,预计将于2012年底前建成。
D楼计划调整规划设计变更,变更后,建筑面积约7万平方米,工程计划于2011年底前开工,2013年底前建成。
二、评估情况经评估,截至2010年9月30日基石公司账面净资产为12,709.85万元,评估净资产为28,589.25万元,评估增值15,879.40万元,增值率124.94%。
49%国有股权对应价值为14,008.73万元。
三、项目转让方案(一)转让方式及挂牌价本次股权转让标的为基石臵业49%国有股权,以经评估备案的企业净资产价值1.41亿元为挂牌价。
(二)挂牌转让程序将转让标的在市招投标中心挂牌,公开征集受让方,挂牌结束后对意向受让方进行资格审查,初步审查结果由市国资工作领导小组办公室报市国资工作领导小组组长会议审核批准后,由市招投标中心组织现场竞价,价高者得。
(三)挂牌转让的付款方式自产权转让合同生效之日起5个工作日内支付不少于转让总价款的50%,余款3个月内付清;(四)挂牌转让股权的前臵性条件1、注册资本及净资产均不少于人民币5000万元(或等值外币);2、在参加竞价前已足额交纳人民币3000万元的竞价保证金;3、受让后新体承继转让标的企业经评估确认的全部资产和负债。
4、受让后新体在存续期内不改变企业注册地,不改变企业的法人主体地位。
受让后新体股东会如对改变企业注册地及法人主体地位等事项进行审议,受让方应按本承诺进行表决。
5、受让后新体继续履行转让标的企业对外签订的全部合同/协议。
同时承诺新城国际项目C楼在 2011年10月31日前结构封顶,并在2012年12月31日前建成;新城国际项目D楼于2011年12月31日前开工,并在2013年12月31日前建成。
6、受让后15个工作日内,由受让方代转让标的企业偿还所欠转让方款项。
四、提请审议的事项1、审议批准以1.41亿元作为挂牌价,在市招投标中心公开挂牌转让合肥政务文化新区投资公司持有的安徽基石臵业有限公司49%国有股权。
2、审议批准《安徽基石臵业有限公司49%股权转让前臵性条件》和《产权转让合同》。
附件:1、安徽基石臵业有限公司49%国有股权挂牌转让的前臵性条件2、安徽基石臵业有限公司49%国有股权转让合同二〇一一年二月二十二日附件1安徽基石置业有限公司49%股权转让前置性条件一、转让标的、转让方式、转让底价及付款条件(一)转让标的本次转让标的系合肥政务文化新区开发投资有限公司(以下简称“转让方”)持有的安徽基石臵业有限公司(以下简称“标的企业”)49%股权,对应的资产、负债及相关情况详见安徽庐东资产评估事务所出具的资产评估报告书[皖东评(2010)第2032号]。
(二)本次转让采取资格审查后现场竞价方式,价高者得。
(三)转让底价为人民币1.41亿元。
(四)付款方式:受让方自《产权转让合同》生效之日起5个工作日内向合肥市产权交易中心指定账户支付不少于转让总价款的50%作为首付款,余款自《产权转让合同》生效之日起3个月内付清,并按同期同档次银行贷款基准利率的1.2倍向转让方支付自应付首付款之日起至转让价款实际支付完毕之日止的付款期间利息,同时受让方须对除首付款外的款项提供合法有效的实物抵押或经转让方认可的第三方担保。
二、意向受让方应具备的条件符合下列条件,并具有完全民事行为能力的境内外企业法人,除法律另有规定外,均可参与受让。
(一)注册资本及净资产均不少于人民币5000万元(或等值外币)。
(二)具有良好的商业信用、财务状况、银行资信证明(或存款证明),具有支付本次股权转让价款的能力。
(三)意向受让方如为联合体的,则联合体中的主要受让方须具备以上条件。
(四)在参加竞价前已足额交纳人民币3000万元的竞价保证金。
三、意向受让方须承诺的事项:(一)受让后新体承继转让标的企业经评估确认的全部资产和负债。
(二)受让后新体继续履行转让标的企业对外签订的全部合同/协议,包括转让标的企业与有关单位签订的关于标的企业开发项目工程进度方面的协议,并承担由此产生的一切法律后果和经济责任。
(三)受让后新体在存续期内不改变企业注册地,不改变企业的法人主体地位。
受让后新体股东会如对改变企业注册地及法人主体地位等事项进行审议,受让方应按本承诺进行表决。
(四)受让方自《产权转让合同》生效之日起10个工作日内与转让方办理债权转让手续,受让转让方对转让标的企业在《产权转让合同》生效日享有的债权(具体金额以审计确认为准);受让价款等同于债权额,并于债权转让后5个工作日内一次性付清。
如不能按时支付,则自应付款之日起,按欠款额每日万分之五支付违约金。
(五)对转让方拟定的《产权转让合同》的所有条款均全部了解并同意接受,并在自收到本项目《中标通知书》次日起3个工作日内与转让方签订该合同。
四、意向受让方应提交的资格审查材料(一)主体资格证明文件(营业执照副本复印件、组织机构代码证复印件、法定代表人身份证复印件、公司章程复印件等)。
(二)基本情况说明(企业性质、组织机构、行业经验、经营业绩、财务状况等)。
(三)股东会或董事会关于同意受让的决议;意向受让方是国有企业的,还需提供上级政府主管部门同意受让的相关文件。
(四)银行出具的意向受让方不低于首付价款的资金证明原件。
(五)2010年以前成立的企业提供2009年度审计报告和2010年6月30日财务报表(能反映截至2010年6月30日该企业净资产不少于人民币5000万元);2010年1月1日至2010年6月30日新成立的企业提供验资报告和2010年6月30日财务报表(能反映截至2010年6月30日该企业净资产不少于人民币5000万元);2010年6月30日后新成立的企业提供验资报告和最近一期财务报表(能反映该企业净资产不少于人民币5000万元)。
(六)委托代理人的身份证明材料复印件及授权委托书原件。
(七)对所提供材料的真实性、合法性、完整性的承诺函。
注:意向受让方所提供材料如为复印件的,需加盖本公司公章。
五、特别事项说明(一)转让方已就本次产权转让履行了公司章程规定的董事会决议同意程序。
(二)审计、评估基准日起至《产权转让合同》生效日期间,标的企业发生的经营损益由转让方按其对标的企业的持股比例承担或享有,具体数额由转让方和受让方在《产权转让合同》生效之日起7个工作日内共同委托安徽诚勤会计师事务所以皖诚勤审字[2010]545号审计报告为基础、以《产权转让合同》生效日为截止日进行审计确认。
(三)标的企业不在审计报告、评估报告范围内的资产、负债及未披露的或有事项对应的权利和义务由转让方按其对转让标的企业的持股比例享有或承担。
(四)受让方全额付清转让价款、利息、违约金及债权受让价款后7个工作日内,转让方协助受让方办理转让标的企业股权工商变更登记。
(五)意向受让方应充分关注、调查、研究与本次产权转让标的相关的所有事宜、信息、或有风险、不确定因素及可能对转让标的企业资产及企业经营管理可能造成的影响,转让方不对转让标的企业是否存在或有风险提供保证。
附件2产权转让合同甲方:合肥政务文化新区开发投资有限公司住所地:合肥市习友路西段投资大厦法定代表人:梅国胜乙方:住所地:法定代表人:根据《中华人民共和国合同法》、《企业国有产权转让管理暂行办法》等相关法律、法规规定,甲、乙双方遵循自愿、公平、诚实守信原则,经友好协商,签订本产权转让合同(以下简称“本合同”)如下:第一条转让标的合肥政务文化新区开发投资有限公司(以下简称“甲方”)持有的安徽基石臵业有限公司(以下简称“标的企业”)49%股权,对应的资产、负债及相关情况详见安徽庐东资产评估事务所出具的资产评估报告书[皖东评(2010)第2032号]。
第二条甲方的声明、保证和承诺一、对转让标的拥有有效的处分权;二、为签订本合同之目的向乙方提交的各项证明文件及资料均为真实、完整的;三、签订本合同所需的包括但不限于授权、审批、公司内部决策等在内的一切批准手续均已取得,本合同成立的前提及先决条件均已满足;四、本合同的签署与履行没有违反甲方业已签署的合同、协议及所有法律文件;五、给予一切合理及必要的协助,以完成本合同项下转让标的所需的有关政府主管部门的批准和变更。
第三条乙方的声明、保证和承诺一、具有签订和履行本合同的能力;二、保证签订本合同所需的各项授权、审批,以及内部决策等在内的一切批准手续均已合法有效取得;三、乙方承诺:1、受让后新体承继转让标的企业经评估确认的全部资产和负债。
2、受让后新体继续履行转让标的企业对外签订的全部合同/协议,包括转让标的企业与有关单位签订的关于标的企业开发项目工程进度方面的协议,并承担由此产生的一切法律后果和经济责任。
3、受让后新体在存续期内不改变企业注册地,不改变企业的法人主体地位。
受让后新体股东会如对改变企业注册地及法人主体地位等事项进行审议,乙方应按本承诺进行表决。
4、乙方自本合同生效之日起10个工作日内与甲方办理债权转让手续,受让甲方对转让标的企业在本合同生效日享有的债权(具体金额以审计确认为准);受让价款等同于债权额,并于债权转让后5个工作日内一次性付清。
如不能按时支付,则自应付款之日起,按欠款额每日万分之五支付违约金。
第四条转让价格及价款支付方式一、转让价格:甲方将转让标的以人民币元(大写,以下简称“转让价款”)转让给乙方,乙方同意以此价格受让转让标的。
二、乙方自本合同生效之日起5个工作日内向合肥市产权交易中心指定账户支付转让价款不少于50%;余款自《产权转让合同》生效之日起3个月内付清,并按同期同档次银行贷款基准利率的1.2倍向转让方支付自应付首付款之日起至转让价款实际支付完毕之日止的付款期间利息。