
七喜笔记本电脑使用说明书(H46R系列)
-1-
使用手册
目录
1.0 注意事项 1.1 特别提示.......................................................................................................................................................3 1.2 笔记本电脑使用重要提示请务必阅读 .......................................................................................................3 1.3 注意事项.......................................................................................................................................................4 1.4 笔记本电脑电池使用须知...........................................................................................................................5 1.5 安全须知.......................................................................................................................................................8 2.0 产品概述...............................................................................................................................................................9 2.1 简介...............................................................................................................................................................9 2.2 部件介绍.......................................................................................................................................................9 2.3 开箱和检查.................................................................................................................................................10 3.0 基本使用常识..................................................................................................................................................... 11 3.1 快速启动按钮及系统状态指示灯............................................................................................................. 11 3.2 将电脑停止................................................................................................................................................. 11 3.3 键盘功能.....................................................................................................................................................12 3.4 触摸板.........................................................................................................................................................13 3.5 显示屏.........................................................................................................................................................15 3.6 网卡.............................................................................................................................................................15
4.2 Info .............................................................................................................................................................. 16
6.1 声音的问题.................................................................................................................................................21 6.2 硬盘的问题.................................................................................................................................................21 6.3 显示器的问题.............................................................................................................................................22 6.4 内存的问题.................................................................................................................................................22 特别声明 ..................................................................................................................................................................... 1 附录 A 产品能效等级 ..............................................................................................................................................2
4.3 Main ............................................................................................................................................................ 16
使用手册
七喜笔记本电脑
使用手册
H46R 系列
0
使用手册
敬告
尊敬的用户: 感谢您购买和使用我司的产品,为了您的安全和利益,请料。如果您未按照产品说明书操作和使用产品,而导致任何的人身伤害、财产或其他损失, 我司将不承担责任。 关于本产品说明书:
z 说明书版权属于我司所有; z 说明书提及的商标、字号属于它们各自的权利拥有者; z 本说明书以及机器所标识的功能属于选配件,部分机型可能不含所示功能,说明书内容如与实际 产品不一致,以实际产品为准。
4.6 Boot ............................................................................................................................................................ 19 5.0 驱动程序安装....................................................................................................................................................20 6.0 故障分析与处理................................................................................................................................................20
笔记本使用教程
笔记本使用教程笔记本使用教程(500字)在当今数字时代,笔记本电脑已成为人们生活和工作中必不可少的工具之一。
然而,对于初次使用笔记本电脑的人来说,可能会面临一些困惑。
下面是一个简单的笔记本使用教程,帮助初学者更好地使用笔记本电脑。
1. 熟悉笔记本的外部结构:首先,了解笔记本电脑的外观和各个端口的功能非常重要。
一般笔记本电脑包括屏幕、键盘、鼠标触控板、USB接口、HDMI 接口、耳机孔等。
通过理解这些外部结构,您可以更方便地使用笔记本。
2. 开机和关机:了解如何正确地开机和关机。
在开机时,请按下电源按钮。
在关机时,可以点击“开始”按钮,然后选择“关机”选项。
3. 设置和调整操作系统:根据个人喜好和需求,定制和调整操作系统。
例如,更改背景壁纸、调整音量和亮度等。
4. 连接无线网络:在设置中,找到无线网络选项,点击“连接”。
然后选择您想要连接的Wi-Fi网络,并输入相应的密码。
5. 使用软件和应用程序:安装和使用常用的软件和应用程序,如浏览器、办公套件、媒体播放器等。
这些应用程序将帮助您进行各种任务。
6. 存储和备份文件:学会使用文件管理器,创建文件夹和对文件进行分类。
定期备份重要文件,以防止数据丢失。
7. 保护电脑:安装杀毒软件和防火墙,定期更新它们以确保电脑的安全性。
此外,避免下载和安装来自未知来源的软件和文件。
8. 节省电池寿命:较长时间离开笔记本电脑时,可将其设置为“睡眠”或“休眠”状态以节省电池寿命。
此外,在使用时降低屏幕亮度、关闭不必要的背景应用程序等,也能延长电池使用时间。
9. 打印和共享文件:学会使用打印机和共享文件的功能,以便更方便地与他人合作和交流。
10. 维护和保养:定期清洁笔记本电脑的键盘和屏幕,确保其正常运行。
避免将液体溅入笔记本电脑中,并避免过度使用。
通过这份简单的笔记本使用教程,您应该能够更熟练地操作笔记本电脑,并应用于日常生活和工作中。
记住,使用笔记本需要一定的练习和耐心,希望这些指南能够帮助您更好地使用笔记本电脑并享受其中带来的便利。
使用者手册 笔记本电脑说明书

目录版权和商标声明 ............................................................................................................1-4修订 ..............................................................................................................................1-4FCC-B 频道干扰声明....................................................................................................1-5FCC 规定......................................................................................................................1-5CE 规定 ........................................................................................................................1-6电池规范 .......................................................................................................................1-6WEEE 声明...................................................................................................................1-6化学物质法规................................................................................................................1-7升级和保修 ..................................................................................................................1-7购买备件 .......................................................................................................................1-7安全指南 .......................................................................................................................1-8产品中有害物质的名称及含量.....................................................................................1-10MSI 特殊功能 .............................................................................................................1-11简介 ...............................................................................................2-1打开包装 .......................................................................................................................2-2产品检视 .......................................................................................................................2-3顶盖开启检视图 .......................................................................................................2-3前端检视图 ..............................................................................................................2-6右端检视图 ..............................................................................................................2-7左端检视图 ..............................................................................................................2-8后端检视图 ............................................................................................................2-10底部检视图 ............................................................................................................2-11如何使用键盘..............................................................................................................2-12Windows 键 ...........................................................................................................2-12快速启动按键.........................................................................................................2-13开启或关闭触摸板..................................................................................................2-14进入睡眠模式.........................................................................................................2-14切换显示器 ............................................................................................................2-14使用多个监视器 .....................................................................................................2-14调整显示器的亮度 ................................................................................................2-14调整扬声器的音量..................................................................................................2-15调整键盘背光 LED 灯的亮度 .................................................................................2-15视频:如何使用 [Fn] 按钮......................................................................................2-16产品规格 .....................................................................................................................2-17使用者手册如何使用入门 .................................................................................3-1开始使用笔记本电脑 .....................................................................................................3-2如何舒适地使用笔记本电脑 ..........................................................................................3-3如何使用电源供应器 .....................................................................................................3-4电源适配器 ..............................................................................................................3-4电池 .........................................................................................................................3-4如何在 Windows 10 下设置一个电源计划设定 .............................................................3-6选择或自定义电源计划 ............................................................................................3-6创建自己的电源计划 ................................................................................................3-8如何使用触摸板 .........................................................................................................3-10了解一般硬盘和固态硬盘............................................................................................3-11了解 M.2 固态硬盘插槽...............................................................................................3-11如何连接 Internet........................................................................................................3-12无线网络 ................................................................................................................3-12有线网络 ................................................................................................................3-14如何设置蓝牙连接.......................................................................................................3-19开启蓝牙连接.........................................................................................................3-19如何连接外部装置.......................................................................................................3-22视频:如何使用 RAID 功能 ........................................................................................3-23如何在 BIOS 中选择 Boot Mode.................................................................................3-24视频:如何在 MSI 笔记本电脑上恢复 Windows 10 操作系统.....................................3-25视频:如何使用 MSI 一键安装 ..................................................................................3-26版权和商标声明Copyright © 微星科技股份有限公司所有。
《笔记本电脑基本操作与使用指南》

笔记本电脑基本操作与使用指南开机:1.找到电源键:通常位于笔记本的侧面、顶部或键盘上方。
2.长按电源键:直到屏幕亮起,显示制造商的LOGO或BIOS信息。
3.等待启动:操作系统加载过程中,可能会看到进度条或启动画面。
4.登录:输入用户名和密码(如果设置了),进入桌面环境。
关机:1.访问开始菜单:通常位于屏幕左下角,点击或触摸打开。
2.选择关机选项:在开始菜单中找到电源图标,选择“关机”、“休眠”或“睡眠”。
3.紧急关机:如果系统无响应,长按电源键约5-10秒,直到屏幕熄灭。
但应尽量避免这样做,因为这可能导致数据丢失或系统不稳定。
基本操作的进阶技巧:触摸板的高级手势:•两指捏合:缩放图片或网页。
•四指轻扫:显示所有打开的窗口或快速切换桌面。
•两指滑动:调节音量或屏幕亮度。
键盘快捷键:•Win + E:打开资源管理器。
•Ctrl + C/V/X:复制、粘贴、剪切。
•Alt + Tab:在打开的程序间快速切换。
•Win + L:锁定屏幕,保护隐私。
软件安装与卸载的注意事项:安装前检查:•确认软件兼容性:检查软件是否支持您的操作系统版本。
•阅读用户评论:了解其他用户的经验,避免安装低质量或潜在危险的软件。
卸载软件的彻底性:•使用第三方卸载工具:有些软件卸载后仍会留下残留文件,使用如Revo Uninstaller等工具可以更彻底地清除。
网络连接的优化技巧:Wi-Fi信号增强:•调整路由器位置:放置在家中中央,远离金属物体和电子设备。
•升级路由器天线:购买增益更高的天线,增强信号覆盖范围。
•更改无线频道:避免与其他设备冲突,选择干扰较少的频道。
有线网络速度提升:•使用千兆网卡:如果您的笔记本支持,更换高速网卡可以显著提高数据传输速率。
•优化网络设置:在系统网络设置中,调整QoS优先级,为关键应用分配更多带宽。
数据备份与安全的进一步措施:加密数据:•使用BitLocker(Windows)或FileVault(macOS)对硬盘进行加密,即使笔记本丢失,数据也不会轻易被盗取。
笔记本电脑的操作使用指南
笔记本电脑的操作使用指南1. 引言笔记本电脑已经成为现代人生活工作中不可或缺的工具之一。
它的便携性和多功能性使得我们在各种场景下都能方便地完成各种任务。
然而,对于一些初次使用笔记本电脑的人来说,其操作和使用可能会带来一些困惑。
本指南将为您提供一份简单明了的笔记本电脑操作使用指南,旨在帮助您更好地利用笔记本电脑的功能。
2. 开机与关机2.1 开机开机是使用笔记本电脑的第一步。
一般来说,笔记本电脑都配有电源按钮,您只需要按下电源按钮,等待电脑启动即可进入操作系统界面。
2.2 关机当您需要关闭笔记本电脑时,可以通过以下步骤进行关机:1.点击操作系统界面左下角的开始按钮。
2.在弹出的菜单中选择关机选项。
3.等待一段时间,直到电脑完全关闭。
3. 操作系统介绍操作系统是笔记本电脑的核心软件,它管理和控制电脑的所有硬件和软件资源。
常见的操作系统有Windows、macOS和Linux等。
每个操作系统都有自己特定的界面和操作方式。
在使用笔记本电脑时,您需要熟悉所使用的操作系统。
4. 常用操作4.1 桌面操作桌面是操作系统界面的核心区域,您可以在桌面上进行一些常用操作,如创建文件夹、调整桌面图标位置等。
以下是一些常见的桌面操作:•右击空白处可以弹出菜单,提供一些快捷操作选项。
•拖动文件或文件夹到桌面上可以创建快捷方式。
•双击图标可以打开相应的应用程序或文件。
4.2 文件管理文件管理是使用笔记本电脑的重要一环。
操作系统提供了文件管理器,可以用来管理文件和文件夹。
您可以通过文件管理器进行以下操作:•创建新的文件夹来组织文件和文件夹。
•拷贝、剪切和粘贴文件和文件夹。
•删除不需要的文件和文件夹。
4.3 网络连接笔记本电脑可以通过有线或无线方式连接到互联网。
下面是一些常见的网络连接操作:•点击右下角系统托盘中的网络图标,选择所要连接的网络。
•输入密码(如果有)来连接到无线网络。
4.4 软件安装您可以通过软件安装来扩展您的笔记本电脑功能。
联想笔记本电脑安全使用指南说明书
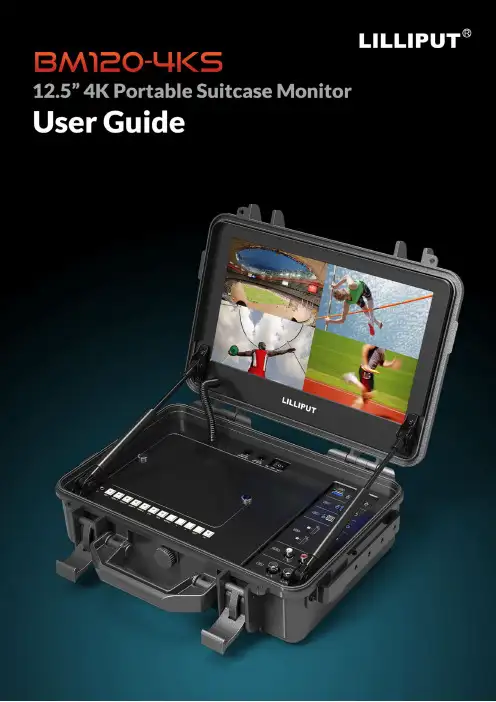
Important Safety Instructionscertified for international use. However, like all electronic equipment, the device should be usedwith care. Please read and follow the safety instructions to protect yourself from possible injury andto minimize the risk of damage to the unit.●Please do not place the display screen towards the ground to avoid scratching the LCD surface.●Please avoid heavy impact.●Please do not use chemical solutions to clean this product. Simply wipe with a soft cloth to keep clean of thesurface.●Please do not place on uneven surfaces.●Please do not store the monitor with sharp, metallic objects.●Please follow the instructions and trouble-shooting to adjust the product.●Internal adjustments or repairs must be performed by a qualified technician.●Please keep user guide for future reference.●Please unplug the power and remove the battery if long-term no-use, or thunder weather.Safety Disposal For Old Electronic EquipmentPlease do not regard the old electronic equipment as municipal waste and do not incinerate old electronic equipment. Instead please always follow local regulations and hand it over to the applicable collection stand for safe recycling. Ensure that these waste materials can be effectively disposed of and recycled to prevent ourenvironment and families from negative effects.IntroductionBM120-4KS is a precision broadcast monitor designed for the film and video shooting on any type of camera. Providing the superior picture quality, as well as a variety of professional assist functions, including 3D-Lut, HDR, Level Meter, Histogram, Peaking, Exposure, False Color, etc. It can help the photographer analyzing every detail of the picture and final capture the best side.FeaturesSupport multiple signal inputs 3G-SDI, HDMI, DVI and VGA.Multiple View Display supports quad view split from different input singles simultaneously.Ultra HD 4K screens containing 8.3 million pixel (3840×2160), so the resolution is four times that of Full HD. 3D LUT for Accurate Color Reproduction and Color space display(Native/Rec.709/User1~User3).Support to upload 3D LUT table via USB port.Equip HDR function.Image flip offers great convenience for user’s user to place the monitor with various mounting methods under different conditions. Users can view the monitor normally no matter what mounting angles.Perfect size for both suitcase and rack mount.WHDI wireless module for optionalCONTENTS1. Product Description (4)1-1. Front Panel (4)1.2 Rear Panel (5)1-2-1. Interfaces (5)2. Sun Shade Installation (6)3. MENU Settings (8)3-1. FN user definable shortcut buttons (8)3-2. / Buttons Operation (9)3-3. MENU Operation (9)3-3-1. Picture (9)3-3-2. Function (12)3-3-3. Display Mode (15)3-3-4. Display Settings (16)3-3-5. Select Region (17)3-3-6. Input (18)3-3-7. Audio (18)3-3-8. VGA (19)3-3-9. System (19)3-3-10. Information (21)4. Accessories (22)5. Parameters (23)6. Trouble Shooting (25)7. Appendix 1: 3D LUT of Loading Manual (26)8. Warranty (30)8-1. Repair Procedure and Terms (30)8-2. Free Repair Exclusions (30)1.P roduct Description 1-1. Front Panel1.2 Rear Panel1-2-1. Interfaces1. Earphone jack: 3.5mm earphone slot.2. SDI button: Signal switch to SDI mode when light on.3. Speaker4. HDMI 1 ~ 4 buttons: Signal switch to HDMI mode when light on.5. DVI button: Signal switch to DVI mode when light on.6. VGA button: Signal switch to VGA mode when light on.7. MENU button Press to enter menu.Press to enter option in the menu.14562 789101117181920218.◄ Left selection keySelect option in the menu. Decrease the option value.Before enter the menu, single press to activate volume, press again to decrease the volume.9. ► Right selection keySelect option in the menu. Increase the option value.10. EXIT button: To return or exit the menu function.11. FN: User definable shortcut button.Default: [Peaking]12. SDI input/output ports13. Audio L/R14. HDMI input port ×4HDMI 1 & HDMI 2: HDMI2.0, support 4K 60HzHDMI 3 & HDMI 4: HDMI1.4, support to 4K 30HzNote!Only HDMI 1 support HDR15. DVI input port16. VGA input port17. TALLY port18. USB port19. Power switch20. DC 12V/3A input21. DC 8V/1A output2. Sun Shade InstallationAs shown below after finished.3. MENU SettingsPlease check whether the device is connected well or not.3-1. FN user definable shortcut buttonsLong keep pressing FN buttons for 3-5 seconds to activate shortcut menu setting. Option selected will be highlighted as white. option will be highlighted as yellow, unavailable option will be highlighted as gray. Select option via " / " buttons. Then press "MENU" button to confirm to set as default option.Shortcut functions can be customized to meet user’s needs as following:NO Shortcut Menu when long press FN shortcut button1 Center Marker2 Safety Marker3 Aspect Marker4 Aspect5 Underscan6 Check Field7 Freeze8 Pixel to Pixel9 Peaking10 False Color11 Exposure (Only available under SDI mode)12 Histogram(Only available under SDI mode)13 Time Code (Only available under SDI mode)14 Display Mode15 Disp Mirror16 Color Space3-2./ Buttons OperationUnder non menu screen, press " / " buttons to activate volume bar, Use " / " buttons to select the option in the menu.3-3. MENU OperationWhen power on, press "MENU" on the device, the menu of function setting will display on the screen. Press " / " button to choose menu;Then press "MENU" button to confirm; Press "EXIT" button to return / exit menu.3-3-1. PicturePicture Brightness0~100Contrast0~100Saturation0~100Hue0~100Sharpness0~4Color Space Native/Rec.709/User1~User3HDR Off/Auto/HDR10 (Available only under “HDMI1”mode)BacklightModeStandard/Outdoor/UserBacklight 0~100 (Note: Available only under “User” mode)Temperature 9300/7500/6500/5800/UserRed Gain 0~256 (Note: Available only under “User”mode)Green Gain0~256Blue Gain0~256● BrightnessAdjust the general brightness of the LCD. For example, if it uses outside in bright conditions, increase the LCD brightness to make it easier to view.● ContrastIncrease or decrease the range between the bright and dark areas of the image. High contrast can reveal detail and depth in the image, and low contrast can make the image appear soft and flat.● SaturationAdjust the color intensity. Press " / " buttons to increase or decrease the color intensity.● HueIt means tint. Use this setting to choose the tint from 0 to 100.● SharpnessIncrease or decrease the sharpness of the image. When the sharpness of image is insufficient, the value of sharpness can be increased to make the image clearer.● Color SpaceSelects the color space from among [Native], [Rec.709] [User1~User3]:- Saturation/Hue/Color Temperature is only available under Native mode.- Select [AUTO] or [HDR10] mode under HDR function, the color space will be saved as Native mode automatically. It can be only changed to other color space mode by hand.- It supports to upload user-defined Lut table "User1~User3".- User-defined Lut table only support RGB format. If the format is not correct, please transform it to the correct format by using tool "Lut Converter" (See appendix 1 for details) and named as User1.cube, User2.cube orUser3.cube.- Copy the User-defined Lut table to flash disk and insert it to the device, the screen displays a prompt message to show whether to upgrade. Select upgrade, the device will be loading automatically in a black screen and then restart after finishing loading.- Requirements for flash diskFormat: FAT32Memory: <16GFile directory: root directoryMust be formatting before using it.- Please note that the responding time for loading user-defined Lut table will be a bit slower. Please wait patiently. - The device only supports loading one table at a time. If needs to load more than one tables, please load them one by one.● HDRSelect HDR from among [Off], [Auto], [HDR10].- HDR is only available under HDMI 1 signal input.- HDR under AUTO or DHR10 mode, and the input signal support HDR, the below function is disabled: Contrast, Brightness, Saturation, Hue, Sharpness, Color Space, BackLightColor Temperature- [Auto]Automatically recognize whether the input HDMI signal supports HDR. If it supports, the input signal shows as the HDR10 performance. If it doesn’t, HDR function is disabled. It’s suggested select [Auto] when use HDR function.- [HDR10]Do not recognize whether the input HDMI signal supports HDR, it will activate the HDR function enforcedly when input signal. If the input signal does not support the HDR function, the image displays abnormal color.● Backlight ModeSelect Backlight Mode from among [Standard], [Outdoor], [User].● BacklightIt is only available under [User] mode.● TemperatureAdjust the color temperature to make the image warmer (Yellow) or colder (Blue). Increase the value to make the image be warmer, decrease the value to make the image be colder. User can use this function to strengthen, weaken or balance the image color according requirements. The standard white light color temperature is 6500K.Note! ONLY available under "User" mode to adjust Color Gain.3-3-2. FunctionFunction Center Marker OFF/ ONSafety Marker OFF, 95%, 93%, 90%, 88%, 85%, 80% Aspect Marker OFF, Full, 17:9, 16:9, 4:3, 1.85:1, 2.35:1 Aspect Full ,17:9, 16:9, 4:3, 1.85:1, 2.35:1 Underscan OFF/ ONPixel To Pixel OFF/ ONCheck Filed OFF/ Red, Green, BlueFreeze OFF/ ONPeaking OFF/ ONPeaking color Red/Green/Blue/White Only available whenunder SDI Mode.Peaking level 0~100 Peaking level 0~100 False Color OFF/ ON Exposure OFF/ ONOnly available when under SDI ModeExposure level 0~100 Histogram OFF/ ON Time CodeOFF/ LTC/ VITC● Center MarkerSelect On, it will appear "+" marker on center of screen. ● Safety MarkerUse this setting to set off the safety marker or choose the one of the safety markers: [OFF], [95%], [93%], [90%], [88%], [85%], [80%]. ● Aspect MarkerDisplay the different aspect of the displayed image. [OFF], [Full], [17:9], [16:9], [4:3], [1.85:1], [2.35:1]. ● AspectSwitch aspect ratio setting among from [Full][17:9][16:9][4:3][1.85:1][2.35:1]. For example: In [Full] mode, images are scaled to fill the entire screen.In [4:3] mode, images are scaled up or down to fill the maximum 4:3 portion of the screen. In [16:9] mode, images are scaled to fill the entire screen if the device aspect is 16:9. ● UnderscanIf the image shows size error, use this setting to zoom in/out pictures automatically when receiving HDMI signals ● Pixel to PixelThe pixel to pixel is a monitor set to 1:1 pixel mapping with native fixed pixels, which avoids loss of sharpness due to scaling artifacts and normally avoids incorrect aspect ratio due to stretching.● Check FieldUse the check field modes for monitor calibration or to analyze individual color components of an image. The device preset in Blue, Green, and Red check field modes, only the selected color will be shown.● PeakingThe peaking is used to aid the camera operator in obtaining the sharpest possible picture. Select "On" to display colored outlines around sharp areas of the image.Note! Peaking color and level ONLY can be changed when under SDI mode.● False ColorThis monitor has a false color filter to aid in the setting of camera exposure. As the camera Iris is adjusted, elements of the image will change color based on the luminance or brightness values. This enables proper exposure to be achieved without the use of costly, complicated external equipment..● Exposure & Exposure LevelThe exposure feature helps the user achieve optimum exposure by displaying diagonal lines over areas of the image that exceed the setting exposure level. The exposure level can be set to 0~100.Note!ONLY available when under SDI mode.● HistogramThe histogram makes users view visually the exposure of whole and each RGM channels. It has the full contrast rang of video for easy color correction during post production. NOTE: Only available when under SDI mode.● Time CodeThe Time Code supports Longitudinal time code (LTC) and Vertical interval time code (VITC). The time code display on the monitor is synchronizing with that of Full HD camcorder’s. It displays the duration of the clips in hours: minutes: seconds: frames. It’s very useful for identifying specific frame in film and video production.Note! ONLY available when under SDI mode.3-3-3. Display ModeDisplay Mode 1P,2P LR,2P TB,2P PIP,4P● Display ModeThe monitor presets 1P, 2P LR, 2P TB, 2P PIP, 4P five display modes. This function can be work with Select Region function to meet user’s requirement. For example: In 1P mode, images are scaled to fill the entire screen. In 2P LR, display two different signals on the left and right sides.3-3-4. Display SettingsDisplay Setting Display Rotate0°, 90°, 180°, 270°Available when singledisplayDisplay Mirror OFF, L/R, U/D Available when dual displayon left and right.● Display RotateThis setting support to flip the image to 0°, 90°, 180°, 270° modes. It is only available when single display.● Display mirrorThis setting displays two different input signals to Light/Right or Up and Down, the user can choose it to view the images according to the requirement. It is only available when dual display on left and right.3-3-5. Select RegionSelect Region Unavailable Display mode 1PLeft Side/Right Side/Full Display mode 2P LRTop Side/Bottom Side/Full Display mode 2P TBMain/Sub/Full Display mode 2P PIP1P In/1P Out/2P In/2P Out/3PIn/3P Out/4P In/4P Out/4P fullDisplay mode 4PNote! This Menu is enabled for audio source selection. It is only available when under multi-picture and picture-in-picture mode. Activate the corresponding EN source to select the needed audio and picture under Audio Source function.3-3-6. InputInput Signal switch to region selected according to users’ needs. 3-3-7. AudioAudio Volume0~100Level Meter OFF/ON(NOTE: Only available when under SDI mode) Audio Source Analog/Digital region 1~4Digital region 2~4 is only available under multi-displays mode and must activate the corresponding Region under Select Region function at the same time.3-3-8. VGAVGA Auto AdjustH Position 0~100V Position 0~100ClockPhase0~100 3-3-9. SystemSystem Reset Press to confirm after selected. Menu Time10~60sOSD H Position 0~100 (To set menu display area) OSD V Position0~100 (To set menu display area) Language English, Chinese Transparency 0~255 (To set menu transparency) Color Calibration Off/OnRotate0°, 90°, 270°Border Width0~10Border Color R, G, B, W● ResetIf there is any problem unknown, press to confirm after selecting. The monitor will return to default set.● Menu TimeAdjust the OSD displaying time form 10 to 60s.● OSD H Position and OSD V PositionMove OSD horizontally or vertically.● LanguageSwitch between English and Chinese.● TransparencySet Menu transparency. Increase the value, the more transparent it will be.● OSD RotateFlip OSD to three modes.● Border Width and Border ColorUser can choose the border color among Red, Green, Blue, White. And adjust the thickness by using Border Width function. This setting is available when display in 2P LR, 2P TB, 2P PIP, 4P mode.The lines separate the different inputsignals means Border.3-3-10. InformationInformation To display current information.4. Accessories1.V-mount battery plate 1 piece2.Tally connector 1 piece3.Sunshade 1 pieceB drive disk 1 piece5.WHDI wireless module (optional) 1 pair6.12V 3A DC power adapter (optional) 1 piece5. ParametersDISPLAY Panel12.5"LCDPhysical Resolution3840x2160Aspect Ratio16:9Brightness400cd/m2(+/-10%@center) Contrast1500:1Viewing Angle170*/170"(H/V)INPUT 3G-SDI3G SDI(support up to1080p60Hz) HDMI HDMI2.0x2(support up to4K60Hz)HDMI1.4b ×2(support up to4K30Hz) DVI1VGA1Audio2(L/R)Tally1USB1OUTPUT3G-SDI3G SDI(support up to1080p60Hz) AUDIO Speaker1Ear Jack1POWER Input Voltage DC10-24VPower Consumption23W(12V)Battery Plate V-mount battery plate Power Output DC8VENVIRONMENT Operating Temperature0'C~50'CStorage Temperature-10'C~60'CDIMENSION Dimension(WD)356.8mm x309.8mm x122.1mm Weight 4.75kg6. Trouble Shooting1) Only black-and-white display.Check whether the color saturation is properly setup or not.2) Power on but no pictures.Check whether the cables of HDMI, VGA,DVI and 3G-SDI are correctly connected or not. Please use the standard power adapter coming with the product package. Improper power input may cause damage.3) Wrong or abnormal colors.Check whether the cables are correctly and properly connected or not. Broken or loose pins of the cables may cause a bad connection.4) When on the picture shows size error.Press “MENU → Function → Underscan” to zoom in/out pictures automatically when receiving HDMI signals 5) Other problems.Please press “MENU” button and choose “MENU → System → Reset → confirm”6) According to the ISP, the machine cannot function properly.ISP for program upgrades, non-professionals do not use. Please reboot your device if press accidentally!7) No Sound.Press HDMI button if no sound; if still unavailable, please contact the technician.8) No signal displayed when connecting with HDMI 1.Please long press HDMI 1 button for 3-5 seconds to activate HDMI signal.Note! Due to constant effort to improve products and product features, specifications may change without notice.7. Appendix 1: 3D LUT of Loading ManualBM-4KS supports 3DLUT to load the color calibration document and the User Log by using flash disk.● Format Requirement●LUT format:Type: .cube3D Size: 17x17x17Data Order: BGRTable Order: BGR●USB flash disk versionUSB: 2.0System: FAT32Size: <16G●Color calibration document: Rec709. cube●User Log: User1 ~User3.cube● LUT Format ConversionThe format of LUT should be transformed if it doesn’t meet Lilliput’s requirement. It can be transformed by using Lut Converter (V1.3.30).● Activate Lut ConverterOne individual Product ID for one computer. Please send the ID number to Lilliput to get an Enter Key. Then the computer gets the permission of Lilliput Lut Converter after inputting the Enter Key.● Enter the Lut Converter interface after input the Enter Key● Click Input File, then select *LUT● Click Output File, and then select the file name as required format.*Such as:Rec709.cube, 3D Size: 17, Data Order: RGB, Table Order: RGB.Note! The format which shown in Red Box above should be selected to RGB.● Click Generate Lut button to finish the transform.● USB Loading●The USB flash disk must be formatted before using to make sure that there are no other files in the root directory.●Copy needed files to the root directory of the USB flash drive. Please note that the system only supports updating one LUT table at a time. Therefore, only a single file to be loaded can be copied to the USB flash drive. If it needs to update more LUT tables, please delete other files in USB flash disk and repeat the above steps.●Power on the device, insert the corresponding video signal into any video signal interface, and switch the signal to the corresponding channel to make sure the device displays normally. (It doesn’t suggest that update the LUT table when there is no input signal as the device will enter the power saving mode in such situation.)●Insert the flash disk into the USB interface on the device and wait for about 5 seconds. It will pop-up prompt box "Load Rec709.cube" after detecting the flash disk. Operate by using press "MENU", "", "", "EXIT" on the front of device. Click "YES" to load, and click "NO" or press "EXIT" to exit. The device displays a black screen after confirmed the loading, and it will update the corresponding LUT table back-stage according to the name of the updated LUT. The device will be restarted automatically after completed. The whole updating process takes about6 seconds according to the updated LUT name.●Please activate and set up the updated LUT table under the menu after restart. It doesn’t need to be reset if the current updated LUT has been selected before updating.●Please note it only calibrates the color for Rec709 mode and upload it to the device in the factory. User1~User3 is grayed out and disabled in the menu. After loading the user LUT table, the corresponding button will be shown as blue and able to be use, shown as the following figure.Before loading After loading[在此处键入]8. Warranty8-1. Repair Procedure and Terms8-1-1. Those products bought from Lilliput, we promise to provide one (1) year free repair service. Lilliput warrants its products against defects (excluding physical damage to the product) in materials and workmanship under normal use for a period of one (1) year from the date of delivery. Beyond the warranty period such services shall be charged at the then prevailing rates in Lilliput’s price list.8-1-2. It is possible that you may need to return products to Lilliput for servicing or troubleshooting. Before you send any product to Lilliput, you must e-mail us, telephone us or fax us and wait for a Return Material Authorization (RMA) form to be sent to ually within two business days, your RMA request will be reviewed and we will contact you with the results. If approved, a RMA number will be e-mailed to you.Customers should deliver the defective products to our appointed service center within 15 days from when you receive the RMA number. For our best receipt, the defective products should be properly packed.Letting us know the packaging details, as well as sender and delivery date.Note!Returned products MUST be subject to the following operations, otherwise, Lilliput has theright to reject.●RMA number must be clearly written on the shipping boxes.●Returned products must be delivered within 15 days from when we send out the RMA number.●Returned items must be in accordance with the RMA form.●Malfunction or damage caused by improper packaging during transportation.8-1-3. Transportation cost which includes shipping charges, duties, insurance, taxes and any other charges for returned products to our repair center is the responsibility of the purchaser. After our verification that the returned product matches our warranty terms and conditions, Lilliput will repair the defective product free of charge, and also bear the resend transportation charge. If the delivered product is confirmed out of warranty, our customer service center will inform the customers. Then, you may decide to pay for the repair items or not.8-2. Free Repair Exclusions●Warranty labels of products or accessories are removed or alteration.●There is no Lilliput RMA number of the returned products.●Operated and maintained in any manner inconsistent with the manual terms and conditions.●Malfunction or damage resulting from repairs or alterations made by parties other than Lilliput or anauthorized distributor.●Malfunction or damage caused by forces of nature (for example, earthquake, fire, flood, lighting strike,War, etc).●Any damages caused by accidents, any unreasonable use or neglect, deterioration, mishandling or failure ofmaintenance (for example, damages caused in transit).●Beyond one (1) year warranty period.30Thank You for Using Lilliput BM120-4KS。
笔记本电脑 用户指南说明书

笔记本电脑 用户指南本出版物的内容将定期变动,恕不另行通知。
更改的内容将会补充到本出版物,且会在本手册发行新版本时予以付梓印刷。
本公司不做任何明示或默许担保,包括本手册内容的适售性或符合特定使用目的。
在下列预留的空白处,记录下型号、序列号、购买日期及购买地点。
型号及序列号可以在电脑外贴的标签上找到。
与电脑元件相关的资料应包括序列号、型号及购买信息。
型号:__________________________________序列号:________________________________购买日期:______________________________购买地点:______________________________版权所有 © 2003保留所有权利笔记本电脑用户指南2003 年 3月第 1 版笔记本电脑所有商标和注册商标的所有权皆归其所属公司所有。
目录iii 前言 vii 连接电脑vii 保养和维护ix 1 熟悉您的电脑1电脑概述3正视图 3俯视图4左视图 6右视图 6后视图7底视图 8产品特性9显示屏11状态指示灯12键盘13特殊键13符合人体工程学的键盘17触摸板18快速执行键20存储设备21硬盘21光驱21闪存插槽23连接选项24以太网(Ethernet),局域网(LAN)24传真/数据调制解调器24无线通信25快速红外线26音频27超级 DJ 控制面板28保护您的笔记本电脑30使用保安锁孔30密码31目录iv目录2 使用电池组33电池组35电池组特性35安装和取出电池组35为电池组充电37检测电池组电量37延长电池使用寿命37电量不足告警38电源管理39高级配置和电源接口393 外设和选用部件41外接式显示器43使用同步显示43S-video44外接式键盘45外接式定点设备46打印机47音频设备48PC 卡49 PC 卡插槽49记忆棒/加密数字(SD)combo 插槽51USB 设备52IEEE 1394 设备53选用部件54备用供电设备54重要部件升级55内存升级55硬盘升级564 携带电脑57与桌面设备断开连接59携带您的电脑59准备您的电脑59出席较短会议须携带的设备59出席较长会议须携带的设备59携带电脑回家59准备您的电脑60须携带的物品60特别注意事项60布置家庭办公室60携带电脑进行长途旅行61准备您的电脑61v 须携带的物品61特别注意事项61携带电脑进行国际旅行61准备您的电脑61须携带的设备62特别注意事项625 软件63系统软件65 Launch Manager65BIOS Utility66关于密码676 疑难解答69常见问题71出错信息74A 规格79B 声明85vi目录vii 前言本款超薄便携式笔记本电脑融合了最新的移动技术。
筆記型電腦使用指南说明书
© Copyright 2010 Hewlett-Packard Development Company, L.P.Bluetooth 是其所有人所擁有的商標,由Hewlett-Packard Company 取得授權使用之。
SD 標誌是其所有人的商標。
Microsoft 和 Windows 是 Microsoft Corporation 在美國的註冊商標。
本文件包含的資訊可能有所變更,恕不另行通知。
HP 產品與服務的保固僅列於隨產品及服務隨附的明確保固聲明中。
本文件的任何部份都不可構成任何額外的保固。
HP 不負責本文件在技術上或編輯上的錯誤或疏失。
第 1 版: 2010 年 3 月文件編號:595485-AB2產品聲明本使用指南說明了大部分機型的常用功能。
某些功能可能無法在您的電腦上使用。
若要取得《筆記型電腦使用指南》的最新資訊,請前往 HP 網站/ support。
安全警告注意事項警告!為了降低因熱所造成的傷害或電腦過熱的可能性,請勿將電腦直接放在您的腿上或擋住電腦的通風孔。
請僅在穩固的平面上使用電腦。
請勿讓其他堅硬的物體(例如旁邊的選用印表機),或柔軟的物體(例如枕頭、地毯或衣服)阻礙空氣流通。
同時,在作業期間,請勿讓 AC 變壓器接觸皮膚或柔軟的物體(例如枕頭、地毯或衣服)。
本電腦及 AC 變壓器的使用者接觸表面溫度,符合資訊科技設備的國際安全標準 (IEC 60950)。
iiiiv安全警告注意事項目錄1 功能 (1)識別硬碟 (2)組件 (3)頂部組件 (3)觸控板 (3)指示燈 (4)按鈕和喇叭 (5)按鍵 (6)顯示器 (7)右側組件 (7)左側組件 (8)底部組件 (9)無線天線 (10)附加的硬體組件 (11)標籤 (12)2 無線、區域網路及數據機 (13)使用無線裝置 (14)識別無線及網路狀態圖示 (14)使用無線控制項 (15)使用無線動作鍵 (15)使用 HP Wireless Assistant (15)使用作業系統控制項 (16)使用 WLAN (17)設定 WLAN (17)保護 WLAN (17)連接至 WLAN (18)漫游到另一個網路 (19)使用 Bluetooth 無線裝置(僅限特定機型) (20)Bluetooth 與網際網路連線分享 (ICS) (20)疑難排解無線連線問題 (21)無法與 WLAN 連線 (21)無法連線至慣用無線網路 (21)v未顯示「網路」圖示 (22)目前未提供網路安全碼 (22)WLAN 連線非常微弱 (23)無法連線到無線路由器 (23)連線至區域網路 (24)3 指標裝置與鍵盤 (25)使用觸控板 (26)開啟及關閉觸控板 (26)使用觸控板的手勢 (27)捲動 (27)收放 (27)旋轉 (28)設定指標裝置偏好設定 (28)連接外接式滑鼠 (28)使用鍵盤 (29)使用動作鍵 (29)使用快速鍵 (30)清理觸控板和鍵盤 (31)4 多媒體 (32)多媒體功能 (33)識別多媒體組件 (33)調整音量 (34)使用媒體活動動作鍵 (36)多媒體軟體 (37)使用 CyberLink PowerDVD 8 軟體 (37)使用其他預先安裝的多媒體軟體 (37)從光碟安裝多媒體軟體(僅限特定機型) (37)音訊 (38)連接外接式音訊裝置 (38)檢查您的音訊功能 (38)視訊 (39)連接外接式顯示器或投影機 (39)連接 HDMI 裝置(僅限特定機型) (39)設定 HDMI 的音訊(僅限特定機型) (41)光碟機 (42)識別已安裝的光碟機 (42)使用光碟片 (43)選取正確的光碟 (44)CD-R 光碟 (44)CD-RW 光碟 (44)viDVD±R 光碟 (44)DVD±RW 光碟 (44)LightScribe DVD+R 光碟 (45)Blu-ray 光碟 (45)播放 CD、DVD 或 BD (45)設定自動播放 (46)變更 DVD 地區設定 (46)遵守著作權警告 (46)複製 CD 或 DVD (47)建立或「燒錄」CD 或 DVD (47)取出光碟(CD、DVD 或 BD) (49)取出光碟機 (50)網路攝影機(僅限特定機型) (53)攝像頭秘訣 (53)調整攝像頭內容 (53)疑難排解 (55)光碟托盤無法開啟以取出 CD、DVD 或 BD (55)電腦未偵測到光碟機 (55)光碟無法播放 (56)光碟未自動播放 (56)影片不規則地停止、跳過或播放 (57)影片無法在外接式顯示器上觀賞 (57)燒錄光碟片的程序尚未開始,或在完成前即停止 (57)Windows Media Player 中播放的 DVD 不發出聲音,也不顯示 (57)必須重新安裝裝置驅動程式 (58)取得最新的 HP 裝置驅動程式 (59)取得最新的 Windows 裝置驅動程式 (59)5 電源管理 (60)設定電源選項 (60)使用省電狀態 (60)啟動和結束睡眠 (60)啟動和結束休眠 (61)使用電池計量器 (61)使用電源計劃 (61)檢視目前的電源計劃 (62)選擇不同的電源計劃 (62)自訂電源計劃 (62)設定結束睡眠或休眠時使用密碼保護 (62)使用外部的 AC 電源 (62)連接 AC 變壓器 (63)測試 AC 變壓器 (64)vii使用電池電源 (64)顯示剩餘的電池電力 (64)在說明及支援中尋找電池資訊 (65)使用電池檢查 (65)裝入或取出電池 (65)電池充電 (66)將電池放電時間最大化 (67)管理低電池電力 (67)識別低電池電力 (67)解決低電池電力的方法 (68)可以使用外部電源時,解決低電池電力的方法 (68)當可以使用已充電的電池時,解決低電池電力的方法 (68)當沒有電源可以使用時,解決低電池電力的方法 (68)當電腦無法結束休眠時,解決低電池電力的方法 (68)校正電池 (68)步驟 1:將電池完全充飽 (68)步驟 2:停用休眠和睡眠 (69)步驟 3:釋放電池的電力 (69)步驟 4:將電池完全充飽電 (70)步驟 5:重新啟用休眠和睡眠 (70)節省電池電力 (70)存放電池 (70)用過電池處置方式 (71)更換電池 (71)電腦關機 (71)6 磁碟機/光碟機 (72)處理磁碟機/光碟機 (73)使用外接式磁碟機/光碟機 (74)改善硬碟效能 (75)使用磁碟重組工具 (75)使用磁碟清理 (75)更換硬碟 (76)7 外接式裝置和外接式媒體卡 (80)使用 USB 裝置 (81)連接 USB 裝置 (81)移除 USB 裝置 (81)使用數位媒體插槽卡 (82)插入數位卡 (82)取出數位卡 (82)viii8 記憶體模組 (84)9 安全性 (88)保護電腦 (88)使用密碼 (88)在 Windows 中設定密碼 (89)在設定公用程式中設定密碼 (89)管理員密碼 (90)管理系統管理員密碼 (90)輸入管理員密碼 (90)輸入開機密碼 (90)管理開機密碼 (91)輸入開機密碼 (91)使用防毒軟體 (91)使用防火牆軟體 (91)安裝重大更新 (92)10 設定公用程式 (BIOS) (93)啟動設定公用程式 (94)使用設定公用程式 (95)變更設定公用程式的語言 (95)在設定公用程式中瀏覽與選取 (95)顯示系統資訊 (96)在設定公用程式中還原預設設定 (96)離開設定公用程式 (96)設定公用程式功能表 (98)主要功能表 (98)安全性功能表 (98)「系統組態」功能表 (98)「診斷」功能表 (99)11 軟體更新 (100)更新 BIOS (101)確定 BIOS 版本 (101)下載 BIOS 更新檔 (101)更新程式和驅動程式 (103)12 備份與復原 (104)建立復原光碟 (105)備份您的資訊 (106)使用「Windows 備份與還原」 (106)ix使用系統還原點 (107)建立還原點時機 (107)建立系統還原點 (107)還原至之前的日期和時間 (107)執行復原 (108)從復原光碟進行復原 (108)從專用的復原分割區進行復原(僅限特定機型) (108)索引 (109)x1功能1識別硬碟若要查看電腦中已安裝硬體的清單,請依照下列步驟執行:▲選取「開始」>「控制台」>「系統及安全性」。
笔记本电脑使用说明及登记表.doc
附件:笔记本电脑使用说明笔记本电脑使用说明一、开机、关机、电源、USB口以及光驱的保养打开液晶显示屏时,请手扶中间,开启速度稍缓,力度不要太大。
关机一定要等系统关闭以后再合上屏幕。
开机前先连接好电源,关机以后再拔除电源连线。
尽量避免使用过程中中途插电。
使用光盘时,尽可能把光盘资料拷贝到硬盘上使用,更不要长时间持续使用光驱(会严重影响光驱使用寿命)。
光盘不用的时候一定要把光盘取出,不可长时间放在光驱中。
使用U盘的时候,插拔尽量温柔。
二、液晶屏幕的保养、键盘上不放任何东西不要用手指或者任何硬、者尖利的物体触碰屏幕,以防沾染油腻或者划伤屏幕。
屏幕上有异物或者灰尘,请小心处理,并用专用的布料擦拭,或者用软性的绒布、眼睛布、相机镜头布。
实在没有的情况下,可使用纸巾,但要先将屏幕上大的灰尘吹去后擦。
不论是使用状态还是关机状态,键盘上面不可放置任何物品,合上屏幕前检查键盘上是否有东西。
请勿将水杯或其他水源放在笔记本电脑旁,以防水洒或溅入键盘内,造成机器损坏。
三、笔记本电脑与投影机的连接(视频切换)使用前,首先接好与投影机连接的RGB视频线,再打开笔记本电脑电源。
然后切换到“外接PC”,如果投影没有显示,只需按Fn+F8功能键(不同型号的机器会有差异)进行切换。
反复按Fn+F8可以切换出三种模式:1、单独液晶显示、2 单独投影屏显示、3液晶屏和投影屏同时显示。
使用后,先关闭笔记本电脑的电源,再拔掉与投影机的RGB连接线。
四、笔记本电脑上网说明:1、无线上网:笔记本电脑内置有无线网卡,可通过无线AP(Access Point,无线访问节点)或无线路由器连接上网。
搜索附近无线网络并连接,将鼠标移至屏幕右下角“无线网络连接”图标,选择附近可用的无线网络,然后点击“连接”按钮,输入密码即可连接。
需要注意的是,“无线网络连接”属性中,Internet协议(TCP/IP)属性设置中IP地址、DNS服务器地址均选择自动获得,如下图:五、常用360杀毒、360安全卫士软件查杀病毒木马,增强上网安全意识请各位员工注意更新360杀毒软件(上网后,会定时自动升级),经常对自己的电脑进行全盘杀毒。
电脑使用说明书
电脑使用说明书电脑使用说明书1. 简介本文档是电脑使用的详细说明书,帮助用户了解电脑的基本操作和常见问题解决方法。
本文将介绍电脑的启动和关闭、操作系统的基本功能、文件和文件夹的管理、软件安装与卸载等内容。
通过阅读本文,您将能够更好地利用电脑完成各种任务。
2. 电脑的启动和关闭电脑启动时,确保电源插头已连接并处于通电状态。
按下电源键,等待电脑启动。
开机后,系统将自动加载操作系统。
在使用完电脑后,点击“开始”菜单,选择“关机”选项。
在确认关闭电脑之前保存所有工作。
3. 操作系统基本功能3.1 桌面桌面是操作系统中的一个主要界面,用于访问各种应用程序和文件。
在桌面上,您可以找到开始菜单、任务栏、桌面图标等。
通过双击桌面上的图标来打开文件或应用程序。
3.2 开始菜单开始菜单是操作系统的一部分,它提供了访问程序、文件、设置和关机选项的入口。
单击“开始”按钮,开始菜单将弹出。
您可以使用鼠标单击开始菜单中的项目,或使用键盘上的箭头键和回车键进行导航和选择。
3.3 窗口管理操作系统允许您同时打开多个窗口,并提供了窗口管理功能来切换和管理窗口。
您可以使用窗口的标题栏拖动窗口,调整窗口的大小并最大化或最小化窗口。
使用任务栏上的按钮可以切换窗口。
4. 文件和文件夹的管理4.1 文件资源管理器文件资源管理器是用于管理文件和文件夹的工具。
通过打开文件资源管理器,您可以访问电脑上的所有文件和文件夹。
可以使用文件资源管理器来创建、复制、剪切、粘贴、重命名和删除文件和文件夹。
4.2 文件和文件夹操作要打开文件或文件夹,请双击它们。
要复制文件或文件夹,请选择它们,右键单击并选择“复制”选项。
然后导航到目标位置,右键单击空白处,并选择“粘贴”选项。
要移动文件或文件夹,请选择它们,右键单击并选择“剪切”选项。
然后导航到目标位置,右键单击空白处,并选择“粘贴”选项。
要重命名文件或文件夹,请选中它们,右键单击并选择“重命名”选项。
输入新的名称并按下回车键。
HP笔记本计算机用户指南说明书
用户指南© Copyright 2014 Hewlett-Packard Development Company, L.P. Bluetooth 是其所有者的商标,Hewlett-Packard Company 经授权得以使用。
Intel、Celeron、Centrino 和 Pentium 是 Intel Corporation 在美国和其他国家/地区的商标。
Java 是 Sun Microsystems, Inc. 在美国的商标。
Microsoft 和 Windows 是 Microsoft 集团公司在美国的注册商标。
本文档中包含的信息如有更改,恕不另行通知。
随 HP 产品和服务附带的明确有限保修声明中阐明了此类产品和服务的全部保修服务。
本文档中的任何内容均不应理解为构成任何额外保证。
HP 对本文档中出现的技术错误、编辑错误或遗漏之处不承担责任。
第一版: 2014 年 10 月文档编号: 781076-AA1产品通告本用户指南介绍了大多数机型的常用功能。
您的笔记本计算机上可能未提供某些功能。
并非所有功能在所有 Windows 版本中都可用。
该笔记本计算机可能需要升级和/或单独购买硬件、驱动程序和/或软件,以充分利用 Windows 功能。
如需详细信息,请转到。
要访问最新的用户指南,请转到/support,然后选择您所在的国家/地区。
选择驱动程序和下载,然后按照屏幕上的说明进行操作。
软件条款如果安装、复制、下载或以其他方式使用此笔记本计算机上预安装的任何软件产品,即表明您同意受 HP 最终用户许可协议 (EULA) 条款的约束。
如果您不接受这些许可条款,唯一的补救办法是在 14 天内将全部产品(硬件和软件)原封不动地退回经销商处,并依据经销商的退款政策获得全额退款。
有关任何其他信息或申请笔记本计算机的全额退款,请联系您的经销商。
安全警告声明如旁边的打印机选件)或柔软物体(例如枕头、毛毯或衣物)阻挡空气流通。