Practical 1_Introduction to lab hardware & software
lab5
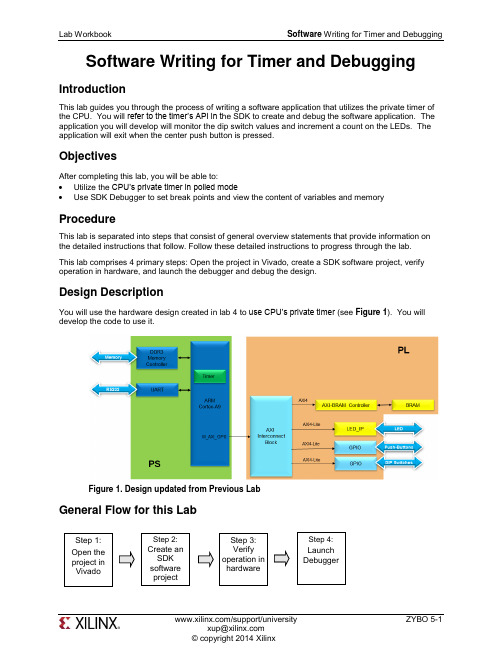
Software Writing for Timer and DebuggingIntroductionThis lab guides you through the process of writing a software application that utilizes the private timer of the CPU. You will refer to the timer’s API in t he SDK to create and debug the software application. The application you will develop will monitor the dip switch values and increment a count on the LEDs. The application will exit when the center push button is pressed.ObjectivesAfter completing this lab, you will be able to:∙ Utilize the CPU’s private timer in polled mode∙ Use SDK Debugger to set break points and view the content of variables and memoryProcedureThis lab is separated into steps that consist of general overview statements that provide information on the detailed instructions that follow. Follow these detailed instructions to progress through the lab. This lab comprises 4 primary steps: Open the project in Vivado, create a SDK software project, verify operation in hardware, and launch the debugger and debug the design.Design DescriptionYou will use the hardware design created in lab 4 to use CPU’s private timer (see Figure 1). You will develop the code to use it.Figure 1. Design updated from Previous LabGeneral Flow for this LabStep 1: Open theproject in VivadoStep 2: Create an SDKsoftware project Step 3: Verify operation in hardware Step 4: Launch DebuggerOpen the Project in Vivado Step 1 e the lab4 project from the last lab or, use the lab4 from the labsolution directory, and save it as lab5. Open the project in Vivado and then export to SDK.1-1-1.If you wish to continue using the design that you created in the previous lab, open the lab4 project from the previous lab, or open the lab4 project in the labsolution directory, and Save it as lab5 to the labs/ directorySince we will be using the private timer of the CPU, which is always present, we d on’t need tomodify the hardware design.1-1-2.Open the Block Design and notice that the status changes to synthesis and implementation out-of-date. Since the bitstream is already generated and will be in the exported directory, we cansafely ignore the warning.unch SDK by selecting File > Export > Export Hardware for SDK in Vivado1-1-4.Check the Launch SDK box only and click OK.You may see the following message when SDK opens. Ignore this warning.Create an SDK Software Project Step 2 2-1.Create a new empty application project called lab5 utilizing already existing standalone_bsp_0 software platform. Import the lab5.c source file.2-1-1.In the Project Explorer in SDK, right click on lab4 and select Close Project2-1-2.Select File > New > Application Project. the project lab5, and for the board Support Package, select Use Existing (standalone_bsp) and click Next.2-1-4.Select Empty Application and click Finish.2-1-5.Select lab5 > src in the project explorer, right-click, and select Import.2-1-6.Expand General category and double-click on File System.2-1-7.Browse to c:\xup\embedded\sources\lab5 folder, select lab5.c and click OK, and then click Finish.You will notice that there are multiple compilation errors. This is expected as the code isincomplete. You will complete the code in this lab.2-2.Refer to the Scutimer API documentation.2-2-1.Select the system.mss tab (if it is not open, open it from standalone > system.mss)2-2-2.Click on Documentation link corresponding to scutimer (ps7_scutimer) peripheral under the Peripheral Drivers section to open the documentation in a default browser window.2-2-3.Click on the Files link to see available files related to the private timer API.2-2-4.Click on the xscutimer.h link to see various functions and data structures available in the API.Look at the XScuTimer_LookupConfig( ) and XScuTimer_CfgInitialize( ) API functions which must be called before the timer functionality can be accessed.Look at various functions available to interact with the timer hardware, includingFigure 2. Useful Functions2-3.Correct the errors.2-3-1.In SDK, in the Problems tab, double-click on the first red unknown type name x for the parse error. This will open the source file and bring you around to the error place.Figure 3. First error2-3-2.Add the include file for the XScuTimer.h. Save the file and the errors should disappear.2-3-3.Scroll down the file and notice that there are few lines intentionally left blank with some guiding comments.Figure 4. Fill in Missing Codeing the API functions list, fill those lines. Save the file and correct errors if any.2-3-5.Scroll down the file further and notice that there are few more lines intentionally left blank with some guiding comments.Figure 5. More Code to be completeding the API functions list, complete those lines. Save the file and correct errors if necessary.Figure 6. Portions of the completed CodeVerify Operation in Hardware Step 3 3-1.Make sure that the JP7 is set to select USB power. Connect the board witha micro-usb cable and power it ON. Establish the serial communicationusing SDK’s Terminal tab.3-1-1.Make sure that the JP7 is set to select USB power.3-1-2.Make sure that a micro-USB cable is connected to the JTAG PROG connector (next to the power supply connector). Turn ON the power.3-1-3.Select the tab. If it is not visible then select Window > Show view > Terminal.3-1-4.Click on and if required, select appropriate COM port (depends on your computer), and configure it with the parameters as shown. (These settings may have been saved from previous lab).3-2.Program the FPGA by selecting Xilinx Tools > Program FPGA and assigning system_wrapper.bit file. Run the TestApp application and verify the functionality.3-2-1.Select Xilinx Tools > Program FPGA.3-2-2.Click on the Search button of the Bitstream field, select system_wrapper.bit, and click OK.3-2-3.Click the Program button to program the FPGA.3-2-4.Select lab5 in Project Explorer, right-click and select Run As > Launch on Hardware (GDB) to download the application, execute ps7_init, and execute lab5.elfDepending on the switch settings you will see LEDs counting with corresponding delay.Flip the DIP switches and verify that the LEDs light with corresponding delay according to theswitch settings. Also notice in the Terminal window, the previous and current switch settings are displayed whenever you flip switches.Figure 7. Terminal window outputLaunch Debugger Step 4 unch Debugger and debug4-1-1.Right-click on the Lab5 project in the Project Explorer view and select Debug As > Launch on Hardware (GDB).The lab5.elf file will be downloaded and if prompted, click Yes to stop the current execution of the program.4-1-2.Click Yes if prompted to change to the Debug perspective.At this point you could have added global variables by right clicking in the Variables tab andselecting Add Global Variables … All global variables would have been displayed and you could have selected desired variables. Since we do not have any global variables, we won’t do it.4-1-3.Double-click in the left margin to set a breakpoint on various lines in lab5.c shown below. A breakpoint has been set when a “tick” and blue circle appear in the left margin beside the linewhen the breakpoint was set.The first breakpoint is where count is initialized to 0. The second breakpoint is to catch if thetimer initialization fails. The third breakpoint is when the program is about to read the dip switch settings. The fourth breakpoint is when the program is about to terminate due to pressing ofcenter push button. The fifth breakpoint is when the timer has expired and about to write to LED.Figure 8. Setting breakpoints4-1-4.Click on the Resume () button to continue executing the program up until the first breakpoint is reached.In the Variables tab you will notice that the count variable may have value other than 0.4-1-5.Click on the Step Over () button or press F6 to execute one statement. As you do step over, you will notice that the count variable value changed to 0.4-1-6.Click on the Resume button again and you will see that several lines of the code are executed and the execution is suspended at the third breakpoint. The second breakpoint is skipped. This is due to successful timer initialization.4-1-7.Click on the Step Over button to execute one statement. As you do step over, you will notice that the dip_check_prev variable value changed to a value depending on the switch settings on your board.4-1-8.Click on the memory tab. If you do not see it, go to Window > Show View > Memory.4-1-9.Click the sign to add a Memory MonitorFigure 9. Monitor memory location4-1-10.Enter the address for the private counter load register (0xF8F00600), and click OK.Figure 10. Monitoring a Memory AddressYou can find the address by looking at the xparameters.h file entry to get the base address(), and find the load offset double-clicking on the xscutimer.h in the outline window followed by double-clicking on the xscutimer_hw.h and then selectingXSCUTIMER_LOAD_OFFSET.Figure 71. Memory Offset4-1-11.Click on the Step Over button to execute one statement which will load the timer register.Notice that the address 0xF8F00604 has become red colored as the content has changed. Verify that the content is same as the value: dip_check_prev*325000000. Y ou will see hexadecimalequivalent (displaying bytes in the order 0 -> 3).E.g. for dip_check_prev = 1; the value is 0x13D92D40; (reversed: 0x402DD913)4-1-12.Click on the Resume button to continue execution of the program. It will stop at the writing to the LED port (skipping fourth breakpoint as center push button as has not occurred).Notice that the value of the counter register is changed from the previous one as the timer wasstarted and the countdown had begun.4-1-13.Click on the Step Over button to execute one statement which will write to the LED port and which should turn OFF the LEDs as the count=0.4-1-14.Double-click on the fifth breakpoint, the one that writes to the LED port, so the program can execute freely.4-1-15.Click on the Resume button to continue execution of the program. This time it will continuously run the program changing LED lit pattern at the switch setting rate.4-1-16.Flip the switches to change the delay and observe the effect.4-1-17.Press center push button and observe that the program suspends at the fourth breakpoint. The timer register content as well as the control register (offset 0x08) is red as the counter value had changed and the control register value changed due to timer stop function call. (In the Memorymonitor, you may need to right click on the address that is being monitored and click Reset torefresh the memory view.)4-1-18.Terminate the session by clicking on the Terminate () button.4-1-19.Exit the SDK and Vivado.4-1-20.Power OFF the board.ConclusionThis lab led you through d eveloping software that utilized CPU’s private timer. You studied the API documentation, used the appropriate function calls and achieved the desired functionality. You verified the functionality in hardware. Additionally, you used the SDK debugger to view the content of variables and memory, and stepped through various part of the code.。
SSD2上课pptUnit

2.6
6
International School of Software, WHU
2.1 Processor and Memory
• 2.1.1 Processor Basics • 2.1.2 Types of Memory • 2.1.3 Lab: Benchmarking (Optional)
• The clock rate (or clock speed) is rate in cycles per second (Hz, KHz, MHz, GHz).
• Computer clock rate are closely related to the execution of instructions. The greater the clock rate, the faster the execution
10
Introduction to Computer Systems
2.10
International School of Software, WHU
2) Instruction Execution with the CPU
Fetch-Execute Cycle:
1. Fetch- The control unit gets the instruction from memory.
• The processor carries out instructions given to the computer. These instructions
are stored in the computer's memory.
Introduction to Computer Systems
2. Interpret- The control unit decodes what the instruction means and directs the necessary data to be moved from memory to the ALU.
Autolab电化学工作站仪器基本操作步骤

Autolab电化学工作站仪器的基本操作步骤瑞士万通中国有限公司上海办王增健1、开机前,检查电化学工作站与电脑的USB接线连接是否正常,保持正确连接。
2、接通电化学工作站主电源,按动电化学工作站前操作面板电源按钮Power键,即打开工作站。
3、启动电脑,并进入Windows操作系统。
4、在启动电脑的同时,电脑会自动检测与电化学工作站的连接情况以及电化学工作站内部设备是否运作正常。
自检完毕后,位于电脑屏幕右下角任务栏处的Autolab之Interface 小图标正常显示,可进行下一步操作。
否则将弹出不能正常连接的对话框,并且其对应的右下角Interface小图标出现连接错误的提示符号,此时电化学工作站连接不正常或者内部设备出错,在这种情况之下转步骤5操作。
5、若显示电化学工作站与电脑连接不正常,需要点击电脑屏幕右下角的Interface小图标,进入Interface操作界面,点击Refresh,进行更新,一般情况下,Interface会正常连接。
若还不能正常连接,需要关闭电化学工作站和电脑,重新检查USB接线连接情况,并重新开机启动,重复步骤1~4。
若仍然不能正常连接,需要报告仪器负责人检修。
6、进行电化学方法测试前,首先将电化学工作站测量插头(分别是工作电极WE,反馈电极SE,辅助电极CE,参比电极RE)与电解池正确连接,注意电极的正负。
以经典的三电极电解槽为例,其中阴极为测量电极(即工作电解),接线方法为:WE与SE串连接后并与阴极连接,RE与参比电极连接,CE与辅助电极即阳极连接。
连接完毕后,须再次确认连接是否正常。
7、若进行基本电化学方法测试,点击Autolab之GPES图标,出现该测量界面,进行基本电化学测试,选择相应的Procedure/Method,输入相应的参数,确定参数输入无误后,点击Start按钮,进行测试。
测试完毕后,需要手动保存数据,以免数据丢失,特别需要注意的是保存路径中不能出现中文,否则不能保存数据,也不能打开数据。
环境实验室中测量不确定度计算手册

英语作文实验报告
When writing an English essay for a lab report,its important to follow a structured format that includes the following sections:Introduction,Methodology,Results, Discussion,and Conclusion.Heres a detailed guide on how to approach each part:1.Title Page:Start with a title that clearly states the purpose of the experiment.Include your name,the course name,the instructors name,and the date.2.Abstract:Write a brief summary of the entire report,usually not more than250words. This should include the purpose of the experiment,the methods used,the main findings, and the conclusions drawn.3.Introduction:Background Information:Provide context for the experiment.Explain why the experiment is important and what existing knowledge or gaps in knowledge it addresses. Objectives:Clearly state the purpose of the experiment and the specific questions or hypotheses you are testing.4.Materials and Methods Methodology:Materials:List all the equipment,chemicals,or materials used in the experiment. Methods:Describe the procedures you followed in a stepbystep manner.Be precise and clear so that someone else could replicate your experiment.5.Results:Present your findings in a logical e tables,graphs,and figures to help illustrate your results.Make sure to label all figures and tables clearly and include captions.Avoid interpreting the results at this stage simply state what was observed.6.Discussion:Analyze the results in relation to your initial objectives and hypotheses.Discuss why the results occurred and how they relate to existing literature or theories.Address any discrepancies between your results and what was expected.Discuss potential sources of error and limitations of the experiment.7.Conclusion:Summarize the main findings of the experiment.Restate the objectives and state whether they were met.Provide recommendations for future research or practical applications of the findings.8.References:List all the sources of information you cited in your e aconsistent citation style,such as APA,MLA,or Chicago.9.Appendices:Include any additional data,calculations,or extended methods that were not included in the main body of the report.10.Proofreading:Before submitting your report,proofread it carefully to check for grammatical errors,typos,and clarity of expression.Remember,a lab report is not just a record of what you did and observed its also an opportunity to demonstrate your analytical skills and understanding of the scientific method.。
安捷伦EMPro内部培训资料1- Introduction version 2.0

Very useful library when a package is often combined with a layout
Makes dynamic EM simulations for package plus layout a lot easier Multiple packages can be added to the package 3D EM component design kit
3D arbitrary structures Full Wave EM simulations Handles much larger and complex problems Time Domain EM Simulate full size cell phone antennas EM simulations per each port GPU based hardware acceleration
EMPro Workshop Version 2.0 2
Agenda
Module 1: Introduction to 3D EM Technologies
Module 2: EMPro Basics Module 3: EMPro Electro-Magnetic Simulations Module 4: Data Display and Post-processing in EMPro
PCB
LTCC Balun
Si PA
LTCC Balun
Single Ended PA Input
Package
EMPro Workshop Version 2.0
电气工程及其自动化专业英语介绍
电气工程及其自动化专业英语介绍Introduction to Electrical Engineering and its Automation1. IntroductionElectrical Engineering and its Automation is a specialized field that combines the principles of electrical engineering with automation technologies. It focuses on the study, design, development, and application of electrical systems and automation processes. This field plays a crucial role in various industries, including power generation, manufacturing, telecommunications, and transportation.2. Curriculum and CoursesThe curriculum of Electrical Engineering and its Automation program is designed to provide students with a strong foundation in electrical engineering principles and automation techniques. The courses offered in this program include:- Electrical Circuit Analysis: This course covers the fundamental concepts of electrical circuits, including Ohm's law, Kirchhoff's laws, and circuit analysis techniques.- Electromagnetic Fields and Waves: Students learn about the behavior of electromagnetic fields and waves, including Maxwell's equations and their applications.- Digital Electronics: This course focuses on the design and analysis of digital circuits and systems using logic gates, flip-flops, and registers.- Control Systems: Students study the principles of control systems, including feedback control, stability analysis, and controller design.- Power Systems: This course explores the generation, transmission, and distribution of electrical power, as well as power system protection and stability.- Industrial Automation: Students gain knowledge of automation technologies used in industries, such as programmable logic controllers (PLCs), human-machine interfaces (HMIs), and industrial robotics.3. Laboratory FacilitiesTo enhance practical skills and hands-on experience, the Electrical Engineering and its Automation program provides state-of-the-art laboratory facilities. These facilities include:- Electrical Circuits Laboratory: Equipped with various electrical components and instruments, this lab allows students to conduct experiments and analyze electrical circuits.- Control Systems Laboratory: This lab provides hands-on experience in designing and implementing control systems using software tools and hardware devices.- Power Systems Laboratory: Students can simulate and analyze power systems using software programs and hardware equipment available in this lab.- Automation Laboratory: This lab is equipped with industrial automation devices, such as PLCs and HMIs, enabling students to develop and test automation systems.4. Career OpportunitiesGraduates of the Electrical Engineering and its Automation program have excellent career prospects in various industries. They can work as:- Electrical Engineers: They design and develop electrical systems for power generation, distribution, and utilization.- Automation Engineers: They design and implement automation systems in industries to improve productivity and efficiency.- Control Systems Engineers: They work on the design and implementation of control systems for various applications, such as robotics and manufacturing processes.- Power Systems Engineers: They specialize in the planning, operation, and maintenance of power systems, ensuring reliable and efficient electricity supply.- Research and Development Specialists: They contribute to the advancement of electrical engineering and automation technologies through research and innovation.5. ConclusionThe Electrical Engineering and its Automation program provides students with a comprehensive understanding of electrical engineering principles and automation technologies. Through a combination of theoretical knowledge and practical experience, graduates are well-prepared for successful careers in industries that rely on electrical systems and automation processes.。
真空离心浓缩仪使用手册
1.21.11.81.71.61.51.31.42.22.3 2.1Fig. 1Fig. 2Fig. 31.9161Introduction . . . . . . . . . . . . . . . . . . . . . . . . . . . . . . . . . . . . . . . . . . . . . . . . . . . . . . . . . . . . . . . . . . . . . . . . . . . . . .171.1Safety precautions . . . . . . . . . . . . . . . . . . . . . . . . . . . . . . . . . . . . . . . . . . . . . . . . . . . . . . . . . . . . . . . . . . . . . . . . .171.2Installing the device. . . . . . . . . . . . . . . . . . . . . . . . . . . . . . . . . . . . . . . . . . . . . . . . . . . . . . . . . . . . . . . . . . . . . . . . .191.3Delivery package. . . . . . . . . . . . . . . . . . . . . . . . . . . . . . . . . . . . . . . . . . . . . . . . . . . . . . . . . . . . . . . . . . . . . . . . . . .192Operating controls . . . . . . . . . . . . . . . . . . . . . . . . . . . . . . . . . . . . . . . . . . . . . . . . . . . . . . . . . . . . . . . . . . . . . . . .203Operation . . . . . . . . . . . . . . . . . . . . . . . . . . . . . . . . . . . . . . . . . . . . . . . . . . . . . . . . . . . . . . . . . . . . . . . . . . . . . . . .213.1Mounting / Dismounting the rotor. . . . . . . . . . . . . . . . . . . . . . . . . . . . . . . . . . . . . . . . . . . . . . . . . . . . . . . . . . . . . .213.2Loading the rotor. . . . . . . . . . . . . . . . . . . . . . . . . . . . . . . . . . . . . . . . . . . . . . . . . . . . . . . . . . . . . . . . . . . . . . . . . . .213.3Evaporation without heating . . . . . . . . . . . . . . . . . . . . . . . . . . . . . . . . . . . . . . . . . . . . . . . . . . . . . . . . . . . . . . . . . .213.4Evaporation with heating. . . . . . . . . . . . . . . . . . . . . . . . . . . . . . . . . . . . . . . . . . . . . . . . . . . . . . . . . . . . . . . . . . . . .213.5Centrifugation with braked deceleration. . . . . . . . . . . . . . . . . . . . . . . . . . . . . . . . . . . . . . . . . . . . . . . . . . . . . . . . .223.6Special functions. . . . . . . . . . . . . . . . . . . . . . . . . . . . . . . . . . . . . . . . . . . . . . . . . . . . . . . . . . . . . . . . . . . . . . . . . . .223.7Opening the device in the case of a power failure . . . . . . . . . . . . . . . . . . . . . . . . . . . . . . . . . . . . . . . . . . . . . . . . .223.8Exchanging the main power fuse . . . . . . . . . . . . . . . . . . . . . . . . . . . . . . . . . . . . . . . . . . . . . . . . . . . . . . . . . . . . . .223.9Gel dryer connection. . . . . . . . . . . . . . . . . . . . . . . . . . . . . . . . . . . . . . . . . . . . . . . . . . . . . . . . . . . . . . . . . . . . . . . .224Cleaning and maintenance of the device . . . . . . . . . . . . . . . . . . . . . . . . . . . . . . . . . . . . . . . . . . . . . . . . . . . . . .235Troubleshooting table. . . . . . . . . . . . . . . . . . . . . . . . . . . . . . . . . . . . . . . . . . . . . . . . . . . . . . . . . . . . . . . . . . . . . .246Technical data . . . . . . . . . . . . . . . . . . . . . . . . . . . . . . . . . . . . . . . . . . . . . . . . . . . . . . . . . . . . . . . . . . . . . . . . . . . .257Ordering information. . . . . . . . . . . . . . . . . . . . . . . . . . . . . . . . . . . . . . . . . . . . . . . . . . . . . . . . . . . . . . . . . . . . . . .26C o nt en ts Contents17Dear Customer,The Concentrator 5301 is designed for the evaporation of liquid samples in micro test tubes:–for 1.5 and 2.0 ml micro test tubes in a 48-place rotor,–for 0.5 ml micro test tubes in a 72-place rotor,–for 1.5 and 2.0 ml micro test tubes in a 70-place rotor.The device is available in two versions:–Concentrator 5301 Complete System with built-in diaphragm vacuum pump and– A Basic Concentrator 5301 without pump.The second version can be connected to an external vacuum system.Each device without a pump can be upgraded to a Concentrator Complete System by an Eppendorf service technician.The following important practical functions of the Concentrator 5301 have been optimized:–Three temperature levels can be set (30, 45, 60 ˚C) or evacuation can take place without temperature regulation.–Three functions are available for liquid evaporation: in addition to pure evacuation, aqueous or alcoholic solutions can be concentrated rapidly with two special functions.–The Concentrator 5301 may also be operated as a desiccator only.–The chemical-resistant pump in the Concentrator 5301 Complete System makes a variety of applications possible.A solvent trap can be connected to the device behind the pump.The device is suitable for use in laboratories in the life sciences, clinical chemistry, medicine and industrial research. Its space-saving design eases installation directly on the bench top. The device is easy and convenient to operate.Before using the Concentrator 5301 for the first time, please read the manual. The latest version of the manual and the safety instructions in your language can be found on the Internet at .The device must not be operated in a hazardous or flammable environment and must not be used to evaporate/centrifuge self-inflammable substances.Before plugging in the device, compare your power supply with the electrical requirements listed on the identification plate (see Fig. 1 and 2 on the fold-back cover at the front of this manual: identification plates on the right-hand panel of the Concentrator 5301 Complete System and on the rear panel of the Concentrator 5301).The rotor must be properly mounted. It should be loaded symmetrically.Repairs must only be performed by an Eppendorf authorized service technician. Only use original rotors and spare parts recommended by Eppendorf.Do not expose body parts to the vacuum under any circumstances.Continuous pumping of liquids is not permitted.Please note the maximum permissible pressures and pressure differences listed under "Technical Data". Excesspressure in the pipes caused by closed taps or blocked pipes can result in bursting. Therefore, be sure to always keep the exhaust fumes pipe free and to use sufficiently wide pipes.When evaporating poisonous liquids or liquids which contain pathogenic bacteria, a suitable chemical or cooling trap must be used to ensure the required condensation and separation of the vapor. The corresponding safety precautions must be observed (hood, lab with appropriate safety class).Please avoid releasing poisonous, health-damaging or corrosive substances. When handling poisonous, health-damaging or corrosive substances or pathogenic germs of risk group II (see World Health Organization: "Laboratory Biosafety Manual"), the appropriate national regulations are to be observed.Before evaporating, all the tubes should be subjected to a visual inspection for material damage. Damaged tubes must not be centrifuged, as if tubes break, there may be further damage to the Concentrator and its accessories in addition to loss of the sample.1.1 Safety precautionsIntroduction 118Declaration concerning the ATEX directive (94/9/EC)The present design and ambient conditions inside Eppendorf centrifuges mean that they are not suitable for use in a potentially explosive atmosphere. The centrifuges must therefore only be used in a safe environment such as the open environment of a ventilated laboratory or a fully-extracted fume hood. The use of substances which may contribute to a potentially explosive atmosphere is not permitted. The final decision on the risks in connection with the use of such substances is the responsibility of the user of the centrifuge.TransferIf the device is passed on to someone else, please include the instruction manual.Disposal In case the product is to be disposed of, the relevant legal regulations are to be rmation on the disposal of electrical and electronic devices in the European Community The disposal of electrical devices is regulated within the European Community by nationalregulations based on EU Directive 2002/96/EC on waste electrical and electronic equipment (WEEE).According to these regulations, any devices supplied after 13.08.05 in the business-to-business sphere, to which this product is assigned, may no longer be disposed of in municipal or domestic waste. They are marked with the following symbol to indicate this.As disposal regulations within the EU may vary from country to country, please contact your supplier if necessary.I n t r o d u c t i o n 119Concentrator 5301 Complete System: After unpacking the device, unscrew the two thumbscrews at the rear of the base plate (transport safety device of the vacuum pump).Place the device onto a level, horizontal surface. To ensure sufficient ventilation, there should be 10 cm clearance at both sides of the device and 30 cm at the back of the device.Connect the emission condensator to the nozzle on the left side of the pump housing (see Fig. 3 on the fold-back cover at the front of this manual) using the solvent-resistant tube included in the accessories (8 mm inner diameter).Connect the device with the power cable to the main power supply. The main power socket is on the bottom right of the housing of the vacuum pump next to the main power switch. When the device is switched on, the lid can be opened as long as the control lamp Lid lights up.Before commissioning the Concentrator with integrated vacuum pump, please be sure that the ambient temperature during operation is between 15 °C and a maximum of 35 °C. Measures according to DIN VDE 0530 are to be taken when setting up the device at an elevation greater than 1,000 m above sea level.Concentrator 5301: As for Concentrator Complete System, however, the removal of the transport safety device for the vacuum pump is not applicable.The main power switch on the rear panel of the device is next to the socket for direct connection of a vacuum pump (see Fig. 2 on the fold-back cover at the front of this manual).A vacuum pump can be connected to the main power supply via the Concentrator with a special connector (see Sec. 7, Ordering information).The power consumption of a vacuum pump which is connected directly to the Concentrator is max. 400 W.The normal program sequence can also be performed with a vacuum pump connected to the power supply indepen-dently of the Concentrator or with a central vacuum system when a solenoid valve is switched between the vacuum pump and the Concentrator. For additional information, please contact an Eppendorf service technician.If a solenoid valve is not used, the vacuum system can be disconnected from the Concentrator as required before the evaporation run is ended by manually closing a correctly positioned valve (e.g., cock with ground-in stopper).Every pump used should be able to hold a maximum ultimate pressure of 20 mbar.Condensate separator: Depending on the type of pump used, an emission condensator can be switched between the devices or behind the pump. The solvent-resistant pump of the Concentrator Complete System enables installation of the emission condensator behind the pump.Note: When attaching a filter to the outlet of the condensator, the excess pressure at the pump outlet of the Concen-trator Complete System must not exceed 1 bar.When evaporating chemically aggressive liquids or liquids with volatile, chemically aggressive or biologically hazardous components, an appropriately effective cooling trap or chemical trap must be used instead of a condensate separator.Concentrator 5301 complete system with gel dryer connection (Order no. 5301 000.326): In order to be able to connect a gel dryer to the Concentrator 5301, please use the accompanying tube connection. Screw the tubeconnection into the free thread of the stop valve on the left side of the Concentrator. The size of the connection thread for the gel dryer connection is G1/4".1 Concentrator 5301 / Concentrator 5301 Complete System /Concentrator 5301 complete system with gel dryer connection without rotor1 Rotor F 45-48-11 with 6 feet for rotors F 45-48-11 and F 45-72-81Main power cable 1Instruction manual for Concentrator / Concentrator 5301 Complete System 1Emission condensator (only for Concentrator Complete System)1Tube for connecting the emission condensator / Concentrator Complete System 1Set of main power fuses 1.2 Installing the device1.3 Delivery packageIntroduction121Mount the rotor onto the drive axle making sure it is seated onto the spindle. To dismount, pull rotor off the drive axle. The rotor does not have to be tightened.A spacer is available (order no. 5301 316.005) for sandwich use of 2 rotors (with rotors F 45-48-11 and F 45-72-8 in any order, not with rotor F 45-70-11).The delivery package of the device contains feet which can be screwed into the appropriate bores of the rotorsF 45-48-11 and F 45-72-11. The feet make sure that the tubes are not pushed out of the bores when the rotor is placed onto the bench.The rotor should be loaded symmetrically with open tubes. Maximum unsymmetrical load for one run ≤ 1 hour: difference of 6 x 2.0 ml tubes between 2 rotor sides.The temperature selected can be changed during the run and is regulated accordingly. After switch-on, the device is set to operation without heating.Following evaporation, ensure that heating is switched off again. To do so, press Set temp repeatedly until the three temperature displays go out.Note: When heating selected, the behavior of the samples at the desired temperature must be compatible.Caution:Avoid touching the wall of the rotor chamber after evaporation at 60 ˚C. This could have a temperature in excess of 65 °C.When switching from a higher to a lower temperature, a rapid blinking of the control lamp after a brief waiting period shows that the rotor chamber temperature deviates from the selected temperature.Close the lid.Press Start :The rotor starts up. The Rotation control lamp lights up (green). As soon as the lid haslocked automatically, the Lid control lamp (green) goes out.At 1,000 rpm, the vacuum pump is switched on. The Vacuum control lamp lights up andthe ventilation valve closes. The Ventilation control lamp flashes.The rotor accelerates to its final speed of 1,400 rpm.If Start is pressed during the run, the ventilation valve is opened, air streams in andrinses the pump and the tubing system.We recommend that you press Start for a few seconds at the end of the last run of theday (see Sec. 3.3) to remove remaining condensate from the pump.Press Stop :The rotor chamber is ventilated. After 2 s, the vacuum pump is switched off.The Vacuum control lamp goes out.The rotor decelerates without braking (see Sec. 3.5).When the rotor is at a standstill: The Rotation control lamp goes out.The Lid control lamp lights up when the lid can be opened.Press Set temp :30 ˚C display flashes until the temperature in the rotor chamber is reached(30 ˚C display constant).If Set temp is pressed repeatedly, the display switches to 45 ˚C , then to 60 ˚C andthen the heating is switched off.3.1 Mounting / Dismounting the rotor3.2 Loading the rotor3.3 Evaporation without heating3.4 Evaporation with heating3 OperationOperation322To switch on gentle braking, press Brake . The Brake control lamp lights up (red).It is possible to switch over between deceleration with soft braking/without braking at any time.For optimal evaporation of samples, 3 different functions are available:Function 1:This function is especially suitable for the evaporation of alcoholic solutions and is set as a default when the device is switched on.Function 2:For evaporation of solvents with a particularly high vapor pressure.Function 3:This function is especially suitable for the evaporation of aqueous solutions.These functions are switched on by pressing Brake and Set temp simultaneously. To indicate that the device has recognized that these two keys have been pressed, the control lamp Ventilation flashes briefly three times. When both keys are pressed, the different functions are selected in succession.When the device is at a standstill or in operation, the function selected is indicated as follows by the control lamps Ventilation and Vacuum :Desiccator function:The Concentrator 5301 can also be operated as a desiccator only. The rotor chamber is evacuated normally, although the rotor does not move.This function can be called up and ended as follows:–Hold down the STOP key. After one second, press START as well. The run is carried out with the set parameters (F1, F2, F3, selected temperature) without the rotor moving. Function 2 is recommended for this.–Press the STOP key to end the desiccator function.In the event of a power failure, the ventilation valve opens. Before the rotor comes to a standstill, standard pressure is restored in the rotor chamber. The lid can be unlocked when the rotor is at a standstill by inserting a sharp object (paper clip) into the opening in the right panel of the housing under the lid. The lid can then be opened.The fuses are located under the flap in the housing of the main power switch.The Concentrator 5301 complete system is available under the order no. 5301 000.326 with gel dryer connection. The gel dryer can be operated parallel to the evaporation or on its own. When using parallel to the evaporation, the stop valve is opened, meaning that the knob is parallel to the flow direction.The drying of the gel and the evaporation begin with the switching on of the internal vacuum pump.If simultaneous evaporation is not desired, please use the Exsiccator function (see Ch. 3.6).Before the device is started, the enclosed tube connector must be screwed into the stop valve.Please close the stop valve when the gel dryer is no longer required.Ventilation control lampVacuum control lamp Function 1during run in standstill flashes flasheslights up constantly offFunction 2during run in standstill offlights up constantly lights up constantly off Function 3during run in standstillofflights up constantlyflashes flashes3.5 Centrifugation with braked deceleration3.6 Special functions3.7 Opening the device in the case of a power failure3.8 Exchanging the main power fuse3.9 Gel dryer connectionO p e r a t i o n3 Operation323When cleaning and disinfecting the device on the outside and inside (rotor chamber), only use neutral detergents (e.g. Extran ® neutral) and disinfectants containing alcohol. Disconnect the main power plug before starting cleaning.For the frequent evaporation of corrosive liquids (e.g. buffers containing HCl), apply a thin coating of Vaseline to the rotor and rotor chamber (see "Ordering information").The rotors can be autoclaved at 121 ˚C for 20 minutes. They can be cleaned with the same solutions as the device. Do not allow saline aqueous solutions to dry. Do not allow acids or alkaline solutions to soak into the material (aluminum).The chemical-resistant pump of the Concentrator 5301 Complete System does not require maintenance. The pump and tubing system can be blown through by pressing Start during the run (see Sec. 3.3).Valves and diaphragms are subject to natural wear and should be renewed by an authorized Service technician, at the latest when the pressure values begin to decrease. A permanent conveyance of liquids can damage diaphragms and valves. Please regularly remove the condensation from the pump as described above. This measure prolongs the service life of the parts subject to wear and tear.Glass breakageWhen concentrating from glass tubes, be aware that the risk of glass breakage increases during centrifugation. Please observe manufacturers’ information about maximum loading of centrifuge tubes.In case of glass breakage, carefully remove all splinters from the rotor and the centrifugal chamber immediately.Otherwise fine glass splinters will scratch the surface of the rotors, reducing their resistance to chemicals. Air vortices will result in very fine black abraded metal in the centrifugal chamber; in addition to damaging the centrifugal chamber and rotor, this material will also cause samples to become contaminated.Returning devicesWhen returning the Concentrator 5301, please ensure that the device is completely decontaminated so it does not present any kind of health hazard to our Service staff.You will find additional information and a blank of the decontamination confirmation at . Do also consult your laboratory safety officer about a suitable decontamination method.Please fill out the decontamination confirmation and place it together with the device when it is to be sent back to Eppendorf.4 Cleaning and maintenanceCleaning and maintenance424If the suggested measure repeatedly fails to eliminate the fault, please contact Service.Error CauseSolutionNo display.No main power connection.Power failure.Check power supply cable.Check main power fuse at the device (see Sec. 3.8) and in the laboratory.Concentrator does not start up (Display "Lid" flashes).Lid not closed.Lid switch defective.Close lid.⇒ SERVICE.Concentrator does not start up or switches off during run(Rotation control lamp flashes.)Mechanical stiffness.Electronics error in drive.Move rotor by hand.Remove any obstruction and restart.⇒ SERVICE.No noticeable evaporation.Sealing ring in lid of device damaged.Mount new sealing ring(see "Ordering information").All 3 temperature displays flash.Heating or temperature sensor defective.⇒ SERVICE.All displays flash.Electronics error.⇒ SERVICE.Pump does not start up.Thermal switch atconnecting box of pump initiated.Pump overload,leave to cool, restart.⇒ SERVICE.One of the heating displays flashes (1x per second).Heating at least 5 °C above nominal value.Allow heat from previous run to cool.One of the heating displays flashes rapidly (2x per second).Heating at least 10 °C above nominal value.Switch off external heat source (e.g. halogen lamp).No conveyance capacity.Long, narrow pipe?Condensation in the pump?Use short pipes that are wide enough.Allow pump to run for a few minutes with the intake connector open.T r o u b l e s h o o t i n g t a b l e5 Troubleshooting table5Power supply:see identification platePower consumption: max. 500 W(with largest external pump permitted) Max. rotational speed:1,400 rpmMax. centrifugal force:240 x gMax. load:96 x 2.0 ml micro test tubesMax. density of material to be centrifuged: 1.2 g/mlPermitted ambient temperaturefor operating the device:15–35 °CPermitted max. average annual relative air humidity:75 %Dimensions (H x W x D)Concentrator 5301:230 x 320 x 369 mm Concentrator 5301 Complete System:298 x 320 x 530 mm WeightConcentrator 5301:17 kgConcentrator 5301 Complete System:31 kgMain power fuse 230 V: 4.0 A time-lagMain power fuse 115 V: 6.25 A time-lagMax. excess pressure at pump outlet ofConcentrator 5301 Complete System: 1 barTechnical data of the diaphragm vacuum pumpMax. power / motor capacity of the diaphragm vacuum pump120 V 2.9 A / 220 W230 V 1.6 A / 220 WMax. power input of the diaphragm vacuum pump120 V350 VA230 V345 VAMotor protection Thermal cutout Protection degree according to IEC 529IP 54Maximum output 50 / 60 Hz 1.7 / 2.0 m3/hAttainable ultimate pressure (absolute)9 mbarMaximum permissible pressure at outlet (absolute) 2 barMaximum pressure difference between inlet and outlet 2 barNominal rotational speed of the pump at 50 / 60 Hz1500 min-1 / 1800 min-1 Materials of the diaphragm vacuum pump surfaces coming into contact with media Housing cover insert PTFE carbon reinforced Head cover, diaphragm clamping disc,inlet / outlet / fittings ETFEValve FFKMDiaphragm PTFE-NBRHose PTFETechnical specifications subject to change!Technical data6 Technical data62526Important note:Please use the original accessories recommended by Eppendorf. Using spare parts or disposables which we have not recommended can reduce the precision, accuracy and life of this instrument. We do not honor any warranty or accept any responsibility for damage resulting from such action.Concentrator 5301, incl. 48 x 1.5 / 2.0 ml fixed-angle rotor 230 V , 50/60 Hz,Other versions available on request!5301 000.016Concentrator 5301 complete system, incl. 48 x 1.5 / 2.0 ml fixed-angle rotor 230 V , 50/60 Hz,Other versions available on request!5301 000.210Concentrator 5301 complete system, w/o rotor5301 000.610Concentrator 5301 complete system with gel dryer connection, w/o rotor 230 V / 50 – 60 Hz5301 000.326Pump upgrade kit for the Concentrator 5301 to create the complete system (with separator and tube)230 V , 50/60 Hz, Other versions available on request!5399 000.167Rotor F-45-48-11 für 48 Safe-Lock Microcentrifuge Tubes 1,5 und 2,0 ml 5490 030.001Rotor F-45-70-11 für 70 Safe-Lock Microcentrifuge Tubes 1,5 und 2,0 ml 5490 032.004Rotor F-45-72-8 für 72 Safe-Lock Microcentrifuge Tubes 0,5 ml 5490 034.007Rotor A-2-VC for MTP or PCR plates with a maximum height of 15 mm5490 045.009Rotor F-45-24-12 for 24 round bottom tubes of up to 6 ml (tube measurement 12 mm ø, 67 – 100 mm in length)5490 036.000Rotor F-50-8-16 for 8 round bottom tubes of up to 15 ml (tube measurement 16 mm ø, 97 – 120 mm in length)5490 041.003Rotor F-50-8-18 for 8 round bottom tubes of up to 16 ml (tube measurement 18 mm ø, 105 – 128 mm in length)5490 042.000Rotor F-45-8-17 for 8 Falcons ® of up to 15 ml (tube measurements 17 mm ø, 120 mm in length)5490 038.002Rotor F-40-36-12 for 36 x 1.5 ml flasks(tube measurements 12 mm ø, 32 mm in length)5490 040.007Rotor F-45-36-15 for 36 x 6 ml flasks(tube measurements 15 mm ø, 48 mm in length)5490 035.003Rotor F-45-16-20 for 16 x 6.5 – 10 ml flasks(tube measurements 20 mm ø, 42 – 55 mm in length)5490 043.006Rotor F-40-18-19 for 18 x 10 ml flasks(tube measurements 19 mm ø, 66 mm in length)5490 037.006Rotor F-45-12-31 for 12 x 20 ml flasks(tube measurements 31 mm ø, 55 mm in length)5490 044.002Rotor F-35-8-24 für 8 x 25 ml flasks(tube measurements 24 mm ø, 86 mm in length)5490 039.009Spacer for sandwich use of 2 rotors 5301 316.005Emission condensator (w/o tube)5301 330.008Tube for emission condensator5301 337.002Special connector for external pump (only for Germany, for other countries on request)5301 010.003Solenoid valve for external vacuum connection, 230 V 50/60 Hz Other versions available on request!5301 030.004Sealing ring for lid 5301 160.005Grease for pivots5810 350.050O r d e r i n g i n f o r m a t i o n7 Ordering information716.09.200289/336/EWG, EN 55011, EN 61000-6-1, EN 61000-3-2, EN 61000-3-373/23/EWG, EN 61010-1, EN 61010-2-20Vakuumkonzentrator / VacuumconcentratorConcentrator 53015301 900.300-03EG-Konformitätserklärung EC Conformity DeclarationDas bezeichnete Produkt entspricht den einschlägigen grundlegenden Anforderungen der aufgeführten EG-Richtlinien und Normen. Bei einer nicht mit uns abgestimmten Änderung des Produktes oder einer nicht bestimmungsgemäßen Anwendung verliert diese Erklärung ihre Gültigkeit. The product named below fulfills the relevant fundamental requirements ofthe EC directives and standards listed. In the case of unauthorized modifications to the productor an unintended use this declaration becomes invalid.Produktbezeichnung, Product name:Produkttyp, Product type:Einschlägige EG-Richtlinien/Normen, Relevant EC directives/standards:Vorstand, Board of Management: Projektmanagement, Project Management:Hamburg, Date:Eppendorf AG · Barkhausenweg 1 · 22339 Hamburg · Germany0015 033.509-02。
学以致用的英文作文
学以致用的英文作文全文共3篇示例,供读者参考篇1Title: Applying What You Learn - The Importance of Putting Knowledge into PracticeIntroductionEducation plays a crucial role in shaping individuals and society as a whole. However, the true value of learning lies in its application. The concept of "learning by doing" or "learning through experience" emphasizes the importance of putting knowledge into practice. In this essay, we will explore the significance of applying what we learn in various aspects of life.Academic SettingIn the academic setting, students often acquire knowledge through lectures, textbooks, and assignments. While theoretical knowledge is essential, practical application is equally important. By engaging in hands-on activities, such as experiments, case studies, and group projects, students can deepen their understanding of concepts and develop essential skills. For example, in a science class, conducting experiments allowsstudents to observe phenomena firsthand and test hypotheses, leading to a more profound comprehension of scientific principles.Professional DevelopmentIn the professional world, applying what we learn is vital for success. Whether in business, healthcare, engineering, or any other field, practical skills are essential for job performance. Continuous learning and skill development enable individuals to stay competitive in the workforce. For instance, a marketing professional who applies the latest strategies and tools will be more effective in reaching target audiences and achieving business goals.Personal GrowthBeyond academics and career, applying what we learn is crucial for personal growth and development. Life experiences and challenges provide opportunities to apply knowledge in real-world situations. By reflecting on past experiences and learning from them, individuals can make informed decisions and improve their problem-solving abilities. For example, someone who has learned mindfulness techniques can apply them in stressful situations to maintain calm and focus.Social ImpactThe application of knowledge also extends to making a positive impact on society. By using their skills and expertise to address social issues, individuals can contribute to the betterment of their communities. For instance, a healthcare professional who volunteers at a free clinic is applying their medical knowledge to help underserved populations. Similarly, an environmental scientist who conducts research on climate change is using their expertise to raise awareness and advocate for sustainable practices.ConclusionIn conclusion, learning is a continuous process that is enriched by applying what we learn. Whether in academics, career, personal life, or social endeavors, the practical application of knowledge is essential for growth and success. By actively engaging in hands-on activities, reflecting on experiences, and making a difference in society, individuals can truly harness the power of learning and make a meaningful impact in the world. So, let us strive to learn with purpose and apply our knowledge to create positive change.篇2Learning by applying what we have learned is a crucial aspect of education. It is not enough to simply memorize facts and theories; we must also be able to put this knowledge into practice. This is known as the principle of "learning by doing" or "learning by applying." In this essay, we will explore the importance of learning by applying and how it can benefit students in their academic and professional lives.One of the key benefits of learning by applying is that it helps students to understand concepts more deeply. When students are able to use their knowledge in real-life situations, they are forced to think critically about how to apply this knowledge and solve problems. This can lead to a deeper understanding of the material and a greater ability to retain and recall this information in the future.Furthermore, learning by applying can also help students develop important skills that will be valuable in their future careers. For example, by working on projects that require them to apply their knowledge, students can develop skills such as problem-solving, critical thinking, and communication. These are all skills that are highly valued by employers and can help students to succeed in the competitive job market.In addition, learning by applying can make the learning process more engaging and enjoyable for students. Rather than passively listening to lectures or reading textbooks, students are actively involved in the learning process and can see thereal-world relevance of what they are learning. This can make learning more meaningful and help students to stay motivated and engaged in their studies.One way that educators can promote learning by applying is through hands-on learning activities and projects. For example, science teachers could have students conduct experiments in the lab, while language teachers could have students practice their language skills by engaging in real-life conversations or writing assignments. These types of activities can help students to apply their knowledge in a practical way and see the real-world implications of what they are learning.In conclusion, learning by applying is a vital aspect of education that can benefit students in numerous ways. By applying their knowledge in real-life situations, students can deepen their understanding of concepts, develop important skills, and make the learning process more engaging and enjoyable. Educators should strive to incorporate opportunities for learning by applying into their teaching methods to helpstudents succeed academically and professionally. Learning by applying ultimately helps students to become critical thinkers, problem-solvers, and lifelong learners.篇3Title: The Importance of Applying What We Learn in PracticeIntroductionEducation is essential for personal development and growth. However, the true value of education lies in its practical application in real-life situations. In this essay, we will discuss the significance of applying what we learn in practice, known as "learning by doing" or "experiential learning".Benefits of Applying What We Learn1. Efficient Learning: When we apply what we learn in practical situations, we reinforce our understanding of the concepts. This hands-on experience helps us retain knowledge better and enhances our learning process.2. Problem-Solving Skills: Applying theoretical knowledge in practical scenarios allows us to develop problem-solving skills. By facing challenges and obstacles, we learn to think critically and come up with creative solutions.3. Real-world Experience: The application of knowledge in real-life situations provides us with valuable experience that cannot be gained through textbooks or lectures. This practical experience prepares us for the challenges of the real world.4. Bridging the Gap: Often, there is a gap between theoretical knowledge and practical skills. By applying what we learn, we bridge this gap and develop the necessary skills to succeed in our careers.5. Continuous Improvement: Through continuous application of what we learn, we can identify areas for improvement and work towards enhancing our skills and knowledge. This process of self-improvement is crucial for personal and professional growth.Examples of Learning by Doing1. Internships: Internships provide students with the opportunity to apply their academic knowledge in a real work environment. This hands-on experience helps them gain practical skills and industry insights.2. Project-based Learning: Project-based learning involves students working on real-world projects that require them to apply their knowledge to solve specific problems. This approachhelps students develop critical thinking and problem-solving skills.3. Simulations: Simulations are interactive learning activities that simulate real-life scenarios. By engaging in simulations, students can apply their theoretical knowledge in practical situations and learn from their mistakes in a risk-free environment.4. Field Trips: Field trips allow students to explore real-world settings related to their academic studies. By experiencing firsthand the application of theory in practice, students gain a deeper understanding of the subject matter.ConclusionIn conclusion, learning by doing is a valuable approach to education that enhances the learning experience and prepares individuals for success in their careers. By applying what we learn in practice, we develop practical skills, problem-solving abilities, and real-world experience. It is essential for educators to incorporate experiential learning opportunities into their teaching methods to ensure that students can effectively apply their knowledge in real-life situations.Ultimately, the true test of knowledge is its application in practice.。
最新研究生面试英文稿三篇
最新研究生面试英文稿三篇篇一:研究生面试英文稿Introduction:Good morning/afternoon/evening, respected professors and interviewers. I am honored to be given the opportunity to introduce myself and share my aspirations with all of you today. My name is [Your Name], and I am a candidate applying for the [Name of the Program] at your esteemed institution.Academic Background:I completed my undergraduate studies at [Name of University] majoring in [Major]. Throughout my undergraduate journey, I actively participated in various academic and extracurricular activities, which helped me develop a well-rounded personality. I consistently maintained a high GPA and was recognized for my dedication and commitment to my studies.Research Experience:During my undergraduate studies, I had the privilege of working as a research assistant in the [Name of Research Lab] under the guidance of [Name of Professor]. This experience allowed me to gain valuable insights into the research process and enhanced my critical thinking and problem-solving skills. I actively contributed to several research projects, which resulted in the publication of two papers in renowned academic journals.Motivation for Pursuing a Graduate Degree:The reason I am applying for a graduate degree in [Name of Program] is twofold. Firstly, I am deeply passionate aboutadvancing knowledge in my field of study. The opportunity to engage in cutting-edge research and contribute to the existing body of knowledge is both exhilarating and fulfilling to me. Secondly, I believe that a graduate degree will equip me with the necessary skills and expertise to make a meaningful impact in my chosen profession.Research Interests:My research interests lie in the area of [Research Interest]. I am particularly fascinated by the potential applications of [Specific Research Topic] and its implications for [Field of Study]. I am eager to explore the uncharted territories within this field and contribute to the development of innovative solutions to real-world problems.Conclusion:In conclusion, I am confident that my academic background, research experience, and passion for my chosen field make me a strong candidate for the [Name of Program] at your institution. Given the opportunity, I am committed to dedicating myself wholeheartedly to my research and making a significant contribution to the academic community. Thank you for considering my application, and I look forward to the possibility of joining your esteemed institution.篇二:研究生面试英文稿Introduction:Good morning/afternoon/evening, respected professors and interviewers. It is with great pleasure that I stand before you today as a candidate for the [Name of Program] at your prestigiousinstitution. My name is [Your Name], and I am excited to share my background, experiences, and aspirations with all of you. Academic Background:I completed my undergraduate studies at [Name of University] majoring in [Major]. Throughout my academic journey, I consistently demonstrated a strong commitment to learning and achieved remarkable academic results. I was actively involved in student organizations, which allowed me to develop leadership, teamwork, and communication skills.Research Experience:During my undergraduate studies, I had the opportunity to engage in research projects that deepened my understanding and ignited my passion for academic inquiry. I worked as a research intern at [Name of Research Institution] under the guidance of [Name of Professor]. This experience enriched my knowledge in the field of [Research Area] and equipped me with valuable research methodologies and analytical skills.Motivation for Pursuing a Graduate Degree:The decision to pursue a graduate degree in [Name of Program] stems from my unwavering commitment to intellectual growth and my desire to make a positive impact in my field of study. I believe that a graduate education will provide me with the necessary tools to delve deeper into my research interests and contribute to the advancement of knowledge.Research Interests:My research interests lie in the intersection of [Research Area 1] and [Research Area 2]. I am particularly intrigued by the potential applications of [Specific Research Topic] in addressing contemporary challenges in [Field of Study]. I am driven by a desire to explore innovative approaches and develop practical solutions that can have a tangible impact on society.Future Goals:Looking ahead, my ultimate goal is to pursue a career in academia.I aspire to become a respected researcher and educator, dedicated to inspiring the next generation of scholars. I am committed to continuously expanding my knowledge, honing my skills, and contributing to the academic community through my research, publications, and collaborations.Conclusion:In conclusion, I believe that my academic background, research experience, and unwavering passion for my field of study make me a strong candidate for the [Name of Program] at your esteemed institution. I am eager to embrace the challenges and opportunities that await me in graduate school, and I am confident that the knowledge and skills I acquire will enable me to make a meaningful contribution to my chosen field. Thank you for considering my application, and I look forward to the prospect of joining your institution.篇三:研究生面试英文稿Introduction:Good morning/afternoon/evening, respected professors and interviewers. I am honored to be here today as a candidate for the[Name of Program] at your esteemed institution. My name is [Your Name], and I am excited to share my academic background, research experiences, and future aspirations with all of you. Academic Background:I completed my undergraduate studies at [Name of University] majoring in [Major]. Throughout my academic journey, I consistently pursued excellence and maintained a high GPA. I actively participated in various academic and extracurricular activities, which helped me develop a well-rounded personality and enhance my leadership and interpersonal skills.Research Experience:During my undergraduate studies, I had the opportunity to work as a research assistant in the [Name of Research Lab] under the guidance of [Name of Professor]. This experience allowed me to delve into the world of research and cultivate a passion for contributing to the advancement of knowledge. I actively engaged in research projects, which resulted in the publication of several papers and presentations at national conferences.Motivation for Pursuing a Graduate Degree:The decision to pursue a graduate degree in [Name of Program] is driven by my insatiable curiosity and desire to make a meaningful impact in my field of study. I believe that a graduate education will afford me the opportunity to explore my research interests in greater depth and equip me with the necessary skills and knowledge to address complex challenges.Research Interests:My research interests revolve around [Research Area]. I am particularly fascinated by the potential applications of [Specific Research Topic] and its implications for [Field of Study]. I am eager to contribute to the existing body of knowledge by exploring novel approaches and developing innovative solutions to real-world problems.Future Goals:Looking ahead, my long-term goal is to establish myself as a respected researcher and educator. I aspire to bridge the gap between academia and industry, translating research findings into practical applications that can positively impact society. I also strive to mentor and inspire future generations of students, fostering a passion for research and innovation.Conclusion:In conclusion, I firmly believe that my academic background, research experience, and unwavering dedication to my field of study make me an ideal candidate for the [Name of Program] at your institution. I am excited about the prospect of joining your esteemed institution and collaborating with distinguished faculty members and fellow scholars. Thank you for considering my application, and I look forward to the opportunity to contribute to the academic community.。