
颂拓(松拓)M5系列中文说明书
1 欢迎. . . . . . . . . . . . . . . . . . . . . . . . . . . . . . . . . . . . . . . . . . . . . . . . . . . . . . . . . . . . . . . . . . . . . . . . . 4 2 显示屏图标和区段. . . . . . . . . . . . . . . . . . . . . . . . . . . . . . . . . . . . . . . . . . . . . . . . . . . . . . . . 6 3 使用按钮. . . . . . . . . . . . . . . . . . . . . . . . . . . . . . . . . . . . . . . . . . . . . . . . . . . . . . . . . . . . . . . . . . . 7 4 入门. . . . . . . . . . . . . . . . . . . . . . . . . . . . . . . . . . . . . . . . . . . . . . . . . . . . . . . . . . . . . . . . . . . . . . . . 8 4.1 估计您的健身水平. . . . . . . . . . . . . . . . . . . . . . . . . . . . . . . . . . . . . . . . . . . . . 9 5 使用背光灯和按钮锁. . . . . . . . . . . . . . . . . . . . . . . . . . . . . . . . . . . . . . . . . . . . . . . . . . . . . 11 6 穿上心率传输带. . . . . . . . . . . . . . . . . . . . . . . . . . . . . . . . . . . . . . . . . . . . . . . . . . . . . . . . . . 12 7 开始锻炼. . . . . . . . . . . . . . . . . . . . . . . . . . . . . . . . . . . . . . . . . . . . . . . . . . . . . . . . . . . . . . . . . . 13 7.1 故障排查:无心率信号. . . . . . . . . . . . . . . . . . . . . . . . . . . . . . . . . . . . . . . 14 8 锻炼期间的操作. . . . . . . . . . . . . . . . . . . . . . . . . . . . . . . . . . . . . . . . . . . . . . . . . . . . . . . . . . 15 8.1 在指导锻炼期间的操作. . . . . . . . . . . . . . . . . . . . . . . . . . . . . . . . . . . . . . . 16 9 每周锻炼计划示例:从差到优秀. . . . . . . . . . . . . . . . . . . . . . . . . . . . . . . . . . . . . . . 18 10 锻炼之后. . . . . . . . . . . . . . . . . . . . . . . . . . . . . . . . . . . . . . . . . . . . . . . . . . . . . . . . . . . . . . . . . 19 10.1 提供心率信息的锻炼后操作. . . . . . . . . . . . . . . . . . . . . . . . . . . . . . . . 19 10.2 不提供心率信息的锻炼后操作. . . . . . . . . . . . . . . . . . . . . . . . . . . . . 20 10.3 恢复率. . . . . . . . . . . . . . . . . . . . . . . . . . . . . . . . . . . . . . . . . . . . . . . . . . . . . . . . 21 11 健身测试和休息心率测试. . . . . . . . . . . . . . . . . . . . . . . . . . . . . . . . . . . . . . . . . . . . . . 22 11.1 测试您的健身水平. . . . . . . . . . . . . . . . . . . . . . . . . . . . . . . . . . . . . . . . . . . 22 11.2 测试您的休息心率. . . . . . . . . . . . . . . . . . . . . . . . . . . . . . . . . . . . . . . . . . . 23 12 复查计划和历史. . . . . . . . . . . . . . . . . . . . . . . . . . . . . . . . . . . . . . . . . . . . . . . . . . . . . . . . 25 12.1 锻炼计划. . . . . . . . . . . . . . . . . . . . . . . . . . . . . . . . . . . . . . . . . . . . . . . . . . . . . . 26 12.2 历史和趋势. . . . . . . . . . . . . . . . . . . . . . . . . . . . . . . . . . . . . . . . . . . . . . . . . . . 26 12.3 上次锻炼. . . . . . . . . . . . . . . . . . . . . . . . . . . . . . . . . . . . . . . . . . . . . . . . . . . . . 27 13 调整设置. . . . . . . . . . . . . . . . . . . . . . . . . . . . . . . . . . . . . . . . . . . . . . . . . . . . . . . . . . . . . . . . . 28 时间和个人设置. . . . . . . . . . . . . . . . . . . . . . . . . . . . . . . . . . . . . . . . . . . . . . . . . . . 28 2
14 连接到网络. . . . . . . . . . . . . . . . . . . . . . . . . . . . . . . . . . . . . . . . . . . . . . . . . . . . . . . . . . . . . . 32 15 配对POD/心率传输带. . . . . . . . . . . . . . . . . . . . . . . . . . . . . . . . . . . . . . . . . . . . . . . . . 33 15.1 故障排查. . . . . . . . . . . . . . . . . . . . . . . . . . . . . . . . . . . . . . . . . . . . . . . . . . . . . . 34 16 保养和维护. . . . . . . . . . . . . . . . . . . . . . . . . . . . . . . . . . . . . . . . . . . . . . . . . . . . . . . . . . . . . . 35 16.1 更换电池. . . . . . . . . . . . . . . . . . . . . . . . . . . . . . . . . . . . . . . . . . . . . . . . . . . . . . 35 16.2 更换心率传输带电池. . . . . . . . . . . . . . . . . . . . . . . . . . . . . . . . . . . . . . . . 37 17 规格. . . . . . . . . . . . . . . . . . . . . . . . . . . . . . . . . . . . . . . . . . . . . . . . . . . . . . . . . . . . . . . . . . . . . . 38 17.1 技术规格. . . . . . . . . . . . . . . . . . . . . . . . . . . . . . . . . . . . . . . . . . . . . . . . . . . . . . 38 17.2 商标. . . . . . . . . . . . . . . . . . . . . . . . . . . . . . . . . . . . . . . . . . . . . . . . . . . . . . . . . . . 39 17.3 FCC 合规性. . . . . . . . . . . . . . . . . . . . . . . . . . . . . . . . . . . . . . . . . . . ห้องสมุดไป่ตู้ . . . . . . . 39 17.4 CE . . . . . . . . . . . . . . . . . . . . . . . . . . . . . . . . . . . . . . . . . . . . . . . . . . . . . . . . . . . . . 40 17.5 版权. . . . . . . . . . . . . . . . . . . . . . . . . . . . . . . . . . . . . . . . . . . . . . . . . . . . . . . . . . . 40 17.6 专利声明. . . . . . . . . . . . . . . . . . . . . . . . . . . . . . . . . . . . . . . . . . . . . . . . . . . . . 40 17.7 设备的处置. . . . . . . . . . . . . . . . . . . . . . . . . . . . . . . . . . . . . . . . . . . . . . . . . . . 40 18 担保. . . . . . . . . . . . . . . . . . . . . . . . . . . . . . . . . . . . . . . . . . . . . . . . . . . . . . . . . . . . . . . . . . . . . . 41 保修期限. . . . . . . . . . . . . . . . . . . . . . . . . . . . . . . . . . . . . . . . . . . . . . . . . . . . . . . . . . . 41 排除和限制. . . . . . . . . . . . . . . . . . . . . . . . . . . . . . . . . . . . . . . . . . . . . . . . . . . . . . . . 41 Suunto 保修服务获得途径. . . . . . . . . . . . . . . . . . . . . . . . . . . . . . . . . . . . . . . 42 责任限制. . . . . . . . . . . . . . . . . . . . . . . . . . . . . . . . . . . . . . . . . . . . . . . . . . . . . . . . . . . 42 3 zh
松拓 本源说明书
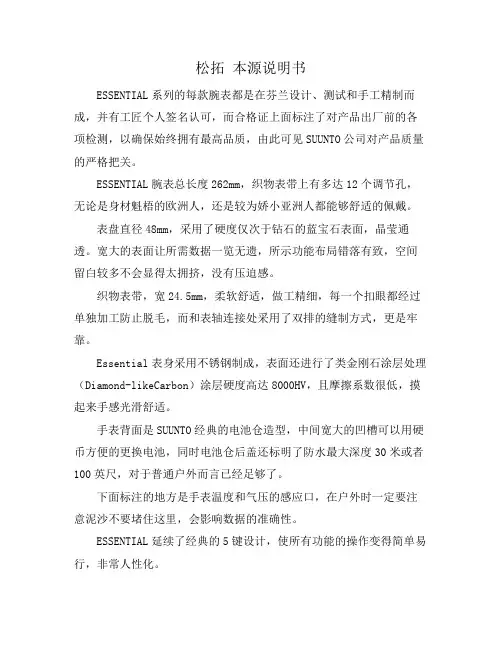
松拓本源说明书ESSENTIAL系列的每款腕表都是在芬兰设计、测试和手工精制而成,并有工匠个人签名认可,而合格证上面标注了对产品出厂前的各项检测,以确保始终拥有最高品质,由此可见SUUNTO公司对产品质量的严格把关。
ESSENTIAL腕表总长度262mm,织物表带上有多达12个调节孔,无论是身材魁梧的欧洲人,还是较为娇小亚洲人都能够舒适的佩戴。
表盘直径48mm,采用了硬度仅次于钻石的蓝宝石表面,晶莹通透。
宽大的表面让所需数据一览无遗,所示功能布局错落有致,空间留白较多不会显得太拥挤,没有压迫感。
织物表带,宽24.5mm,柔软舒适,做工精细,每一个扣眼都经过单独加工防止脱毛,而和表轴连接处采用了双排的缝制方式,更是牢靠。
Essential表身采用不锈钢制成,表面还进行了类金刚石涂层处理(Diamond-likeCarbon)涂层硬度高达8000HV,且摩擦系数很低,摸起来手感光滑舒适。
手表背面是SUUNTO经典的电池仓造型,中间宽大的凹槽可以用硬币方便的更换电池,同时电池仓后盖还标明了防水最大深度30米或者100英尺,对于普通户外而言已经足够了。
下面标注的地方是手表温度和气压的感应口,在户外时一定要注意泥沙不要堵住这里,会影响数据的准确性。
ESSENTIAL延续了经典的5键设计,使所有功能的操作变得简单易行,非常人性化。
按钮开关则采用了圆润的设计,和表盘融为一体,按下颇有压力感,应该是防水硅胶的阻力。
注意,ESSENTIAL的定位是户外探险腕表,而非专业潜水表,虽然能够达到30米的防水等级,但在潜水时还是不要按动按钮,会有进水的风险。
ESSENTIAL的功能非常强大,下面就简要逐一介绍下手表功能分为三大模块:“TIME”——时间“ALTI&BARO”——高度与气压“COMPASS”——指南针TIME——时间功能按手表右侧中间的MODE按钮,把手表调整到TIME模式,然后使用左侧下方VIEW切换功能视图TIME模式下,除中间显示实时时间以外,下方的显示区可以显示以下几种功能:1、日期2、秒针3、第二时区时间4、当地日出日落时间5、秒表(“StarStop”按钮开始、暂停,长按“+”按钮恢复)6、倒计时(“StarStop”按钮开始、暂停,长按“+”按钮恢复)ALTI&BARO——高度与气压模式按手表右侧中间的MODE按钮,把手表调整到“ALTI&BARO”模式,然后可以长按左侧下方VIEW切换功能视图在户外实际使用过程中你会发现本源的气压高度计非常的灵敏,当你爬山时,哪怕就是走过一小段坡度,高度计都会有变化。
Suunto松拓_t3d_T3C中文说明书

• distance • average speed • maximum speed • lap time • time
Note: Additional views available depending on paired devices.
1 简介 . . . . . . . . . . . . . . . . . . . . . . . . . . . . . . . . . . . . . . . . . . . . . . . . . . . . . . . . . . . . . . . . . . . . . . . . . . . . . . . . . . 5 2 入门 . . . . . . . . . . . . . . . . . . . . . . . . . . . . . . . . . . . . . . . . . . . . . . . . . . . . . . . . . . . . . . . . . . . . . . . . . . . . . . . . . . 6 2.1 基本设置 . . . . . . . . . . . . . . . . . . . . . . . . . . . . . . . . . . . . . . . . . . . . . . . . . . . . . . . . . . . . . . . . . 6 2.2 模式和视图 . . . . . . . . . . . . . . . . . . . . . . . . . . . . . . . . . . . . . . . . . . . . . . . . . . . . . . . . . . . . . . 8 2.3 菜单导航 . . . . . . . . . . . . . . . . . . . . . . . . . . . . . . . . . . . . . . . . . . . . . . . . . . . . . . . . . . . . . . . . . 9 3 定义主设置 . . . . . . . . . . . . . . . . . . . . . . . . . . . . . . . . . . . . . . . . . . . . . . . . . . . . . . . . . . . . . . . . . . . . . . . . . 11 3.1 常规设置 . . . . . . . . . . . . . . . . . . . . . . . . . . . . . . . . . . . . . . . . . . . . . . . . . . . . . . . . . . . . . . . . . 11 3.2 个人设置 . . . . . . . . . . . . . . . . . . . . . . . . . . . . . . . . . . . . . . . . . . . . . . . . . . . . . . . . . . . . . . . . 13 3.2.1 最大心率 . . . . . . . . . . . . . . . . . . . . . . . . . . . . . . . . . . . . . . . . . . . . . . . . . . . . . 14 4 使用 TRAINING 模式 . . . . . . . . . . . . . . . . . . . . . . . . . . . . . . . . . . . . . . . . . . . . . . . . . . . . . . . . . . . . . . 15 4.1 佩戴心率传输带 . . . . . . . . . . . . . . . . . . . . . . . . . . . . . . . . . . . . . . . . . . . . . . . . . . . . . . . . 15 4.2 开始训练课程 . . . . . . . . . . . . . . . . . . . . . . . . . . . . . . . . . . . . . . . . . . . . . . . . . . . . . . . . . . . 16 4.3 训练过程 . . . . . . . . . . . . . . . . . . . . . . . . . . . . . . . . . . . . . . . . . . . . . . . . . . . . . . . . . . . . . . . . 16 4.4 训练之后 . . . . . . . . . . . . . . . . . . . . . . . . . . . . . . . . . . . . . . . . . . . . . . . . . . . . . . . . . . . . . . . . 17 4.4.1 查看训练日志 . . . . . . . . . . . . . . . . . . . . . . . . . . . . . . . . . . . . . . . . . . . . . . . . 17 4.4.2 查看训练总量 . . . . . . . . . . . . . . . . . . . . . . . . . . . . . . . . . . . . . . . . . . . . . . . 18 4.5 测定训练强度 . . . . . . . . . . . . . . . . . . . . . . . . . . . . . . . . . . . . . . . . . . . . . . . . . . . . . . . . . . . 19 4.6 使用 Training Effect(训练效果) . . . . . . . . . . . . . . . . . . . . . . . . . . . . . . . . 21 4.7 使用心率限制和心率区域 . . . . . . . . . . . . . . . . . . . . . . . . . . . . . . . . . . . . . . . . . . . . . 24 4.7.1 心率限制 . . . . . . . . . . . . . . . . . . . . . . . . . . . . . . . . . . . . . . . . . . . . . . . . . . . . . 24 4.7.2 心率区域 . . . . . . . . . . . . . . . . . . . . . . . . . . . . . . . . . . . . . . . . . . . . . . . . . . . . . 26 2
canon eos m5中文使用手册说明书

基本指南進階指南相機的基本操作自動模式/混合自動拍攝模式其他拍攝模式播放模式無線功能設定選單配件附錄索引P 模式Tv 、Av 、M 、C1及C2模式用前須知基本指南進階指南相機的基本操作自動模式/混合自動拍攝模式其他拍攝模式播放模式無線功能設定選單配件附錄索引P 模式Tv 、Av 、M 、C1及C2模式用前須知基本指南進階指南相機的基本操作自動模式/混合自動拍攝模式其他拍攝模式播放模式無線功能設定選單配件附錄索引P 模式Tv 、Av 、M 、C1及C2模式用前須知基本指南進階指南相機的基本操作自動模式/混合自動拍攝模式其他拍攝模式播放模式無線功能設定選單配件附錄索引P 模式Tv 、Av 、M 、C1及C2模式用前須知2223232424262728293131 (33)34 (37) (37)37基本指南進階指南相機的基本操作自動模式/混合自動拍攝模式其他拍攝模式播放模式無線功能設定選單配件附錄索引P 模式Tv 、Av 、M 、C1及C2模式用前須知5353 (53)5556) (56)) (57)5858) (58)) (59)) (59)) (59)) (60)(以1分鐘的短片為例) (60)) (61)61 (62)63636464656566) (66)在混合自動拍攝模式下拍攝 .播放短片摘要靜止影像/短片靜止影像短片場景圖示 .螢幕上的方框 ......................................................................................常用的便捷功能 ...............................................................................42使用自拍 ..............................................................................................使用自拍功能以避免相機震動 .....................................................自訂自拍 .........................................................................................輕觸螢幕進行拍攝(輕觸式快門) .......................................................連續拍攝 ..............................................................................................影像自訂功能 ...................................................................................45變更影像畫質 ......................................................................................拍攝RAW 格式的影像 ....................................................................使用選單 .........................................................................................變更長寬比 ..........................................................................................變更短片影像畫質 ..............................................................................實用的拍攝功能 ...............................................................................48使用雙軸電子水平儀 ..........................................................................使用自動程度 ......................................................................................自訂相機操作 ...................................................................................49避免自動對焦輔助光發光 ..................................................................關閉防紅眼燈 ......................................................................................變更拍攝後影像的顯示時間 ..............................................................其他拍攝模式.....................................................................使用您喜愛的設定進行拍攝(創意輔助儲存/載入設定.儲存設定載入設定基本指南進階指南相機的基本操作自動模式/混合自動拍攝模式其他拍攝模式播放模式無線功能設定選單配件附錄索引P 模式Tv 、Av 、M 、C1及C2模式用前須知8181818182828283 (83)84 (84)85858686 (87)8889) (89) (91)929292 (93).............................93調整影像亮度(曝光補償關閉曝光模擬鎖定影像亮度/曝光(自動曝光鎖變更測光方法 .變更ISO 感光度調整自動ISO 設定 .自動包圍曝光(自動包圍曝光拍攝) ...................................................自動校正亮度及對比度(自動亮度優化) ...........................................拍攝明亮主體(高光色調優先) ...........................................................影像色彩 ...........................................................................................71調整白平衡 ..........................................................................................自訂白平衡 .....................................................................................手動校正白平衡 .............................................................................手動設定白平衡色溫 .....................................................................自訂色彩(相片風格) ...........................................................................自訂相片風格 .................................................................................儲存自訂相片風格 .........................................................................對焦 ...................................................................................................75選擇自動對焦方式 ..............................................................................單點自動對焦 .................................................................................+追蹤............................................................................................流暢區域自動對焦 .........................................................................選擇要對焦的主體(觸控自動對焦使用自動對焦鎖拍攝 ..........................................................................使用伺服自動對焦拍攝 ......................................................................變更對焦設定 ......................................................................................微調焦點 ..............................................................................................使用手動對焦模式拍攝 .輕鬆辨識對焦區域(手動對焦突出輪廓) .閃光燈 ...............................................................................................80變更閃燈模式 .自動 .................................................................................................基本指南進階指南相機的基本操作自動模式/混合自動拍攝模式其他拍攝模式播放模式無線功能設定選單配件附錄索引P 模式Tv 、Av 、M 、C1及C2模式107108108109109110110110111111111111112112113113114115115116117117119120120將功能指定給按鈕及轉盤將功能指定給速控轉盤自訂快速設定選單 .選擇要包含在選單中的項目重新排列選單項目儲存拍攝設定 ......................................................................................可儲存的設定 .................................................................................儲存常用拍攝選單項目(我的選單) ...................................................重新命名我的選單設定頁 .............................................................刪除我的選單設定頁 .....................................................................將我的選單設定頁或項目全部刪除 .............................................自訂我的選單設定頁顯示 .............................................................播放模式..........................................................................檢視 .................................................................................................100輕觸式螢幕操作 ................................................................................切換顯示模式 ....................................................................................自訂顯示的拍攝資訊 ...................................................................過度曝光警告(影像的光亮部份) .顯示自動對焦點 ...........................................................................顯示格線 .......................................................................................亮度直方圖 ...................................................................................RGB 直方圖 ...................................................................................拍攝靜止影像時檢視建立的短片按日期檢視 ...................................................................................瀏覽及篩選影像 .............................................................................104使用索引搜尋影像 .輕觸式螢幕操作輕觸兩下放大尋找符合特定條件的影像 .使用主轉盤在影像之間跳轉 .輕觸式螢幕操作基本指南進階指南相機的基本操作自動模式/混合自動拍攝模式其他拍攝模式播放模式無線功能設定選單配件附錄索引P 模式Tv 、Av 、M 、C1及C2模式141141142142142143發送的影像 ........................143 .............................144 ................................................144144144145146146147 ...................................................147148 ............................................................148 ....................................................149150150150151151152152152縮減檔案大小 .編輯短片摘要 .無線功能.可用的無線功能使用Wi-Fi 功能使用藍牙®功能 ..................................................................................將影像傳輸至智能手機 .................................................................124將影像傳輸至具備藍牙功能的智能手機 ........................................將影像傳輸至兼容NFC 的智能手機 ................................................相機處於拍攝模式時透過NFC 連接............................................相機處於播放模式時透過NFC 連接............................................透過Wi-Fi 選單連接至智能手機.......................................................使用其他存取點 ................................................................................確認存取點的兼容性 ...................................................................使用兼容WPS 的存取點 ...............................................................連接至列出的存取點 ...................................................................以前使用過的存取點 ...................................................................發送影像至註冊的網絡服務 .........................................................132註冊網絡服務 ....................................................................................註冊CANON iMAGE GATEWAY ...............................................註冊其他網絡服務 .......................................................................上傳影像至網絡服務 ........................................................................使用媒體播放器檢視影像 .............................................................136從連接的打印機無線打印影像 .....................................................137發送影像至其他相機影像發送選項發送多張影像 .逐張選擇影像選擇範圍發送評分的影像基本指南進階指南相機的基本操作自動模式/混合自動拍攝模式其他拍攝模式播放模式無線功能設定選單配件附錄索引P 模式Tv 、Av 、M 、C1及C2模式用前須知164164165166166166167167 (169169169)170171171171171172173174 ...........................................174175175175176176176 ...........................................................177 ...........................................177 .. (177)使用省電模式 .省電調整 .螢幕亮度 .切換螢幕資訊顏色 .世界時鐘 .日期及時間 .顯示的語言 ........................................................................................關閉相機聲音 ....................................................................................開啟相機聲音 ....................................................................................隱藏提示 ............................................................................................按圖示列出拍攝模式 ........................................................................調整輕觸式螢幕面板 ........................................................................清潔影像感應器 ................................................................................關閉自動清潔 ...............................................................................啟動清潔感應器 ...........................................................................手動清潔感應器 ...........................................................................查看認證標誌 ....................................................................................設定要記錄在影像中的版權資訊 ....................................................刪除全部版權資訊 .......................................................................調整其他設定 ....................................................................................回復相機的預設設定 ........................................................................回復相機的所有預設值 ...............................................................回復個別功能的預設值 ...............................................................配件 .................................................................................系統圖 .............................................................................................161另購配件 .. (162)鏡頭 ....................................................................................................電源 ....................................................................................................閃光燈 ................................................................................................麥克風 ................................................................................................其他配件 ............................................................................................打印機 ................................................................................................基本指南進階指南相機的基本操作自動模式/混合自動拍攝模式其他拍攝模式播放模式無線功能設定選單配件附錄索引P 模式Tv 、Av 、M 、C1及C2模式用前須知清除打印清單的所有影像將影像加入相簿 .指定選擇的方法逐張加入影像將所有影像加入相簿移除相簿的所有影像附錄 .................................................................................疑難排解 .........................................................................................179螢幕提示 .........................................................................................183螢幕資訊 .. (185)拍攝時 ................................................................................................電量 ...............................................................................................播放時 ................................................................................................資訊顯示1 .....................................................................................資訊顯示2 .....................................................................................資訊顯示3 .....................................................................................資訊顯示4 .....................................................................................資訊顯示5 .....................................................................................資訊顯示6 .....................................................................................資訊顯示7 .....................................................................................資訊顯示8 .....................................................................................短片控制介面的總覽 ...................................................................功能及選單表 (188)各拍攝模式下的可用功能 ................................................................快速設定選單 ....................................................................................拍攝設定頁 .C.Fn 設定頁INFO.速控.設定設定頁 .我的選單設定頁 .播放設定頁 .播放模式下的快速設定選單 .206206206206206207207207207208209209210210210210210210211)的注意事項 ...............................214214214215 . (215215215)基本指南進階指南相機的基本操作自動模式/混合自動拍攝模式其他拍攝模式播放模式無線功能設定選單配件附錄索引P 模式Tv 、Av 、M 、C1及C2模式用前須知基本指南進階指南相機的基本操作自動模式/混合自動拍攝模式其他拍攝模式播放模式無線功能設定選單配件附錄索引P 模式Tv 、Av 、M 、C1及C2模式用前須知基本指南進階指南相機的基本操作自動模式/混合自動拍攝模式其他拍攝模式播放模式無線功能設定選單配件附錄索引P 模式Tv 、Av 、M 、C1及C2模式用前須知用前須知基本指南進階指南相機的基本操作自動模式/混合自動拍攝模式其他拍攝模式播放模式無線功能設定選單配件附錄索引P 模式Tv 、Av 、M 、C1及C2模式用前須知基本指南進階指南相機的基本操作自動模式/混合自動拍攝模式其他拍攝模式播放模式無線功能設定選單配件附錄索引P 模式Tv 、Av 、M 、C1及C2模式用前須知基本指南進階指南相機的基本操作自動模式/混合自動拍攝模式其他拍攝模式播放模式無線功能設定選單配件附錄索引P 模式Tv 、Av 、M 、C1及C2模式用前須知基本指南進階指南相機的基本操作自動模式/混合自動拍攝模式其他拍攝模式播放模式無線功能設定選單配件附錄索引P 模式Tv 、Av 、M 、C1及C2模式用前須知基本指南進階指南相機的基本操作自動模式/混合自動拍攝模式其他拍攝模式播放模式無線功能設定選單配件附錄索引P 模式Tv 、Av 、M 、C1及C2模式用前須知基本指南進階指南相機的基本操作自動模式/混合自動拍攝模式其他拍攝模式播放模式無線功能設定選單配件附錄索引P 模式Tv 、Av 、M 、C1及C2模式用前須知基本指南進階指南相機的基本操作自動模式/混合自動拍攝模式其他拍攝模式播放模式無線功能設定選單配件附錄索引P 模式Tv 、Av 、M 、C1及C2模式用前須知基本指南進階指南相機的基本操作自動模式/混合自動拍攝模式其他拍攝模式播放模式無線功能設定選單配件附錄索引P 模式Tv 、Av 、M 、C1及C2模式用前須知基本指南進階指南相機的基本操作自動模式/混合自動拍攝模式其他拍攝模式播放模式無線功能設定選單配件附錄索引P 模式Tv 、Av 、M 、C1及C2模式用前須知基本指南進階指南相機的基本操作自動模式/混合自動拍攝模式其他拍攝模式播放模式無線功能設定選單配件附錄索引P 模式Tv 、Av 、M 、C1及C2模式升起閃光燈],請按下起閃光燈。
Suunto D5 - 产品说明书
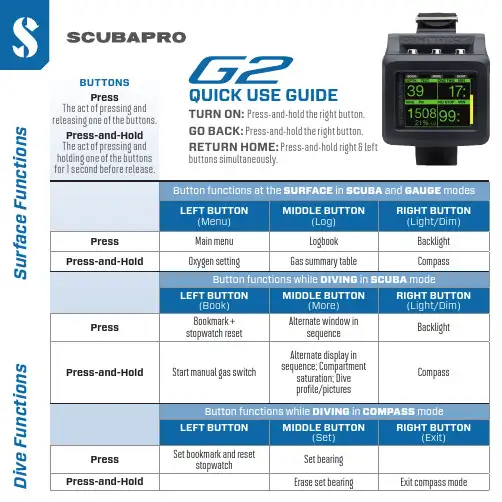
Press-and-hold right & leftDive settings ›Digital compass ›Altimeter ›Warning settings ›Clock settings › Other settings ›Personalization › Pictures › Dive planner › Bluetooth › Logbook ›02 settings › Main MenuP /N 06.205.360SELECT FROM FOUR DIVE SCREEN OPTIONS — Light, Classic, Full, Graphical (Go to Personalization > Screen configuration)You can also rotate the screen to have the buttons positioned at the bottom of the screen.WARNING!When your G2’s battery reaches the end of its lifetime, it can only be replaced by an authorized SCUBAPRO service center. Do not open your G2 or try to replace the battery yourself!Opening the G2 housing or the metal cap on the side of the G2 will VOID YOUR WARRANTY.Changing the battery must be done with particular care in order to prevent water from seeping in.The G2’s warranty does not cover damages due to the improper placementof the battery, or the incorrect closing of the battery ca p.LIGHT SCREENS IN FOUR DIFFERENT COLOR OPTIONSCLASSIC FULL GRAPHICALCHECK YOUR BATTERY❚ Your G2 is powered by a rechargeable Li-Ion battery.❚ Always check the battery capacity before each dive.❚ If the battery warning appears, charge the battery.PAIRING YOUR TRANSMITTERMETHOD 1 AUTOMATIC❚ Mount 1ST stage with transmitter attached on a full tank.❚ T urn on your G2, make sure it is displaying the Time-of-Day screen, then place it near the transmitter (as shown on right) and open the tank valve.METHOD 2 MANUAL❚ Mount 1ST stage with transmitter attached on a full tank.❚ Turn on your G2.❚ F rom the Time-of-Day display, press left button to get to Main Menu .❚ Scroll to Other Settings .❚ Press right button to ENTER.❚ From Other Settings menu, scroll down Gas Integration .❚ Press right button to ENTER.❚ From Gas Integration menu, scroll to Pairing .❚ Press the right button to ENTER.❚ Open the tank valve, and you are ready to pair.❚ U sing either method, once pressurized the transmitter will send apairing sequence to your G2.❚ W hen it receives this information, the display will show a list of tankdesignations.❚S croll to Tank T1. (Tank T1 is always the main tank you start your dive with.)❚ Press right button to SAVE your selection.❚ Your G2 will confirm pairing with message: PAIRING TO T1 SUCCESSFUL. ❚ A t that point, tank pressure will appear on your G2 display, and you’re ready.HOW TO POSITION AND USE THE HEART RATE MONITOR ❚ Position your HR belt (as shown on right).❚ A djust the strap so that it is comfortable to wear but snug enough so that it stays in place.❚ HR belt must be worn directly against the skin.❚ Moisten the electrode areas if your skin is dry or when diving in a drysuit. ❚ The maximum operating depth for the HR belt is 197ft/60m.TO ACTIVATE THE HEART RATE FUNCTION ON YOUR G2❚ Time-of-Day screen to Main Menu – press Enter.❚ Main Menu to Personalization – press Enter.❚ Scroll to Workload (WL) – press Enter.❚ Select Heart Rate - press right arrow to Save.❚ Advance to Max Heart Rate – set MHR - press right arrow to Save.❚ Advance to Base Heart Rate – set BHR - press right arrow to Save.❚ Advance to Skin Temp – set to On - press right arrow to Save. ❚ Heart Rate & Skin Temperature functions are now activated.P /N 06.205.407。
颂拓山雄中文说明完整版

zh SUUNTO ELEMENTUM TERRA用户指南A B CTIMESETTINGS MEMORY COMPASSDATEALTITUDE RECORDING CALIBRATIONzh功能:_时间、日期、闹铃_背光灯_高度计_气压趋势_3D 指南针_计时器_累计上升/下降_日志:最近 8 次上升/下降,最大高度zh1.2.3.zh 测量上升/下降的累积高度1. 在高度模式下,按 [A] 开始测量。
2. 旋转 [A] 在上升和下降之间切换。
3. 按 [A] 停止测量。
4. 按住 [C] 重置测量。
按钮锁定同时按下 [A] 和 [B] 可激活/打开按钮锁。
memOrY (记录)1. 在 time (时间) 模式下,向下旋转 [A] 进入 memOrY (记录)。
2. 向上/向下旋转 [A] 浏览日志。
3. 按 [A] 在日志的第一和第二个视图之间切换。
4. 按 [B] 或 [C] 退出。
背光灯按住 [B] 激活背光灯。
注意:为了节电,背光灯在 COmPASS (指南针)模式下使用时将闪烁。
指南针校准zh1入门 (4)1.1更改常规设置 (4)1.2使用闹铃 (5)1.3使用按钮锁定 (6)1.4激活背光灯 (6)2使用Suunto Elementum Terra (8)2.1Time(时间)模式 (8)2.1.1使用秒表 (8)2.2Altitude Recording(高度记录)模式 (9)2.2.1记录高度 (10)2.2.2设置参考高度 (10)2.2.3测量上升/下降的累积高度 (11)2.2.4查看高度日志 (11)2.3Compass(指南针)视图 (12)2.3.1校准指南针 (13)3测量天气 (15)3.1气压趋势箭头 (15)3.2预测天气变化 (16)3.3在测量高度和天气变化之间自动切换 (16)3.4高度恒定 (17)3.5高度变化 (18)4保养和维护 (20)4.1电池更换 (20)5规格 (21)5.1技术规格 (21)25.2商标 (22)5.3版权所有 (22)5.4专利声明 (22)5.5仪器的报废处理 (22)6担保 (23)担保期限 (23)排除和限制 (24)Suunto担保服务获得途径 (25)其它重要告知事项 (25)责任限制 (26)31入门Suunto Elementum Terra有两种模式:TIME(时间)模式和ALTITUDE RECORDING(高度记录)模式。
Ubiquiti NanoStation M5用户手册说明书

M5 Corpus 高性能电动悬架车说明书
TAKE THE HIGH ROAD.ADDED STABILITY WITH UNIQUESUSPENSION GEOMETRY ANDLINEAR SPRING DESIGNFLEXLINK PRO™ SUSPENSION FORADVANCED VIBRATION REDUCTION &INDEPENDENT DRIVE WHEEL SUSPENSIONYOU'RE CLEARED FOR TAKE OFFIn the tradition of high-perf ormance motors andgearboxes, the M5 takes control with a 7.5 mphmotor package and superior torque. Coupled witha 14" seat elevator that maintains full suspension atany seating position and drive speed, piloting the M5Corpus will help you take adventure to a new level.3.2MPH @ 14"OF ELEVATION +FULL SUSPENSIONAT ANY SPEED,POSITION, ORELEVATIONREACH FOR MORE |14” OF ELEVATION +20º FORWARD TILT = ULTIMATE ACCESSIBILITY.The M5 Corpus™ is unlike anything you have ever experienced. Our unique suspension geometry provides increased stability even in 14” of seat elevation. The FlexLink Pro™ suspension combines the advanced vibration suppression of FlexLink™ with independent drive wheel suspension, giving you the power to traverse all of life's obstacles while maintaining your desired seating position.Your world isn't one dimensional. Your seat elevator shouldn't be either. ActiveReach™ technology is the ultimate advantage in accessing your environment. By combining 14” of seat elevation and up to 20º of forward tilt, Permobil’s ActiveReach™ technology enables you to reach beyond obstructions, into high cabinets, and can even assist in transfers. Truly putting your world within reach.|DRIVE LIKE A PROGalacticGreen PowerPink Midnight Black PhantomGrey。
M5高清移动电源摄像机操作(中文)使用说明书
M5高清1080P移动电源摄像机使用说明书首先对您使用本公司的产品表示感谢!在使用之前请先阅读此说明书,正确使用此产品。
为了更好的服务,本用户手册的内容可能变更。
因为产品的性能和功能而发生的变更,将不做另行通知。
本产品是首款配置数字电量显示屏移动电源摄像机。
产品开机即可进入摄像,关机即可保存视频文件,数字屏显示电池电量。
本产品操作简便,美观实用,便于携带,是家庭安防、教育、生活等领域必备的实用工具,深受各用户的青睐。
产品结构示意图:注意事项:1.夜视灯起到暗光情况下辅助作用,夜视模式根据灯光光线情况灯光光线越好效果越好。
(因一颗夜视灯,产品设计PCB板空间有限,夜视只起到一定的辅助作用)2.如出现死机,操作无任何反应,请用尖小硬物投RESET复位孔的按键,机器即可复位。
3.使用之前,请确保安装好TF内存卡,内存卡建议用TFC10高速内存卡。
4.在关机状态下,数据线连接电脑,会弹出可移动磁盘。
如果连接电脑失败,请确保数据线是否有问题,请确保TF内存卡是否高速卡。
如不行,可取出内存卡,用读卡器连接电脑读取文件。
5.由于电池容量较大,设备电池充电速度较慢,属于正常现象。
6.设备镜头带夜视红外滤光片,拍摄时,部分有机物体会轻微偏红紫,属于正常现象。
使用方法:1.一键摄像:长按开关机键约2秒钟,红蓝灯同时亮起,红灯闪烁3下灭掉,此时代表进入摄像。
停止摄像,长按开关机键约2秒钟,蓝灯闪烁3下,代表停止摄像并且关机。
2.夜视灯开启/关闭:在摄像状态下,短按开关机键一下约半秒钟,红蓝灯同时闪烁2下,代表夜视已开启。
关闭夜视灯,再短按开关机键一下约半秒钟,红蓝灯同时闪烁4下,代表关闭夜视灯。
3.全天自动循环模式:数据线每次连接电脑,在可移动磁盘里,找到:时间文档,打开如下:2016.06.13 11:21:00 A1打开后 2016.06.13 11:21:00 A1最后面A1可以改成所需要的模式,具体更改如下:A1,A2,A3,是全天自动循环自动循环录像模式改为A1然后点击保存(拍摄视频分辨率1920*1080P)改为A2然后点击保存(拍摄视频分辨率1280*720P)改为A3然后点击保存(拍摄视频分辨率640*360P)注明:调节分辨率,视频画面缩小,像素不变4.移动侦测模式:数据线每次连接电脑,在可移动磁盘里,找到:时间文档,打开如下:2016.06.13 11:21:00 A1打开后 2016.06.13 11:21:00 A1最后面A1可以改成所需要的模式,具体更改如下:B1,B2,B3,是移动侦测录像模式改为B1然后点击保存(拍摄视频分辨率1920*1080P)改为B2然后点击保存(拍摄视频分辨率1280*720P)改为B3然后点击保存(拍摄视频分辨率640*360P)注明:调节分辨率,视频画面缩小,像素不变5.移动侦测操作提示:在移动侦测模式下,长按开机键约2秒钟,红蓝灯同时闪烁6下灭掉,此时进入移动侦测待机模式,当前面(约3米内)有物体晃动,红蓝灯闪烁一下,开始摄像,没有物体晃动,3分钟后自动停止拍摄,当前面有物体晃动,自动启动再次拍摄。
运动手表品牌SUUNTO斯巴达系列产品说明书
SUUNTO SPARTAN ULTRA 1.1用户指南1 安全 (4)2 快速入门 (6)2.1 触摸屏和按钮 (7)2.2 显示屏 (8)2.3 调整设置 (10)3 功能 (12)3.1 活动监测 (12)3.2 飞行模式 (13)3.3 高度计 (13)3.3.1 FusedAlti (13)3.4 背光灯 (14)3.5 按钮和屏幕锁定 (14)3.6 指南针 (15)3.6.1 校准指南针 (15)3.6.2 设置磁偏角 (16)3.7 设备信息 (16)3.8 FusedSpeed (16)3.9 GPS 精度和节电 (18)3.10 心率传感器 (20)3.11 语言和单位制 (20)3.12 日志 (20)3.13 Movescount (22)3.13.1 SuuntoLink (22)3.13.2 Suunto Movescount App 应用程序 (22)3.14 通知 (23)3.15 配对 POD 和心率传感器 (23)3.16 记录锻炼 (25)3.17 恢复时间 (27)23.18 路线 (28)3.19 软件更新 (29)3.20 运动模式 (29)3.20.1 游泳 (30)3.21 秒表 (31)3.22 时间和日期 (32)3.23 音调和振动 (32)3.24 训练洞察 (33)3.25 表盘 (33)4 保养与支持 (35)4.1 操作指南 (35)4.2 电池 (35)4.3 废弃处置 (36)5 参考资料 (37)5.1 技术规格 (37)5.2 合规性 (38)5.2.1 CE (38)5.2.2 FCC 合规性 (38)5.2.3 IC (39)5.2.4 NOM-121-SCT1-2009 (39)5.3 商标 (39)5.4 专利公告 (39)5.5 国际有限保修 (40)5.6 版权所有 (41)34警告 仅用于娱乐目的。
切勿完全依赖产品的 GPS 或电池续航时间。