
在虚拟机Linux中安装weblogic
一、下载weblogic for linux ,版本很多,我下的是bin版本,这个版本的安装非常简单。
我下载的是:[WebLogic.Platform.8.1.with.SP5.for.Linux英文版].platform815_linux32.bin
二、想办法弄到虚拟机里的linux中。
我实在windows下面下载的,然后通过SSH上传到虚拟机里的,当然方法很多,在虚拟机里上网也是可以下载的。
三、以root用户身份linux,建立bea组,和weblogic用户。
groupadd bea
useradd -g bea weblogic
四、给上传到linux中的文件赋予执行的权限。
mv [WebLogic.Platform.8.1.with.SP5.for.Linux英文
版].platform815_linux32.bin weblogic81_linux32.bin
chmod 777 weblogic81_linux32.bin
五、切换到weblogic用户,执行安装。
su weblogic
./weblogic81_linux32.bin
六、按照系统给出的提示完成安装。
这个过程我是什么都没有改,按照默认的即可。
七、如果默认安装的话,会在/home/weblogic 下生成下面的路径:
/home/weblogic/bea
八、开始配置domain。
cd /home/weblogic/bea/weblogic81/common/bin
./config.sh
九、domain配置完成之后,会在/home/weblogic/bea/下面生成
user_projects/domains目录,进入domains目录,找到自己配制的域名,进入。
这
里以mydomain为例,运行 startWeblogic.sh
cd mydomain
./startWeblogic.sh
十、登陆控制台:http://localhost:7001/console,部署一个简单的WEB应用程序,看能否访问,正常的情况下是没问题的。
weblogic12C集群安装配置

weblogic12C集群安装配置1环境准备weblogic12.1.3.0对于jdk及linux操作系统版本的要求在oracle官⽹上⾯有详细的介绍。
1.1安装jdkWeblogic12C 选择JDK1.8.0_211版本,上传介质jdk-8u211-linux-x64.tar.gz 到指定⽬录。
#tar -zxvf jdk-8u211-linux-x64.tar.gz#Vi /etc/profileexport JAVA_HOME=/opt/jdk1.8.0_211export PATH=/usr/local/sbin:/usr/local/bin:/sbin:/bin:/usr/sbin:/usr/bin:/root/bin:/usr/local/mysql/bin:/opt/jdk1.8.0_211/bin export CLASSPATH=.:$JAVA_HOME/lib/dt.jar:$JAVA_HOME/lib/tools.jarsource /etc/profile #配置⽣效[root@hdp-02 opt]# java -versionjava version "1.8.0_211"Java(TM) SE Runtime Environment (build 1.8.0_211-b12)Java HotSpot(TM) 64-Bit Server VM (build 25.211-b12, mixed mode)2安装Weblogic12C2.1执⾏安装命令# chown weblogic:bea fmw_12.1.3.0.0_infrastructure.jar$ su – weblogic$ cd /opt/$ export DISPLAY=192.168.56.1:0.0$ java -jar fmw_12.1.3.0.0_infrastructure.jar2.2选择产品⽬录⼀步步下,截图不描叙执⾏./config.sh截图省略,启动管理Admin[weblogic@hdp-01 bin]$ ./startWebLogic.sh启动Server1被管理服务异机上Server2被管理服务的配置异机上不需要重新安装weblogic软件介质和建域,只需要把admin上weblogic 安装⽬录复制过去就⾏。
Linux下安装部署Weblogic12c

Linux下安装部署Weblogic12c目录一、安装 (3)1.1下载 (3)1.2上传 (3)1.3安装JDK (3)1.4创建安装目录 (3)1.5创建用户并设置密码 (4)1.6修改配置文件 (4)1.7创建初始化目录 (6)1.8创建初始化文件 (7)1.9创建响应文件 (7)1.10安装weblogic (8)1.11创建一个domain (9)1.12打补丁(可选) (11)1.13优化 (12)1.14启动weblogic (14)1.15停止weblogic (14)1.16设置无需用户名密码启动weblogic (14)二、一个域多个SERVER (15)三、多个域 (22)四、部署项目方式优缺点 (22)五、部署项目 (23)5.1控制台部署 (23)5.2 autodeploy自动部署 (28)5.3 confing.xml配置文件部署 (29)六、删除已部署项目 (30)6.1控制台部署删除方法 (30)6.2 autodeploy自动部署删除方法 (33)6.3 config.xml配置文件部署删除方法 (34)七、WEBLOGIC开发模式、生产模式区别及相互转换方法 (34)八、WEBLOGIC12C集群环境搭建 (34)一、安装1.1下载(1)通过百度下载即可,下载之后为fmw_12.1.3.0.0_wls.jar或压缩包解压后为xxx.jar。
(2)下载jdk7,本例版本为jdk7u79linuxx64.tar.gz(实际版本请根据现场情况下载)1.2上传将下载后的jar包和jdk直接上传至linux系统的任意目录,本例为”/”1.3安装JDK以root用户执行:(1)压缩包复制到/usr/local/(2)解压cd /usr/local/tar -xvf jdk7u79linuxx64.tar.gz(3)配置路径vi /etc/profile注:在文件最后加上export JAVA_HOME=/usr/local/jdk1.7.0_79export JRE_HOME=$JAVA_HOME/jreexport PATH=$JAVA_HOME/bin:$PATHexport CLASSPATH=./:JAVA_HOME/lib:$JRE_HOME/lib1.4创建安装目录以root用户执行:创建安装目录并赋权(目录名自定义):mkdir /aitchmod 777 /ait1.5创建用户并设置密码以root用户执行:创建管理用户并设置密码(密码自定义,这里使用weblogic):useradd weblogicpasswd weblogic输入新密码并确认1.6修改配置文件(1)在root用户下,修改/etc/hosts在/etc/hosts中添加本机IP和主机名vi /etc/hosts(2)不限制core文件的大小在weblogic用户下:su - weblogicvi .bash_profile添加并保存:umask 002ulimit -c unlimited(2)添加java变量在weblogic用户下,添加上面安装的JDK路径:su - weblogicvi .bash_profile添加并保存:export JAVA_HOME=/usr/local/jdk1.7.0_79export JRE_HOME=$JAVA_HOME/jreexport PATH=$JAVA_HOME/bin:$PATHexport CLASSPATH=./:JAVA_HOME/lib:$JRE_HOME/lib(4)加载文件source .bash_profile1.7创建初始化目录以刚才创建的weblogic用户执行:su - weblogicmkdir /ait/oraInventorymkdir /ait/installmkdir /ait/weblogiccp /fmw_12.1.3.0.0_wls.jar /ait/install 注:注意weblogic安装包存放的位置1.8创建初始化文件以weblogic用户执行:su - weblogiccd /ait/installvi /ait/install/oraInst.loc添加:inventory_loc=/ait/oraInventory#产品清单目录;注意不能放在 weblogic安装目录下,要保证安装目录为空inst_group=weblogic#用户的组名称,根据实际的修改,注意用什么用户安装weblogic这里就写什么用户名,我用的是weblogic用户安的1.9创建响应文件以weblogic用户执行:su - weblogiccd /ait/installvi /ait/install/wls.rsp添加并保存:[ENGINE]#DO NOT CHANGE THISResponse File Version=1.0.0.0.0[GENERIC]#weblogic的安装路径ORACLE_HOME=/ait/weblogicINSTALL_TYPE=WebLogic ServerDECLINE_SECURITY_UPDATES=trueSECURITY_UPDATES_VIA_MYORACLESUPPORT=false1.10安装weblogic以weblogic用户执行:su - weblogiccd /ait/installjava -jar fmw_12.1.3.0.0_wls.jar -silent -responseFile /ait/install/wls.rsp-invPtrLoc /ait/install/oraInst.loc注:初始化文件和响应文件一定要是全路径(自定义的)。
OracleLinux6.3下的Weblogic12C安装步骤
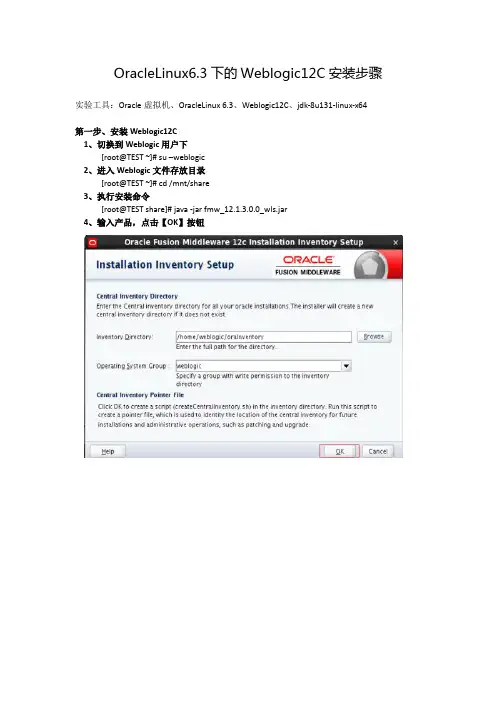
OracleLinux6.3下的Weblogic12C安装步骤实验工具:Oracle虚拟机、OracleLinux 6.3、Weblogic12C、jdk-8u131-linux-x64第一步、安装Weblogic12C1、切换到Weblogic用户下[root@TEST ~]# su –weblogic2、进入Weblogic文件存放目录[root@TEST ~]# cd /mnt/share3、执行安装命令[root@TEST share]# java -jar fmw_12.1.3.0.0_wls.jar4、输入产品,点击【OK】按钮5、显示欢迎界面,点击【NEXT】按钮6、输入安装路径,点击【NEXT】按钮7、选择安装类型“WebLogic Server”,点击【NEXT】按钮8、检查系统环境,点击【NEXT】按钮9、安全升级,去掉“勾选”,点击【NEXT】按钮10、弹出如下界面,点击【YES】按钮11、安装信息汇总,点击【INSTALL】按钮12、安装进程,显示100%后,点击【NEXT】按钮13、安装完成,点击【NEXT】按钮第二步、配置Domain1、WebLogic安装完毕后,系统自动弹出Create Domain界面,点击【NEXT】按钮2、使用模板创建域,点击【NEXT】按钮3、输入weblogic用户密码,点击【NEXT】按钮4、选择域模式,点击【NEXT】按钮5、高级配置,点击【NEXT】按钮6、管理服务器配置,配置服务名和端口,点击【NEXT】按钮7、配置信息汇总,点击【CREATE】按钮8、配置进程界面,点击【NEXT】按钮9、配置成功界面,点击【FINISH】按钮第三步、修改hosts文件,否则无法启动Domain1、切换到root用户登录su – root2、编辑/etc/hosts文件,在最后添加127.0.0.1 TEST /*TEST为主机名*/第九步、启动服务时无需输入用户名和密码1、进入Domain目录cd /home/weblogic/Oracle/Middleware/Oracle_Home/user_projects/domains/base_domain/servers/CZJM2、在目录内创建security文件夹mkdir security3、进入security文件夹,并新建boot.properties文件cd securitytouch boot.properties4、用vi编辑boot.properties,输入以下信息username=weblogicpassword=weblogic@1235、保存后,并重启weblogic,此时你发现再也不会提示输入密码,且新建的boot.properties文件里的用户名和密码也加密了第十步、启动Domain1、进入Domain目录cd /home/weblogic/Oracle/Middleware/Oracle_Home/user_projects/domains/base_domain2、执行启动脚本(注需手动输入用户名和密码)./startWebLogic.sh3、另外一种启动方式nohup ./startWebLogic.sh >nohup.out&(该命令可以在你退出帐户/关闭终端之后继续运行相应的进程。
linux系统weblogic12c安装
linux系统weblogic12c安装Weblogic12c安装⽂档环境准备:这⾥请⾃⼰去下载就不多做说明版本12.1.3.0.01.安装包下载和环境准备mkdir -p /u01/weblogicgroupadd weblogicuseradd -g weblogic -d /u01/weblogic weblogicchown -R weblogic:weblogic /u012.创建⽤户1)创建管理⽤户weblogic ,并添加密码(root)useradd weblogicpassword weblogic2)weblogic⾃定义配置(weblogic)~/.bash_profile,umask 002ulimit -c unlimited#(不限制core⽂件的⼤⼩)cd <domain路径 >3.安装jdk1) 安装jdk1.8.0_172 (root)tar -zxvf jdk-8u172-linux-x64.tar.gz -C /usr/local/java -version //查看jdk版本2)配置java环境变量:(weblogic )vi ~/.bash_profileexport PATHexport JAVA_HOME=/usr/local/jdk1.8.0_172export JRE_HOME=/usr/java/jdk1.8.0_172/jreexport CLASSPATH=.:$JAVA_HOME/lib/dt.jar:$JAVA_HOME/lib/tools.jar:$JRE_HOME/libexport PATH=$JAVA_HOME/bin:$PATH重新加载source .bash_profile4.安装weblogic12c(weblogic)1)创建初始化⽂件mkdir /u01/oraInventorymkdir /u01/installmkdir /u01/weblogic把weblogic的安装包放在 /u01/install⾥,解压出来的包名是fmw_12.1.3.0.0_wls.jarcd /u01/installvi /u01/install/oraInst.locinventory_loc=/u01/oraInventory#产品清单⽬录;注意不能放在 weblogic安装⽬录下,要保证安装⽬录为空inst_group=weblogic#⽤户的组名称,根据实际的修改,注意⽤什么⽤户安装weblogic这⾥就写什么⽤户名,我⽤的是weblogic⽤户安的。
linux下配置weblogic集群

J DK采用SunJ DKl 50_140集群包括—个管理服务器,三个受管服务Pl eas eent er t heabs ol ut epat ht ot hel ocat i onof domai nt em一
器,代理采用硬件负载均衡器。pl at e .
网络环境:集群中的所有Ser ve r 必须位于同一网段,并且必须是
Li nux下 配 置 We bl ogi c 集 群
李菲菲邢朝 辉许文杰
( 山东交通学院,山东济南250023)
i。
拍1
·
。“ ‘一… ?
、
。
?’。≈.、
i ,( }商要] 本文讲谜如何在WebLogi cSer ve r92上配置集群,可以参照这个文档进行硒ux下webl ogi c 群集的配置,群集启动和节点启动,4 7
控受管服务器以及部署应用程序到被管理服务器上。—个域中有且只有这时,选择1创I- - ' P新的域:
一台管理服务器,管理服务器和域是一对一的。受管服务器:受管服务
3) 经过第2步,屏幕显示的关键内容如下:
器是用来部署运行各种应用程序的。一个域中有一台或多台受管服务
Sel e c t t he sour ce f r omwhi c ht he doma i nwi l l be cr ea t e d.
。Tar ge t Loc a t i on。=[ Ent er Rew va l ue or use def a ult 。
l P广播 (UDP) 可到达的: 集群中的所有 Se rve r强须 使用相同的 版本
/ho me/be a/webl ogi c92/ commo n/
包括Ser vi cePack;集群中的Ser ver必须使用永久的静态IP地址,如t empl at es /domai ns /wl s j ar " l
weblogic安装部署
Weblogic安装部署一、首先上官网下载Weblogic的window x86版本和Linux x86(32bit)版本,地址:/technetwork/middleware/weblogic/downloads/index.html选择AcceptLicense Agreement,点击你要下载的版本就可以下载,下载需要用户登录:用户名:justinhits@密码:1nf0h)W1下载后:linux版本:oepe111130_wls1032_linux32.binWindow版本:wls1032_win32.exe二、安装只要运行安装程序,跟着向导一步一步进行就可以啦。
(windows双击安装程序、linux命令(cd安装程序所在目录然后./oepe111130_wls1032_linux32.bin))注意2点1.记录下自己填写的配置管理用户名和密码。
2.新建域的位置。
(我放在F:\bea\user_projects\domains\mydomain)三、部署应用项目(部分摘自/p-36051142.html):自动布署、命令行布署(可与Ant结合)、控制台(console)布署。
下面简要说明三种布署方式。
1.启动weblogic,浏览器地址http://127.0.0.1:7001/console,输入你安装的时候记录的配置管理用户名和密码,点击登录。
2进入控制台界面:3点击部署进入部署界面:3点击安装按钮进入安装界面,进行安装:选择你要安装项目的根目录,点击下一步。
输入你项目部署的名称,访问位置,点击完成。
4设置项目的上下文根:需要在在你的web应用的WEB-INF文件中创建一个文件(weblogic.xml),内容如下<?xml version="1.0"encoding="UTF-8"?><weblogic-web-app><context-root>/struts2</context-root></weblogic-web-app>5当项目使用到外部的jar包的设置1当直接用windows下的welbogic.cmd或者linux下的weblogic.sh 直接启动,就需要在\bea\user_projects\domains\mydomain\bin下找到这2个命令,用文本编辑器打开,修改set SAVE_CLASSPATH=加入你需要jar包的地址:如E:\workspace\car_java\WebRoot\WEB-INF\lib\antlr-2.7.6.jar ;E:\workspace\car_java\WebRoot\WEB-INF\lib\sapjco.jar;%CL ASSPATH%如果是用myeclipse启动weblogic,也需要加入:然后重新启动weblogic,通过http://127.0.0.1:7001/struts2访问项目起始页:通过点击后台action调用正常。
Linux中安装weblogic10和JDK5及配置环境变量
Linux中安装weblogic10和JDK5及配置环境变量Linux中安装weblogic10和JDK5及配置环境变量好久没发技术贴了,因为最近也没学到啥,荒废了快,现在学了点东西,赶紧记上,不然真白学了,我特别不相信我的脑袋,过两天肯定忘的一干二净,这是非常肯定的,对此我也在调查原因!这两天装了Linux的Fedora 5版本来进行weblogic10的测试,以前没使过,装完又是日文系统,真是啥也看不懂,装linux的时候倒是容易,跟windows差不多,傻瓜操作就好!然后装weblogic,这个安装可不是双击就完事的!步骤如下:1.进入GNOME终端,就跟windows的cmd命令窗口一样2.输入:chmod +x server1001_linux32.bin -->在linux上安装软件时,首先要赋予这个软件可执行的权限。
3.输入:./server1001_linux32.bin -->开始安装,安装过程跟windows一样。
安装完weblogic后,还要安装jdk,跟weblogic10匹配的可以选择jdk 1.5,软件可以去sun的网站去下,要先注册,在哪里下,大家自己去找啊!找linux版本的也不太好找,主要是本人英文太烂,哈哈!安装步骤如下:1.输入:chmod +x jdk-1_5_0_13-linux-i586-rpm.bin -->首先也是赋予权限2.输入:./jdk-1_5_0_13-linux-i586-rpm.bin -->运行这个文件,读取安装说明,一路选yes,完成后后会在同一目录解压出一个jdk-1_5_0_13-linux-i586-rpm的文件,然后对这个文件进行安装。
3.赋予执行权限:chmod +x jdk-1_5_0_13-linux-i586-rpm4.接下来的-ivh 命令必须要是系统管理员身份才能操作,系统管理员是:root,所以现在这里转换用户,输入命令:su ,然后是提示输入密码,linux输入密码的时候是不可见的,只看见光标,所以只管输入完成后回车就好了(注:这里的密码不是系统默认的,而是你安装的时候和普通用户一起创建的),回车之后,用户转为root --〉[root@localhost bin]# ,注意后面那个#号,如果是普通用户,后面会是$符号,如[panpan@localhost ]$,这个有区别!这里不转用户会提示被锁住啥的错误!5.输入:rpm -ivh jdk-1_5_0_13-linux-i586-rpm -->开始安装安装完成后的jdk目录在/usr/java 目录下,接下来要配置环境变量!首先要感谢一个网友,他写的相当详细,感谢他的无私精神,特意把网址留下![url]/art/302/20070616/111 5183_1.html[/url]步骤如下:1.设置环境变量#vi /etc/profile 进入vi编辑器,把一下这段加入到最后面。
将应用部署到weblogic及oraclelinu时遇到的问题
使用文件目录部署指的是用weblogic管理服务器安装,直接指定本地的应用文件夹,只要该文件夹下面有包含WEB-INF\web.xml,就可以被选中安装;
所以接下来就是建立ห้องสมุดไป่ตู้用程序的安装目录;
在区别于weblogic域管理目录路径,我们在根路径创建了目录;
/deploy/applications/app
5、Hibernate3、Axis部署问题
ClassNotFoundException:
这个问题网上说的很多,解决方法也各式各样,其实很简单,Weblogic系统默认加载EJB-QL
<xmlversion="1.0"encoding="UTF-8">
<DOCTYPEweblogic-web-appPUBLIC"-//BEASystems,Inc.//DTDWebApplication8.1//EN""">
将PermSize和MaxPermSize调整到256和512按实际需要来调
二、这时候,我们这样可以没问题了吧,谁知一部署,第二个问题来了
错误:
CannotsetwebapprootsystempropertywhenWARfileisnotexpanded
问题分析:
解决办法:
由于用这种写法获得web服务器路径的地方很多,一个个去换显然不是一个很好的办法,而且直接使用war部署对后续的应用更新也比较麻烦,所以准备采用另外一种部署方式,就是文件目录部署;
<weblogic-web-app>
<container-descriptor>
<prefer-web-inf-classes>true</prefer-web-inf-classes>
linux环境下安装、部署weblogic8.1.5
部署前准备创建Weblogic用户组groupadd weblogicuseradd –g weblogic weblogicpasswd weblogic(修改weblogic用户密码)创建Weblogic部署目录,修改目录及安装文件的权限mkdir /opt/middleware/weblogic815chown –Rf weblogic:weblogic /opt/middleware/weblogic815chown weblogic:weblogic weblogic815_linux32.binchmod a+x weblogic815_linux32.bin用weblogic用户登录系统su - weblogic安装Weblogic8.1.5执行./ weblogic815_linux32.bin –mode=console进入控制台安装的欢迎界面Extracting 0%....................................................................................................100%Unable to instantiate GUI, defaulting to console mode.<----------------- BEA Installer - WebLogic Platform 8.1 SP5 ----------------->Welcome:--------This installer will guide you through the installation of WebLogic Platform 8.1 SP5. Type "Next" or enter to proceed to the next prompt. If you want to change data entered previously, type "Previous". You may quit the installer at anytime by typing "Exit".Enter [Exit][Next]>键入[Next]继续此时出现授权许可协议,读完后键入[1]继续<----------------- BEA Installer - WebLogic Platform 8.1 SP5 ----------------->BEA Systems License Agreement:------------------------------BEA SYSTEMS, INC. SOFTWARE LICENSE AGREEMENTUSE OF SOFTWARE ORDERED FROM BEA SYSTEMS, INC. ("BEA") IS PROVIDED ONLY UNDERLICENSE FROM BEA. PLEASE READ THE FOLLOWING LICENSE CAREFULLY AND INDICATE YOUR ACCEPTANCE BY CLICKING THE ACCEPTANCE BOX. CERTAIN CAPITALIZED TERMS AREDEFINED IN SECTION 11.1. LICENSE TERMSa. WebLogic SDK Use. The terms of this Section 1(a) are applicable to you ifyou have registered as a WebLogic SDK customer. Subject to the terms of thisAgreement, BEA grants to you a non-exclusive, non-transferable, royalty-freelicense to use WebLogic SDK solely for Development Use and Scale-LimitedPersonal Use for the number of users and/or developers and the number of CPU's, Servers and/or at the Sites, as specified at the time of registration. Thirdparty software products or modules supplied by BEA, if any, may be used solelywith the Software. All rights not specifically granted to you herein areretained by BEA.b. WebLogic SDK Pro Use. The terms of this Section 1(b) are applicable to youif you have registered as a WebLogic SDK Pro customer. Subject to the terms ofthis Agreement, BEA grants to you a non-exclusive, non-transferable,Select Option:1 - Yes, I agree with the terms of the license2 - No, I do not agree with the terms of the license提示选择一个BEA主目录<----------------- BEA Installer - WebLogic Platform 8.1 SP5 ----------------->Choose BEA Home Directory:--------------------------"BEA Home" = [/home/weblogic/bea]Input new BEA Home OR [Exit][Previous][Next]>输入:/opt/middleware/weblogic815/bea确认BEA主目录*BEA home choice->1|Yes, Use this BEA home directory [/opt/middleware/weblogic815/bea]2|No, return to BEA home directory selection输入[1]继续<----------------- BEA Installer - WebLogic Platform 8.1 SP5 ----------------->Choose Install Type:--------------------->1|Complete|Install the complete BEA WebLogic Platform.2|Custom Installation|Choose software components to install and perform optional configuration. Enter index number to select OR [Exit][Previous][Next]>选择安装类型,键入[1]继续,完全安装<----------------- BEA Installer - WebLogic Platform 8.1 SP5 ----------------->Choose Product Directory:-------------------------"Product Installation Directory" = [/opt/middleware/weblogic815/bea/weblogic81] Input new Product Installation Directory OR [Exit][Previous][Next]>选择安装路径,默认,键入[Next]继续<----------------- BEA Installer - WebLogic Platform 8.1 SP5 ----------------->Choose Product Directory:-------------------------->1|Yes, use this product directory|[/opt/middleware/weblogic815/bea/weblogic81]2|No, select another product directoryEnter index number to select OR [Exit][Previous][Next]>确认安装路径,键入[1]继续<----------------- BEA Installer - WebLogic Platform 8.1 SP5 ----------------->Installing files..0% 25% 50% 75% 100%[------------|------------|------------|------------][***************************************************]<----------------- BEA Installer - WebLogic Platform 8.1 SP5 ----------------->Installing JDK....0% 25% 50% 75% 100%[------------|------------|------------|------------][***************************************************]<----------------- BEA Installer - WebLogic Platform 8.1 SP5 ----------------->Installation CompleteCongratulations! WebLogic Platform 8.1 SP5 has been successfully installed to /opt/middleware/weblogic815/bea/weblogic81.Press any key to continue OR [Exit]>安装完毕创建服务使用weblogic用户登录系统cd /opt/middleware/weblogic815/bea/weblogic81/common/bin./config.sh进入设置Unable to instantiate GUI, defaulting to console mode.<--------------------- BEA WebLogic Configuration Wizard --------------------->Create or Extend a Configuration:---------------------------------Choose between creating and extending a configuration. Based on your selection, the Configuration Wizard guides you through the steps to generate a new orextend an existing configuration.->1|Create a new WebLogic configuration| Start here to create a WebLogic configuration in your projects|directory.2|Extend an existing WebLogic configuration| Start here to extend an existing WebLogic configuration. Use this|option to add applications and services, including Database access (JDBC)|and Messaging (JMS). This option also enables you to extend functionality|by enabling WebLogic Workshop.Enter index number to select OR [Exit][Next]>创建一个新的weblogic配置,键入[1]继续<--------------------- BEA WebLogic Configuration Wizard --------------------->Select a Domain Template:-------------------------Please select a template from the list or select another directory of templates.* [/opt/middleware/weblogic815/bea/weblogic81/common/templates/domains]1|Basic WebLogic Portal Domain 8.1.5.0| BEA Systems, Inc.| Create a basic WebLogic Portal domain, without installing sample|applications. Domains created from this template will support the|WebLogic Server, WebLogic Workshop and WebLogic Portal runtime|functionality, including support for J2EE applications, Web applications,|Web Services, custom controls and portals. Use domains created from this|template for development of WebLogic Portal applications.2|Avitek Medical Records Sample Domain 8.1.5.0| BEA Systems, Inc.| Create the Avitek Medical Records domain in a directory outside of the|installed kit. The Avitek Medical Records is a WebLogic Server sample|application suite that concisely demonstrates all aspects of the J2EE|platform.3|Basic WebLogic Integration Domain 8.1.5.0| BEA Systems, Inc.| Create a basic WebLogic Integration domain, without installing sample|applications. Domains created from this template will support the|WebLogic Server, WebLogic Workshop and WebLogic Integration runtime|functionality, including support for J2EE applications, Web applications,Enter index number to select OR [Down][Exit][Previous][Next]>选择配置模板,由于没有,键入[Down]继续<--------------------- BEA WebLogic Configuration Wizard --------------------->Select a Domain Template:-------------------------Please select a template from the list or select another directory of templates.|Web Services, custom controls and business processes. Use domains created |from this template for development of WebLogic Integration applications.->4|Basic WebLogic Server Domain 8.1.5.0| BEA Systems, Inc.| Create a basic WebLogic Server domain without installing sample|applications.5|WebLogic Server Examples Domain 8.1.5.0| BEA Systems, Inc.| Create the WebLogic Server Examples domain in a directory outside of the |installed kit. The Examples domain contains a collection of examples to|show best practices for coding individual J2EE APIs.6|Basic WebLogic Platform Domain 8.1.5.0| BEA Systems, Inc.| Create a basic WebLogic Platform domain, without installing sample|applications. Domains created from this template will support the|WebLogic Server, WebLogic Workshop, WebLogic Integration and WebLogic|Portal runtime functionality, including support for J2EE applications, Web |applications, Web Services, custom controls, business processes and|portals. Use domains created from this template for development of|WebLogic Platform applications.Enter index number to select OR [Up][Down][Exit][Previous][Next]>键入[4]继续<--------------------- BEA WebLogic Configuration Wizard --------------------->Choose Configuration Option:----------------------------*Do you want to run the wizard in express mode?->1|Yes2|NoEnter index number to select OR [Exit][Previous][Next]>键入[1]继续<--------------------- BEA WebLogic Configuration Wizard --------------------->Configure Administrative Username and Password:-----------------------------------------------Create a user automatically assigned to the Administrative Role. This user isthe default administrator used to start development mode servers.| Name | Value | _|_________________________|_________________________________| 1| *User name: | weblogic | 2| *User password: | | 3| *Confirm user password: | |4| Description: | The default administration user |Select Option:1 - Modify "User name"2 - Modify "User password"3 - Modify "Confirm user password"4 - Modify "Description"Enter option number to select OR [Exit][Previous][Next]>修改密码,键入[2]继续<--------------------- BEA WebLogic Configuration Wizard --------------------->Configure Administrative Username and Password:-----------------------------------------------Create a user automatically assigned to the Administrative Role. This user isthe default administrator used to start development mode servers."*User password:" = []Input new *User password: OR [Exit][Reset][Accept]>输入密码,键入[回车]确认<--------------------- BEA WebLogic Configuration Wizard --------------------->Configure Administrative Username and Password:-----------------------------------------------Create a user automatically assigned to the Administrative Role. This user isthe default administrator used to start development mode servers.| Name | Value | _|_________________________|_________________________________| 1| *User name: | weblogic | 2| *User password: | ******* | 3| *Confirm user password: | |4| Description: | The default administration user |Select Option:1 - Modify "User name"2 - Modify "User password"3 - Modify "Confirm user password"4 - Modify "Description"5 - Discard ChangesEnter option number to select OR [Exit][Previous][Next]>确认密码,长度最小8个字符,键入[3]继续<--------------------- BEA WebLogic Configuration Wizard --------------------->Configure Administrative Username and Password:-----------------------------------------------Create a user automatically assigned to the Administrative Role. This user isthe default administrator used to start development mode servers."*Confirm user password:" = []Input new *Confirm user password: OR [Exit][Reset][Accept]>确认密码,密码必须与上次输入一致,键入[回车]继续<--------------------- BEA WebLogic Configuration Wizard --------------------->Configure Administrative Username and Password:-----------------------------------------------Create a user automatically assigned to the Administrative Role. This user isthe default administrator used to start development mode servers.| Name | Value | _|_________________________|_________________________________| 1| *User name: | weblogic | 2| *User password: | ******* | 3| *Confirm user password: | ******** |4| Description: | The default administration user |Select Option:1 - Modify "User name"2 - Modify "User password"3 - Modify "Confirm user password"4 - Modify "Description"5 - Discard ChangesEnter option number to select OR [Exit][Previous][Next]>键入[Next]继续<--------------------- BEA WebLogic Configuration Wizard --------------------->Domain Mode Configuration:--------------------------Enable Development or Production Mode for this domain.->1|Development Mode2|Production ModeEnter index number to select OR [Exit][Previous][Next]>选择产品模式/开发模式。
linux安装weblogic10集群
Weblogic10集群负载均衡安装和配置1、集群系统架构操作系统: linux as4 u8Weblogic版本 Weblogic10注意:有工作流或MQ时要单独安装,不要放到集群中2、系统整体架构2.1、Weblogic方案:(建议服务器有4G以上的内存)一台管理服务器:安装weblogic10 管理节点、受管节点。
二至五台应用服务器节点:安装Weblogic10 受管节点。
一台工作流服务器:安装WebSphere Application Server。
一台MQ服务器:安装WebSphere Application Server。
2.2、本例中的部署如下所示:管理节点和受管节点安装在主机 JWZHYY1,另一个受管节点单独安装主机名为JWZHYY2,组成一个集群,通过代理服务器来完成负载均衡。
3、集群的安装3.1、安装集群的先决条件注意,必须在每个服务器中编辑/etc/hosts文件使群集的服务器之间能够互相使用机器名访问。
保证每一台应用服务器都可以使用ping 群集应用服务器名称来访问,实例文件/etc/hosts内容如下127.0.0.1 localhost.localdomain localhost #本机192.168.1.3 jwzhyy1 #节点1192.168.1.4 jwzhyy2 #节点2192.168.1.8 jwzhdb1 #数据库1192.168.1.9 jwzhdb2 #数据库2以 root 用户身份登录并在每个主机上配置 Linux 内核参数。
cat >> /etc/sysctl.conf >>EOFkernel.shmall = 2097152kernel.shmmax = 4294967295kernel.shmmni = 4096kernel.sem = 250 32000 100 128fs.file-max = 65536net.ipv4.ip_local_port_range = 1024 65000net.core.rmem_default=262144net.core.wmem_default=262144net.core.rmem_max=262144net.core.wmem_max=262144EOF/sbin/sysctl -p使用date命令查看每一台机器的系统时间,如果服务器时间相差在五分钟之内,请跳过此步。