
华为S基础配置命令说明手册
华为S基础配置命令说
明手册
文稿归稿存档编号:[KKUY-KKIO69-OTM243-OLUI129-G00I-FDQS58-
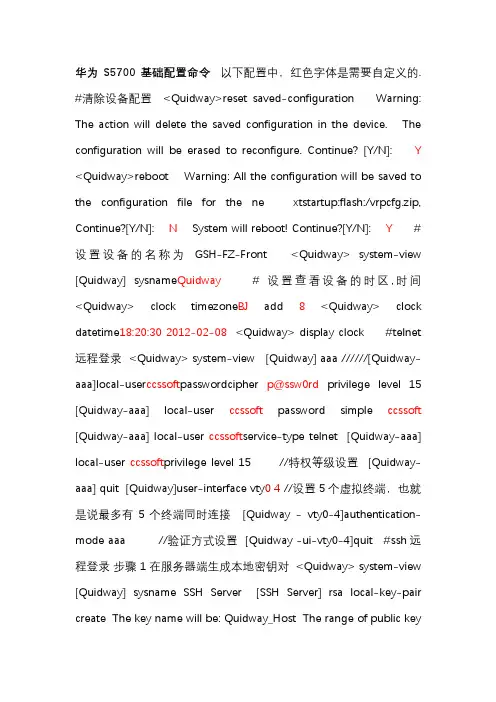
# 设置设备的名称为GSH-FZ-Front
[Quidway] sysname GSH-FZ-Front
# 设置查看设备的时区,时间
#telnet远程登录
[Quidway] aaa
[Quidway-aaa] local-user testadmin password cipher p@ssw0rd
privilege level 15
[Quidway-aaa] quit
[Quidway]user-interface vty 0 4
[Quidway-vty0-4]authentication-mode aaa
#添加VLAN
[Quidway] vlan 128
华为S5700基础配置命令
【最新资料,WORD文档,可编辑修改】
[Quidway-vlan128] quit
#设定端口模式
[Quidway] int gigabitethernet 0/0/1
[Quidway-GigabitEthernet0/0/1] port link-type access
#将端口加入Vlan
[Quidway] vlan 131
[Quidway-vlan131] port gigabitethernet 0/0/21 to 0/0/22
[Quidway-Vlan131] quit
#设置Trunk
[Quidway] interface GigabitEthernet 0/0/23
[Quidway-GigabitEthernet0/0/23] port link-type trunk
[Quidway-GigabitEthernet0/0/23] port trunk allow-pass vlan 128 131
#设置VLAN IP(管理IP)
[Quidway] interface vlanif 131
[Quidway-Vlanif131] shutdown
[Quidway-Vlanif131] undo shutdown
#设置默认路由
#设定NTP
# 关闭WEB Server,dhcp
[Quidway] undo http server enable
[Quidway] undo dhcp enable
#保存配置
#相关查看命令
[Quidway] display version 显示VRP版本号
[Quidway] display current-configuration 显示系统运行配置信息
[Quidway] display saved-configuration 显示保存的配置信息
[Quidway] display interfaces brief 显示接口配置信息
华为_S5700_基础配置命令
华为S5700 基础配置命令以下配置中,红色字体是需要自定义的. #清除设备配置<Quidway>reset saved-configuration Warning: The action will delete the saved configuration in the device. The configuration will be erased to reconfigure. Continue? [Y/N]: Y <Quidway>reboot Warning: All the configuration will be saved to the configuration file for the ne xtstartup:flash:/vrpcfg.zip, Continue?[Y/N]: N System will reboot! Continue?[Y/N]: Y # 设置设备的名称为GSH-FZ-Front <Quidway> system-view [Quidway] sysname Quidway# 设置查看设备的时区,时间<Quidway> clock timezone BJ add 8<Quidway> clock datetime18:20:30 2012-02-08 <Quidway> display clock #telnet 远程登录 <Quidway> system-view [Quidway] aaa //////[Quidway-aaa]local-user ccssoft passwordcipher p@ssw0rd privilege level 15 [Quidway-aaa] local-user ccssoft password simple ccssoft [Quidway-aaa] local-user ccssoft service-type telnet [Quidway-aaa] local-user ccssoft privilege level 15 //特权等级设置[Quidway-aaa] quit [Quidway]user-interface vty0 4 //设置5个虚拟终端,也就是说最多有5个终端同时连接[Quidway - vty0-4]authentication-mode aaa //验证方式设置 [Quidway -ui-vty0-4]quit #ssh远程登录步骤 1 在服务器端生成本地密钥对 <Quidway> system-view [Quidway] sysname SSH Server [SSH Server] rsa local-key-pair create The key name will be: Quidway_Host The range of public keysize is (512 ~ 2048). NOTES: If the key modulus is greater than 512, It will take a few minutes. Input the bits in the modulus[default = 512]: 768 Generating keys... .......++++++++++++ ..........++++++++++++ .......................... .........++++++++......++++++++ 步骤 2 在服务器端配置 VTY 用户界面 [SSH Server] user-interface vty 0 4 [SSH Server-ui-vty0-4] authentication-mode aaa [SSH Server-ui-vty0-4] protocol inbound ssh [SSH Server-ui-vty0-4] quit 说明若配置登录协议为SSH,则S5700 设备将自动禁止 Telnet 功能。
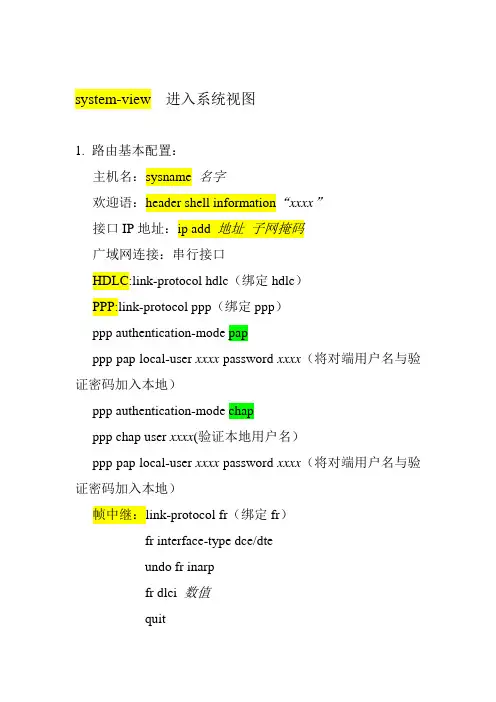
华为基本配置命令
system-view 进入系统视图1. 路由基本配置:主机名:sysname 名字欢迎语:header shell information“xxxx”接口IP地址:ip add 地址子网掩码广域网连接:串行接口HDLC:link-protocol hdlc(绑定hdlc)PPP:link-protocol ppp(绑定ppp)ppp authentication-mode papppp pap local-user xxxx password xxxx(将对端用户名与验证密码加入本地)ppp authentication-mode chapppp chap user xxxx(验证本地用户名)ppp pap local-user xxxx password xxxx(将对端用户名与验证密码加入本地)帧中继:link-protocol fr(绑定fr)fr interface-type dce/dteundo fr inarpfr dlci 数值quitfr ip 对方ip 己方dlci broadcast2.静态路由:包含默认路由ip route-static 目的地址掩码下一跳/接口[preference(优先级) 数值]ip route-static 0.0.0.0 0.0.0.0(默认路由全0)下一跳/接口3.动态路由:RIP: rip 1version 1/2network 网段(通告到rip协议)OSPF:ospf 1 router-id 10.0.1.1area 0(区域0)network 10.0.1.0 0.0.0.255(反掩码)4.访问控制列表ALC[RouterA] acl number 1(数值)[RouterA-acl-basic-1] rule permit source 1.1.1.1 0.0.0.0 [RouterA-acl-basic-1] quit交换:1.Consel口登录连接:[switch]user-interface consle0[switch-user-consle0]authentication-mode password设置登录用户验证方式为密码[switch-user-consle0]set authentication password simple huawei 密码为huawei[switch-user-consle0]idle-timeout 20(空闲超时)0(默认超时)[switch-user-consle0]quit2.配置Telnet连接:(1)vlan1管理IP(管理PC也要IP)ip add xxxx(2)line vtp 线路密码[switch]user-interface vty 0 4[switch-user-vty0-4]authentication-mode password设置登录用户验证方式为密码[switch-user-vty0-4]set authentication password simple huawei 密码为huawei[switch-user-vty0-4]user privilege level 3用户权限级别3 [switch-user-vty0-4]quit(3)超级密码super password simple(明文加密) huaweisuper password cipher(密文加密) huawei3.VLAN创建、划分vlan 1 /vlan batch 1 2 3(创建vlan)port 端口号(增加端口)4.trunk口配置port link-type trunk创建trunk口port trunk pvid vlanport trunk allow-pass vlan all。
华为 S系列 S2750 S5700 S6700 交换机 配置指南-接口管理

和其他华为商标均为华为技术有限公司的商标。 本文档提及的其他所有商标或注册商标,由各自的所有人拥有。
注意 您购买的产品、服务或特性等应受华为公司商业合同和条款的约束,本文档中描述的全部或部分产品、服务或 特性可能不在您的购买或使用范围之内。除非合同另有约定,华为公司对本文档内容不做任何明示或默示的声 明或保证。
2 以太网接口配置.............................................................................................................................10
2.1 以太网接口简介..........................................................................................................................................................11 2.2 规格..............................................................................................................................................................................12 2.3 缺省配置......................................................................................................................................................................13 2.4 配置端口组..................................................................................................................................................................14 2.5 配置以太网接口..........................................................................................................................................................14 2.5.1 配置 Combo 接口工作模式.....................................................................................................................................14 2.5.2 配置 MDI 类型.........................................................................................................................................................15 2.5.3 配置电缆检测...........................................................................................................................................................16 2.5.4 配置自协商功能.......................................................................................................................................................17 2.5.5 配置双工模式...........................................................................................................................................................17 2.5.6 配置接口速率...........................................................................................................................................................18 2.5.7 配置流量控制...........................................................................................................................................................19 2.5.8 配置端口隔离...........................................................................................................................................................20 2.5.9 配置帧间隙...............................................................................................................................................................21 2.5.10 配置允许超大帧通过.............................................................................................................................................22 2.5.11 配置切换到三层模式.............................................................................................................................................22 2.5.12 配置上报状态变化延时时间.................................................................................................................................23
S2700交换机基本命令文本和图形详解

S2700交换机基本命令文本和图形详解一、从用户视图进入系统视图命令:system-view使用指南:用户初次登录,即进入用户视图。
在用户视图下执行该命令,可以进入系统视图。
使用实例:二、设置交换机主机名命令:sysname使用指南:修改交换机的主机名将影响命令行接口的提示符,如交换机的主机名为Quidway,用户视图的提示符为<Quidway>。
使用实例:三、用来设置切换低级别用户到高级别用户的密码命令:super password命令格式:参数说明:使用指南:不论配置的是明文密码还是密文密码,验证时必须输入明文形式的密码。
如果使用simple选项,密码将以明文形式保存在配置文件中,以低级别登录的用户可以通过查看配置文件的方式获取切换密码,造成安全问题。
因此,一般情况下,应使用cipher 选项,将密码加密保存。
同时,使用cipher选项设置了密码后,无法从系统取回。
请妥善保管,以免遗忘或者遗失。
使用实例:比如我登陆公司109交换机,如下图显示:如果我一开始就输入sys命令想进入系统视图是进不去的,图中红色圈标明了必须输入su命令,再输入密码qyeee后才能进入系统视图。
从图中我们可以知道super passwd这个命令在交换机里的作用与功能。
四、进入console 0视图命令:User-interface console 0使用实例:现在用我练习操作过的截图来说明相关命令的功能,如下图所示:User-interface console 0 进入console 0视图界面authentication-mode password设置进入console 0视图界面用密码来验证set aut password cipher qyeee设置进入console 0视图界面的密码为qyeeeidle-timeout 15 设置用户界面断连的超时时间为15分钟,即用户没有输入命令的时间。
下面这个是我用com线连接交换机刚登陆界面的截图,因为之前我在交换机上进入console 0视图界面设置了登陆要密码验证,并且设置的密码是qyeee,所以我用com线连接交换机,按回车键提示要输入密码,如果不输入是进不去的。
华为配置命令大全

华为配置命令大全华为路由器交换机配置命令:计算机命令PCAlogin:root;使用root用户password:linux;口令是linux#shutdown-hnow;关机#init0;关机#logout;用户注销#login;用户登录#ifconfig;显示IP地址#ifconfigeth0netmask;设置IP地址#ifconfigeht0netmaskdown;禁用IP地址#routeadd0.0.0.0gw;设置网关#routedel0.0.0.0gw;删除网关#routeadddefaultgw;设置网关#routedeldefaultgw;删除网关#route;显示网关#ping;发ECHO包#telnet;远程登录华为路由器交换机配置命令:交换机命令[Quidway]discur;显示当前配置[Quidway]displaycurrent-configuration;显示当前配置[Quidway]displayinterfaces;显示接口信息[Quidway]displayvlanall;显示路由信息[Quidway]displayversion;显示版本信息[Quidway]superpassword;修改特权用户密码[Quidway]sysname;交换机命名[Quidway]interfaceethernet0/1;进入接口视图[Quidway]interfacevlanx;进入接口视图[Quidway-Vlan-interfacex]ipaddress10.65.1.1255.255.0.0;配置VLAN的IP地址[Quidway]iproute-static0.0.0.00.0.0.010.65.1.2;静态路由=网关[Quidway]rip;三层交换支持[Quidway]local-userftp[Quidway]user-interfacevty04;进入虚拟终端[S3026-ui-vty0-4]authentication-modepassword;设置口令模式[S3026-ui-vty0-4]setauthentication-modepasswordsimple222;设置口令[S3026-ui-vty0-4]userprivilegelevel3;用户级别[Quidway]interfaceethernet0/1;进入端口模式[Quidway]inte0/1;进入端口模式[Quidway-Ethernet0/1]duplex{half|full|auto};配置端口工作状态[Quidway-Ethernet0/1]speed{10|100|auto};配置端口工作速率[Quidway-Ethernet0/1]flow-control;配置端口流控[Quidway-Ethernet0/1]mdi{across|auto|normal};配置端口平接扭接[Quidway-Ethernet0/1]portlink-type{trunk|access|hybrid};设置端口工作模式[Quidway-Ethernet0/1]portaccessvlan3;当前端口加入到VLAN[Quidway-Ethernet0/2]porttrunkpermitvlan{ID|All};设trunk 允许的VLAN[Quidway-Ethernet0/3]porttrunkpvidvlan3;设置trunk端口的PVID[Quidway-Ethernet0/1]undoshutdown;激活端口[Quidway-Ethernet0/1]shutdown;关闭端口[Quidway-Ethernet0/1]quit;返回[Quidway]vlan3;创建VLAN[Quidway-vlan3]portethernet0/1;在VLAN中增加端口[Quidway-vlan3]porte0/1;简写方式[Quidway-vlan3]portethernet0/1toethernet0/4;在VLAN中增加端口[Quidway-vlan3]porte0/1toe0/4;简写方式[Quidway]monitor-port;指定镜像端口[Quidway]portmirror;指定被镜像端口[Quidway]portmirrorint_listobserving-portint_typeint_num;指定镜像和被镜像[Quidway]descriptionstring;指定VLAN描述字符[Quidway]description;删除VLAN描述字符[Quidway]displayvlan[vlan_id];查看VLAN设置[Quidway]stp{enable|disable};设置生成树,默认关闭[Quidway]stppriority4096;设置交换机的优先级[Quidway]stproot{primary|secondary};设置为根或根的备份[Quidway-Ethernet0/1]stpcost200;设置交换机端口的花费[Quidway]link-aggregatione0/1toe0/4ingress|both;端口的聚合[Quidway]undolink-aggregatione0/1|all;始端口为通道号[SwitchA-vlanx]isolate-user-vlanenable;设置主vlan[SwitchA]isolate-user-vlansecondary;设置主vlan包括的子vlan[Quidway-Ethernet0/2]porthybridpvidvlan;设置vlan的pvid [Quidway-Ethernet0/2]porthybridpvid;删除vlan的pvid[Quidway-Ethernet0/2]porthybridvlanvlan_id_listuntagged;设置无标识的vlan如果包的vlanid与PVId一致,则去掉vlan信息.默认PVID=1。
华为S5720常用命令

华为S5720常⽤命令1、 华为5720的配置命令 1.1 配置IP地址1 system-view //系统视图23 vlan 4//创建交换机管理vlan 445 management-vlan //管理VLAN67 quit //退出89interface vlanif 4//进⼊虚拟局域⽹接⼝41011 ip address 192.168.11.1124//虚拟局域⽹4 配置IP地址2、 配置Telnet1 telnet server enable //telnet 出⼚时候是关闭的,需要打开23 user-interface vty 04//最⼤允许虚拟终端⽤户0 1 2 34 共5个45 protocol inbound telnet //配置允许登录接⼊的⽤户类型67 authentication-mode aaa //推荐使⽤aaa认证89 idle-timeout 15//设置终端⽤户超时1011 quit //退出1213 aaa //telnet常⽤于设备管理员登录,推荐使⽤aaa认证1415 local-user admin password irreversible-cipher *** //配置⽤户名和密码使⽤不可逆密码1617 local-user admin privilege level 15//将管理员的权限设置为15 (最⾼)1819 local-user admin server-type telnet //admin 开启telnet服务3、 配置Vlan的部分命令1 vlan 3//创建VLAN 323 port GigabitEthernet 0/0/1//在VLAN中增加端⼝45 port GigabitEthernet 0/0/1 to 0/0/5//在VLAN中增加端⼝67 port Gig 0/0/1 to 0/0/5//在VLAN中增加端⼝4、 配置端⼝的部分命令1int GigabitEthernet 0/0/1//进⼊到GigabitEthernet 0/0/1端⼝下23 speed 10|100|1000|auto //端⼝速率选择45 mdi across|auto|normal //配置端⼝平接按钮67 port link-type {trunk|access|hybrid} //设置端⼝⼯作模式89 port access vlan 3//当前端⼝加⼊到vlan1011 port trunk permit vlan {ID|All} //设置trunk允许的VLAN1213 port trunk pvid vlan 3//设置trunk端⼝的PVID1415 undo shutdown //激活端⼝1617 shutdown //关闭端⼝1819 quit //返回5 、 其它常⽤命令1 display current-configuration //显⽰当前配置23 display interfaces //显⽰接⼝信息45 display vlan //显⽰VLAN信息67 display version //显⽰版本信息89 super password //修改特权⽤户密码1011 sysname //交换机命名1213 interfaceGigabitEthernet 0/0/1//进⼊接⼝视图1415interface XGigabitEthernet 0/0/1//进⼊接⼝视图1617interface vlan X //进⼊接⼝视图1819 ip route-static0.0.0.00.0.0.010.2.2.2//静态路由=⽹关2021 stp enable|disable //设置⽣成树,默认关闭2223 stp priority 4096//设置交换机的优先级2425 stp root primary|secondary //设置为根或者为根的备份6、 ⼀些名词介绍 6.1 mdi across|auto|normal MDI⼝是快速以太⽹100BASE-T定义的与介质有关接⼝(Media Dependent Interface)。
华为S系列交换机配置
2. 端口配置第1章以太网端口配置以太网端口简介S3526以太网交换机提供24个10/100Base-T固定以太网端口、1个Console口及2个千兆扩展模块插槽,扩展模块插槽支持1端口1000Base-SX、1端口1000Base-LX和1端口1000Base-T、1端口1000Base-ZX和1端口1000Base-LXGL扩展接口模块。
S3526 FS与S3526 FM以太网交换机的区别仅在于它们前面板上的固定光端口属性不同:S3526 FS 以太网交换机提供12个百兆单模光端口,S3526 FM以太网交换机提供12个百兆多模光端口。
除此以外它们完全一样,支持4个扩展模块插槽及1个Console口。
其中后面板的两个扩展模块插槽支持千兆接口模块,包括1端口1000Base-SX、1端口1000Base-LX、1端口1000Base-T、1端口1000Base-ZX和1端口1000Base-LXGL;前面板的两个扩展模块插槽支持百兆接口模块,包括6端口100Base-FX多模、6端口100Base-FX单模和6端口10/100Base-T。
S3526E以太网交换机提供24个10/100Base-T固定以太网端口、1个Console口及2个扩展模块插槽,扩展模块插槽支持1端口1000Base-SX、1端口1000Base-LX和1端口1000Base-T、1端口1000Base-ZX和1端口1000Base-LXGL扩展接口模块、1端口100Base-FX多模模块、1端口100Base-FX单模模块。
S3526E FM/S3526E FS以太网交换机的区别也仅在它们前面板上的固定光端口属性不同:S3526E FS以太网交换机提供12个百兆单模光端口,S3526E FM以太网交换机提供12个百兆多模光端口。
除此以外它们完全一样,支持4个扩展模块插槽及1个Console口。
其中后面板的两个扩展模块插槽支持百兆接口模块和千兆接口模块,其中百兆接口模块包括1端口100Base-FX多模模块和1端口100Base-FX单模模块,千兆接口模块包括1端口1000Base-SX、1端口1000Base-LX、1端口1000Base-T、1端口1000Base-ZX和1端口1000Base-LXGL;前面板的两个扩展模块插槽支持百兆接口模块,包括6端口100Base-FX多模、6端口100Base-FX单模和6端口10/100Base-T。
华为设备配置命令-
简单配置命令[Quidway]display current-configuration 显示当前配置[Quidway]display current-configuration ;显示当前配置[Quidway]display interfaces ;显示接口信息[Quidway]display vlan all ;显示路由信息[Quidway]display version ;显示版本信息[Quidway]super password ;修改特权用户密码[Quidway]sysname name ;交换机命名[Quidway]delete 删除Flash ROM中的配置[Quidway]save 将配置写入Flash ROM [Quidway]display ip routing 显示路由表[Quidway]ping ip_address 测试网络连通性[Quidway]tracert ip_address 测试数据包从主机到目的地所经过的网关一、华为设置远程终端[Quidway]user-interface vty 0 4 ;进入虚拟终端[S3026-ui-vty0-4]authentication-mode password ;设置口令模式[S3026-ui-vty0-4]set authentication-mode password simple 222 ;设置口令[S3026-ui-vty0-4]user privilege level 3 ;用户级别二、设置PPP认证功能1、不验证Router Ainterface serial 0link-protocol ppp // 设置封装协议为PPPip address ------------Router Binterface serial 0link-protocol pppip address ----------2、PAP单向验证Router Ainterface serial 0link-protocol pppppp pap local-user a password simple a //送给对端的用户名密码ip address --------Router Blocal-user a service-type ppp password simple a //本地建立的对方的用户名和密码interface serial 0link-protocol pppppp authentication-mode pap //验证模式PAPip address3、PAP 双向验证Router Alocal-user b service-type ppp password simple binterface serial 0link-protocol pppppp pap local-user a password simple appp authentication-mode papip address -----------Router Blocal-user a service-type ppp password simple ainterface serial 0link-protocol pppppp pap local-user b password simple bppp authentication-mode papip address ---------4、CHAP单向验证Router Ainterface serial 0link-protocol pppppp chap user a //本端的用户名Appp chap password simple hello//密码ip address ----------Router blocal-user a service-type ppp password simple hello// 对端的用户名a和一样的密码hello interface serial 0link-protocol pppppp authentication-mode chapppp chap user bip address-----------5、CHAP 双向验证Router Alocal-user b service-type ppp password simple hellointerface serial 0link-protocol pppppp chap user appp chap password simple helloppp authenticattion-mode chapip address -------Router Blocal-user a service-type ppp password simple hellointerface serial 0link-protocol pppppp chap user bppp chap password simple hellopp authentication-mode chapip address ---------来三、端口相关设置[Quidway]interface ethernet 0/1 ;进入端口模式[Quidway-Ethernet0/1]duplex {half|full|auto} ;配置端口工作状态[Quidway-Ethernet0/1]speed {10|100|auto} ;配置端口工作速率[Quidway-Ethernet0/1]flow-control ;配置端口流控[Quidway-Ethernet0/1]mdi {across|auto|normal} ;配置端口平接扭接[Quidway-Ethernet0/1]port link-type {trunk|access|hybrid} ;设置端口工作模式[Quidway-Ethernet0/1]port access vlan 3 ;当前端口加入到VLAN [Quidway-Ethernet0/2]port trunk permit vlan {ID|All} ;设trunk允许的VLAN [Quidway-Ethernet0/3]port trunk pvid vlan 3 ;设置trunk端口的PVID [Quidway-Ethernet0/1]undo shutdown ;激活端口[Quidway-Ethernet0/1]shutdown ;关闭端口[Quidway-Ethernet0/1]quit ;返回四、交换机划分VLANVLAN基本配置命令(以Quidway S3026为例)[Quidway]vlan 3 创建并进入VLAN配置模式[Quidway]undo vlan 3 删除一个VLAN[Quidway-vlan3]port ethernet 0/1 to ethernet 0/4 给VLAN增加/删除以太网接口[Quidway-Ethernet0/2]port access vlan 3 将本接口加入到指定VLAN id[Quidway-Ethernet0/2]port link-type {access|trunk|hybrid} 设置端口工作方式,access(缺省)不支持802.1q帧的传送,而trunk支持(用于Switch间互连),hybrid和trunk的区别在于trunk 只允许缺省VLAN的报文发送时不打标签,而hybrid允许多个VLAN报文发送时不打标签五、设置端口镜像[Quidway]monitor-port f0/1 ;指定镜像端口(目标端口)[Quidway]port mirror f0/2 ;指定被镜像端口(源端口)[Quidway]port mirror int_list observing-port int_type int_num ;指定镜像和被镜像六、设置相关描述信息[Quidway]description string ;指定VLAN描述字符[Quidway]description ;删除VLAN描述字符[Quidway]display vlan [vlan_id] ;查看VLAN设置七、设置华为交换机的STP[Quidway]stp {enable|disable} ;设置生成树,默认关闭[Quidway]stp priority 4096 ;设置交换机的优先级[Quidway]stp root {primary|secondary} ;设置为根或根的备份[Quidway-Ethernet0/1]stp cost 200 ;设置交换机端口的花费[SwitchB-Ethernet-0/1]stp root-protection ;在指定端口启用根保护功能[SwitchD-Ethernet0/5]stp edged-port enable ;设置端口为边缘端口[SwitchD]stp bpdu-protection ;开启BPDU保护功能配置实例『配置环境参数』1. SwitchA选用华为-3com公司的高中端交换机,如S8500或者S6500系列交换机2. SwitchB和SwitchC选用华为-3com公司的低端交换机,如S3500或者S3550系列交换机3. SwitchD、SwitchE和SwitchF选用华为-3com公司的低端交换机,如S3000或者S2000系列交换机『组网需求』1. 所有设备运行STP(Spanning Tree Protocol)生成树协议2. 以SwitchB为根网桥,阻断网络中的环路,并能达到链路冗余备份的效果『交换机STP配置流程』通过改变交换机或者端口的STP优先级,从而达到手工指定网络中的根网桥,以及端口的STP角色,完成阻断环路及链路的冗余备份。
华为S2326命令解释
华为S2326命令解释System view commands: 英文解释中文解释aaa AAA viewacl Specify ACL configuration information 指定ACL配置信息application-apperceive Set application-apperceive information application-apperceive信息集arp Specify ARP configuration information 指定地址解析协议配置信息arp-suppress Specify arp suppress configuration information,default is disabled 指定地址抑制配置信息,默认是禁用的autoconfig AutoConfig configuration information 指定地址抑制配置信息,bootrom BootRombpdu BPDU message 网桥协议数据单元信息bpdu-tunnel bpdu-tunnelbtv Btv view 快速查看burst-mode Set burst mode 建立突发模式cfm Connectivity fault managementcluster Specify the information for cluster configuration 指定的群集配置信息command-privilege Specify the command level 指定命令cp-car Cpu car setting 中央处理器的车cpu-usage Set cpu usage configuration 使用配置设置dhcp Dynamic host configure protocol 动态主机配置协议display Display current system information 显示当前系统信息dns Specify domain name system 指定域名系统domain Default domain 默认域dot1x 802.1x configuration information 中的配置信息drop discard attribute 丢弃属性efm EFM module 调制模块error-down The interface was shut down because of an error event 该接口被关闭,因为错误事件execute Batch Command 成批命令file Specify file system configuration information 指定文件系统配置信息firewall Specify firewall configuration 指定防火墙配置free Release a user terminal interface 释放一个用户终端接口ftp Specify the server attribute 指定服务器属性garp GenericAttribute Registration Protocol 通用属性注册协议gvrp Generic VLAN Registration Protocol 通用注册协议header Define the login banner 定义登录横幅http HTTP Hypertext Transfer Protocol WWW服务程序所用的协议hwtacacs Set the status of the HWTACACS(Huawei Terminal Access Controller Access Control System) service 设置状态的开关(华为终端访问控制器访问控制系统)服务hwtacacs-server Set HWTACACS server 服务器设置开关icmp-reply Enable ICMP reply fast 使IC MP快速回信ifg Interval frame gap 间隔帧间隙ifindex Constant-ifindex information constant-ifindex信息igmp-snooping Specify parameters for IGMP-Snooping 指定参数igmp-snoopinginfo-center Specify message output configuration information 指定消息输出配置信息interface Specify the interface configuration view 指定配置视图ip IP information 知识产权信息ipv6 Enable IPv6 functionalityl2-topology Layer 2 topologyl2protocol-tunnel Layer 2 protocol tunnellacp Link aggregation control protocollldp Link Layer Discovery Protocolload-balance Specify load balance modeloopback-detect Loopback detect functionmac-address MAC addressmac-authen MAC authenticate configure informationmac-forced-forwarding Mac-Forced Forwardingmip Configure a rule used to create MIPmirror-reserve-port Specify mirror-reserve-portmld-snooping Specify parameters for MLD-Snoopingmulticast multicastnap NAP protocolnd Neighbor discoveryndp Neighbor discovery protocolnqa Specify NQA test classnqa-jitter Switch NQA jitter versionnqa-server Specify NQA echo serverntdp Network topology discovery protocolntp-service Specify NTP(Network Time Protocol) configurationinformationobserve-port Configurate observe port featureping Ping functionport-group port-groupport-isolate port isolateport-mirroring Mirror portpppoe PPPOEqinq 802.1q in 802.1qqos QoS configurationquit Exit from current command viewradius-server Add or delete RADIUS server templatereset Clear running system informationreturn Exit to user viewrmon Specify RMONrouter Open/Close RM interface debug switchrrpp Rapid ring protection protocolrsa Specify RSA module configuration informationset Setsftp Set SFTP service attributesnmp-agent Specify SNMP(Simple Network Management Protocol)configuration informationssh Set the SSH (secure shell) configuration attributestacking Specify stack configuration informationstelnet Set Stelnet service attributestp Specify Spanning Tree Protocol(STP) configurationinformationinformationsuper Modify super password parameterssysname Specify the host nametcp Specify TCP(Transmission Control Protocol)configuration informationtelnet Set the status of the Telnet servicetemperature Device temperaturetest-aaa Accounts testtest-packet Set the test packettftp Establish a TFTP connectiontftp-server TFTP Servertime-range Specify time-range configuration information trace Trace route(switch) to host on Data Link Layer tracert Trace route to hosttraffic Specify traffic configuration informationtraffic-filter Filter packets base on acltraffic-limit Limit the rate of the packets base on acl traffic-mirror Mirror packets base on acltraffic-policy Apply specific traffic policytraffic-remark Remark packets base on acltraffic-statistic Count packets base on aclundo Cancel current configurationupgrade Upgrade software onlineuser-bind User binduser-interface Configure the user terminal interfacevlan Virtual LANvoice-vlan Voice VLAN。
9306交换机配置命令明细
华为S9306交换机配置1.配置电缆连接第一步:将配置电缆的DB-9(或DB-25)孔式插头接到要对路由器进行配置的微机或终端的串口上。
第二步:将配置电缆的RJ-45一端连到路由器的配置口(Console)上。
2.设置微机或终端的参数第一步:打开微机或终端。
如果使用微机进行配置,需要在微机上运行终端仿真程序,如Windows的超级终端。
第二步:设置终端参数。
参数要求:设置波特率为9600,数据位为8,奇偶校验为无,停止位为1,流量控制为无,选择终端仿真为VT100。
超级终端参数设置方法如下:(1) 在超级终端窗口中,单击其[属性]按钮。
(2) 在超级终端属性对话框中[连接时使用]一栏选择连接的串口。
选择的串口应该与配置电缆接的串口一致。
单击[配置]按钮。
(3) 在串口的属性对话框中设置波特率为9600,数据位为8,奇偶校验为无,停止位为1,流量控制为无。
单击[确定]按钮。
(4) 在超级终端属性对话框中选择[设置]一项,进入下图所示的属性设置窗口。
选择终端仿真为VT100,单击[确定]按钮。
3.路由器上电确认路由器与配置终端的连接正确,确认已经完成配置终端参数的设置后,即可对路由器上电。
随后路由器上出现自检内容。
启动完毕,回车,超级终端里显示password。
password:admin 密码:admin<Quidway>sys 输入sys进入全局模式[Quidway]vlan 2 创建VLAN2[Quidway-vlan2]q 退出VLAN2[Quidway]inter vlan 2 进入VLAN2接口视图[Quidway-Vlanif2]ip address 192.168.2.1 255.255.255.0 配置VLAN2ip地址和子网掩码[Quidway-Vlanif2]q 退出VLAN2接口模式[Quidway]inter ethernet 2/0/0 进入以太网口2/0/0 [Quidway-Ethernet2/0/0]port link access 接口类型为access [Quidway-Ethernet2/0/0]q 退出[Quidway]inter ethernet 2/0/1 进入以太网口2/0/1 [Quidway-Ethernet2/0/1]port link access 接口类型为access [Quidway-Ethernet2/0/1]q 退出[Quidway]inter ethernet 2/0/2[Quidway-Ethernet2/0/2]port link access[Quidway-Ethernet2/0/2]q[Quidway]inter ethernet 2/0/3[Quidway-Ethernet2/0/3]port link access[Quidway-Ethernet2/0/3]q[Quidway]inter ethernet 2/0/4[Quidway-Ethernet2/0/4]port link access[Quidway-Ethernet2/0/4]q[Quidway]inter ethernet 2/0/5[Quidway-Ethernet2/0/5]port link access[Quidway-Ethernet2/0/5]q[Quidway]inter ethernet 2/0/6[Quidway-Ethernet2/0/6]port link access[Quidway-Ethernet2/0/6]q[Quidway]inter ethernet 2/0/7[Quidway-Ethernet2/0/7]port link access[Quidway-Ethernet2/0/7]q[Quidway]inter ethernet 2/0/8[Quidway-Ethernet2/0/8]port link access[Quidway-Ethernet2/0/8]q[Quidway]inter ethernet 2/0/9[Quidway-Ethernet2/0/9]port link access[Quidway-Ethernet2/0/9]q[Quidway]inter ethernet 2/0/10[Quidway-Ethernet2/0/10]port link access[Quidway-Ethernet2/0/10]q[Quidway]inter ethernet 2/0/11[Quidway-Ethernet2/0/11]port link access[Quidway-Ethernet2/0/11]q[Quidway]vlan 2 进入VLAN2 [Quidway-vlan2]port ethernet 2/0/0 将2/0/0口加入VLAN2 [Quidway-vlan2]port ethernet 2/0/1 将2/0/1口加入VLAN2 [Quidway-vlan2]port ethernet 2/0/2[Quidway-vlan2]port ethernet 2/0/3[Quidway-vlan2]port ethernet 2/0/4[Quidway-vlan2]port ethernet 2/0/5[Quidway-vlan2]port ethernet 2/0/6[Quidway-vlan2]port ethernet 2/0/7[Quidway-vlan2]port ethernet 2/0/8[Quidway-vlan2]port ethernet 2/0/9[Quidway-vlan2]port ethernet 2/0/10[Quidway-vlan2]port ethernet 2/0/11[Quidway]vlan 3[Quidway-vlan3]q[Quidway]inter vlan 3[Quidway-Vlanif3]ip address 192.168.3.1 255.255.255.0 [Quidway-Vlanif3]q[Quidway]inter ethernet 2/0/12[Quidway-Ethernet2/0/12]port link access [Quidway-Ethernet2/0/12]q[Quidway]inter ethernet 2/0/13[Quidway-Ethernet2/0/13]port link access [Quidway-Ethernet2/0/13]q[Quidway]inter ethernet 2/0/14[Quidway-Ethernet2/0/14]port link access [Quidway-Ethernet2/0/14]q[Quidway]inter ethernet 2/0/15[Quidway-Ethernet2/0/15]port link access [Quidway-Ethernet2/0/15]q[Quidway]inter ethernet 2/0/16[Quidway-Ethernet2/0/16]port link access [Quidway-Ethernet2/0/16]q[Quidway]inter ethernet 2/0/17[Quidway-Ethernet2/0/17]port link access [Quidway-Ethernet2/0/17]q[Quidway]inter ethernet 2/0/18[Quidway-Ethernet2/0/18]port link access [Quidway-Ethernet2/0/18]q[Quidway]inter ethernet 2/0/19[Quidway-Ethernet2/0/19]port link access [Quidway-Ethernet2/0/19]q[Quidway]inter ethernet 2/0/20[Quidway-Ethernet2/0/20]port link access [Quidway-Ethernet2/0/20]q[Quidway]inter ethernet 2/0/21[Quidway-Ethernet2/0/21]port link access [Quidway-Ethernet2/0/21]q[Quidway]inter ethernet 2/0/22[Quidway-Ethernet2/0/22]port link access [Quidway-Ethernet2/0/22]q[Quidway]inter ethernet 2/0/23[Quidway-Ethernet2/0/23]port link access [Quidway-Ethernet2/0/23]q[Quidway]vlan 3[Quidway-vlan3]port ethernet 2/0/12[Quidway-vlan3]port ethernet 2/0/13[Quidway-vlan3]port ethernet 2/0/14[Quidway-vlan3]port ethernet 2/0/15[Quidway-vlan3]port ethernet 2/0/16[Quidway-vlan3]port ethernet 2/0/17[Quidway-vlan3]port ethernet 2/0/18[Quidway-vlan3]port ethernet 2/0/19[Quidway-vlan3]port ethernet 2/0/20[Quidway-vlan3]port ethernet 2/0/21[Quidway-vlan3]port ethernet 2/0/22[Quidway-vlan3]port ethernet 2/0/23[Quidway-vlan3]q[Quidway]vlan 4[Quidway-vlan4]inter vlan 4[Quidway-Vlanif4]ip address 192.168.4.1 255.255.255.0 [Quidway-Vlanif4]q[Quidway]inter ethernet 2/0/24[Quidway-Ethernet2/0/24]port link access [Quidway-Ethernet2/0/24]q[Quidway]inter ethernet 2/0/25[Quidway-Ethernet2/0/25]port link access [Quidway-Ethernet2/0/25]q[Quidway]inter ethernet 2/0/26[Quidway-Ethernet2/0/26]port link access [Quidway-Ethernet2/0/26]q[Quidway]inter ethernet 2/0/27[Quidway-Ethernet2/0/27] port link access [Quidway-Ethernet2/0/27]q[Quidway]inter ethernet 2/0/28[Quidway-Ethernet2/0/28]port link access [Quidway-Ethernet2/0/28]q[Quidway]inter ethernet 2/0/29[Quidway-Ethernet2/0/29]port link access [Quidway-Ethernet2/0/29]q[Quidway]inter ethernet 2/0/30[Quidway-Ethernet2/0/30]port link access [Quidway-Ethernet2/0/30]q[Quidway]inter ethernet 2/0/31[Quidway-Ethernet2/0/31]port link access [Quidway-Ethernet2/0/31]q[Quidway]inter ethernet 2/0/32[Quidway-Ethernet2/0/32]port link access [Quidway-Ethernet2/0/32]q[Quidway]inter ethernet 2/0/33[Quidway-Ethernet2/0/33]port link access [Quidway-Ethernet2/0/33]q[Quidway-Ethernet2/0/34]port link access [Quidway-Ethernet2/0/34]q[Quidway]inter ethernet 2/0/35[Quidway-Ethernet2/0/35]port link access [Quidway-Ethernet2/0/35]q[Quidway]vlan 4[Quidway-vlan4]port ethernet 2/0/24[Quidway-vlan4]port ethernet 2/0/25[Quidway-vlan4]port ethernet 2/0/26[Quidway-vlan4]port ethernet 2/0/27[Quidway-vlan4]port ethernet 2/0/28[Quidway-vlan4]port ethernet 2/0/29[Quidway-vlan4]port ethernet 2/0/30[Quidway-vlan4]port ethernet 2/0/31[Quidway-vlan4]port ethernet 2/0/32[Quidway-vlan4]port ethernet 2/0/33[Quidway-vlan4]port ethernet 2/0/34[Quidway-vlan4]port ethernet 2/0/35[Quidway-vlan4]q[Quidway]vlan 5[Quidway-vlan5]q[Quidway]inter vlan 5[Quidway-Vlanif5]ip address 192.168.5.1 255.255.255.0 [Quidway-Vlanif5]q[Quidway]inter ethernet 2/0/36[Quidway-Ethernet2/0/36]port link access [Quidway-Ethernet2/0/36]q[Quidway]inter ethernet 2/0/37[Quidway-Ethernet2/0/37]port link access [Quidway-Ethernet2/0/37]q[Quidway]inter ethernet 2/0/38[Quidway-Ethernet2/0/38]port link access [Quidway-Ethernet2/0/38]q[Quidway]inter ethernet 2/0/39[Quidway-Ethernet2/0/39]port link access [Quidway-Ethernet2/0/39]q[Quidway]inter ethernet 2/0/40[Quidway-Ethernet2/0/40]port link access [Quidway-Ethernet2/0/40]q[Quidway]inter ethernet 2/0/41[Quidway-Ethernet2/0/41]port link access [Quidway-Ethernet2/0/41]q[Quidway-Ethernet2/0/42]port link access [Quidway-Ethernet2/0/42]q[Quidway]inter ethernet 2/0/43[Quidway-Ethernet2/0/43]port link access [Quidway-Ethernet2/0/43]q[Quidway]inter ethernet 2/0/44[Quidway-Ethernet2/0/44]port link access [Quidway-Ethernet2/0/44]q[Quidway]vlan 5[Quidway-vlan5]port ethernet 2/0/36[Quidway-vlan5]port ethernet 2/0/37[Quidway-vlan5]port ethernet 2/0/38[Quidway-vlan5]port ethernet 2/0/39[Quidway-vlan5]port ethernet 2/0/40[Quidway-vlan5]port ethernet 2/0/41[Quidway-vlan5]port ethernet 2/0/42[Quidway-vlan5]port ethernet 2/0/43[Quidway-vlan5]port ethernet 2/0/44[Quidway-vlan5]q[Quidway]vlan 6[Quidway-vlan6]q[Quidway]inter vlan 6[Quidway-Vlanif6]ip address 192.168.6.1 255.255.255.0 [Quidway-Vlanif6]q[Quidway]inter ethernet 2/0/45[Quidway-Ethernet2/0/45]port link access [Quidway-Ethernet2/0/45]q[Quidway]inter ethernet 2/0/46[Quidway-Ethernet2/0/46]port link access [Quidway-Ethernet2/0/46]q[Quidway]inter ethernet 2/0/47[Quidway-Ethernet2/0/47]port link access [Quidway-Ethernet2/0/47]q[Quidway]vlan 6[Quidway-vlan6]port ethernet 2/0/45[Quidway-vlan6]port ethernet 2/0/46[Quidway-vlan6]port ethernet 2/0/47光口:[Quidway]interface GigabitEthernet1/0/0 [Quidway-GigabitEthernet1/0/0]port link access [Quidway-GigabitEthernet1/0/0]q[Quidway-GigabitEthernet1/0/1]port link access [Quidway-GigabitEthernet1/0/1]q[Quidway]inter g1/0/2[Quidway-GigabitEthernet1/0/2]port link access [Quidway-GigabitEthernet1/0/2]q[Quidway]inter g1/0/3[Quidway-GigabitEthernet1/0/3]port link access [Quidway-GigabitEthernet1/0/3]q[Quidway]inter g1/0/4[Quidway-GigabitEthernet1/0/4]port link access [Quidway-GigabitEthernet1/0/4]q[Quidway]inter g1/0/5[Quidway-GigabitEthernet1/0/5]port link access [Quidway-GigabitEthernet1/0/5]q[Quidway]vlan 6[Quidway-vlan6]port GigabitEthernet1/0/0 [Quidway-vlan6]port GigabitEthernet1/0/1 [Quidway-vlan6]port GigabitEthernet1/0/2 [Quidway-vlan6]port GigabitEthernet1/0/3 [Quidway-vlan6]port GigabitEthernet1/0/4 [Quidway-vlan6]port GigabitEthernet1/0/5 [Quidway-vlan6]q[Quidway]vlan 7[Quidway-vlan7]q[Quidway]inter vlan 7[Quidway-Vlanif7]ip address 192.168.7.1 255.255.255.0 [Quidway-Vlanif7]q[Quidway]inter GigabitEthernet1/0/6[Quidway-GigabitEthernet1/0/6]port link access [Quidway-GigabitEthernet1/0/6]q[Quidway]inter g1/0/7[Quidway-GigabitEthernet1/0/7]port link access [Quidway-GigabitEthernet1/0/7]q[Quidway]inter g1/0/8[Quidway-GigabitEthernet1/0/8]port link access [Quidway-GigabitEthernet1/0/8]q[Quidway]inter g1/0/9[Quidway-GigabitEthernet1/0/9]port link access [Quidway-GigabitEthernet1/0/9]q[Quidway]inter g1/0/10[Quidway-GigabitEthernet1/0/10]port link access [Quidway-GigabitEthernet1/0/10]q[Quidway-GigabitEthernet1/0/11]port link access[Quidway-GigabitEthernet1/0/11]q[Quidway]vlan 7[Quidway-vlan7]port GigabitEthernet1/0/6[Quidway-vlan7]port GigabitEthernet1/0/7[Quidway-vlan7]port GigabitEthernet1/0/8[Quidway-vlan7]port GigabitEthernet1/0/9[Quidway-vlan7]port GigabitEthernet1/0/10[Quidway-vlan7]port GigabitEthernet1/0/11[Quidway-vlan7]q[Quidway]vlan 8[Quidway-vlan8]q[Quidway]inter vlan 8[Quidway-Vlanif8]ip address 192.168.8.1 255.255.255.0[Quidway-Vlanif8]q[Quidway]vlan 8[Quidway-vlan8]port GigabitEthernet1/0/12Error: Trunk or Hybrid port(s) cannot be added or deleted in this manner [Quidway-vlan8]q[Quidway]inter g1/0/12[Quidway-GigabitEthernet1/0/12]port link access[Quidway-GigabitEthernet1/0/12]q[Quidway]inter g1/0/13[Quidway-GigabitEthernet1/0/13]port link access[Quidway-GigabitEthernet1/0/13]q[Quidway]inter g1/0/14[Quidway-GigabitEthernet1/0/14]port link access[Quidway-GigabitEthernet1/0/14]q[Quidway]inter g1/0/15[Quidway-GigabitEthernet1/0/15]port link access[Quidway-GigabitEthernet1/0/15]q[Quidway]inter g1/0/16[Quidway-GigabitEthernet1/0/16]port link access[Quidway-GigabitEthernet1/0/16]q[Quidway]inter g1/0/17[Quidway-GigabitEthernet1/0/17]port link access[Quidway-GigabitEthernet1/0/17]q[Quidway]inter g1/0/18[Quidway-GigabitEthernet1/0/18]port link access[Quidway-GigabitEthernet1/0/18]q[Quidway]vlan 8[Quidway-vlan8]port g1/0/12[Quidway-vlan8]port g1/0/13[Quidway-vlan8]port g1/0/14[Quidway-vlan8]port g1/0/15[Quidway-vlan8]port g1/0/16[Quidway-vlan8]port g1/0/17[Quidway-vlan8]port g1/0/18[Quidway-vlan8]q[Quidway]vlan 9[Quidway-vlan9]q[Quidway]inter vlan 9[Quidway-Vlanif9]ip address 192.168.9.1 255.255.255.0[Quidway-Vlanif9]inter g1/0/19[Quidway-GigabitEthernet1/0/19]port link access[Quidway-GigabitEthernet1/0/19]q[Quidway]inter g1/0/20[Quidway-GigabitEthernet1/0/20]port link access[Quidway-GigabitEthernet1/0/20]q[Quidway]inter g1/0/21[Quidway-GigabitEthernet1/0/21]port link access[Quidway-GigabitEthernet1/0/21]q[Quidway]inter g1/0/22[Quidway-GigabitEthernet1/0/22]port link access[Quidway-GigabitEthernet1/0/22]q[Quidway]inter g1/0/23[Quidway-GigabitEthernet1/0/23]port link access[Quidway-GigabitEthernet1/0/23]q[Quidway]vlan 9[Quidway-vlan9]port g1/0/19[Quidway-vlan9]port g1/0/20[Quidway-vlan9]port g1/0/21[Quidway-vlan9]port g1/0/22[Quidway-vlan9]port g1/0/23[Quidway-vlan9]q[Quidway]q<Quidway>saveThe current configuration will be written to the device. Continue? [Y/N]:yNow saving the current configuration to the device.Nov 3 2009 14:52:23 Quidway %%01CFM/4/SAVE(l): The user chose Y when deciding whether to save the configuration to the device...Info: Succeeded in saving the current configuration to the master board device.Info: Succeeded in saving the current configuration to the device.<Quidway>。